JeepParts
My Garage
My Account
Cart
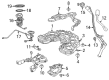
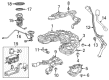
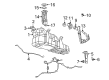
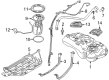
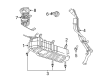
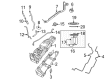
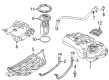
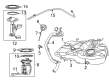
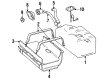
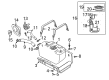
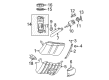
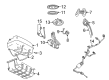
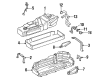
OEM Jeep Fuel Pump
Gas Pump- Select Vehicle by Model
- Select Vehicle by VIN
Select Vehicle by Model
orMake
Model
Year
Select Vehicle by VIN
For the most accurate results, select vehicle by your VIN (Vehicle Identification Number).
92 Fuel Pumps found


Jeep Fuel Pump, Driver Side Part Number: 5145583AD
$497.25 MSRP: $750.00You Save: $252.75 (34%)Ships in 1-3 Business DaysProduct Specifications- Other Name: Module - Fuel Pump/Level Unit; Electric Fuel Pump Assembly; Fuel Level Sensor; Sending Unit.; Fuel Gauge Sending Unit; Fuel Pump Assembly
- Position: Driver Side
- Replaced by: 5145583AE
- Replaces: 5145583AB, 5145583AA, RL145583AB, 5145583AC


Jeep Fuel Pump, Driver Side Part Number: 68412549AB
$919.36 MSRP: $1405.00You Save: $485.64 (35%)Product Specifications- Other Name: Module - Fuel Pump/Level Unit; Fuel Pump and Sender Assembly; Electric Fuel Pump, Left; Fuel Sending Unit; Fuel Pump Assembly; Module Kit Fuel Pump/Level Unit
- Position: Driver Side
- Replaced by: 68412549AC
- Replaces: 68412549AA


Jeep Fuel Pump Part Number: 68004936AE
$436.25 MSRP: $640.00You Save: $203.75 (32%)Ships in 1-2 Business DaysProduct Specifications- Other Name: Module - Fuel Pump/Level Unit; Fuel Sender Assembly; Electric Fuel Pump; Fuel Level Sensor.; Fuel Gauge Sending Unit; Sending Unit
- Replaces: 68017714AC, 68004936AB, 68004936AC, 68004936AD, RL004936AC


Jeep Fuel Pump Part Number: 52029625AA
$612.66 MSRP: $869.00You Save: $256.34 (30%)Product Specifications- Other Name: Module - Fuel Pump/Level Unit; Fuel Pump and Strainer Set; Fuel Pump Assembly; Module Fuel Pump/Level Unit


Jeep Fuel Pump, Driver Side Part Number: 5145589AF
$415.48 MSRP: $627.00You Save: $211.52 (34%)Product Specifications- Other Name: Module - Fuel Pump/Level Unit; Electric Fuel Pump Assembly; Fuel Sending Unit; Fuel Pump Assembly
- Position: Driver Side
- Replaced by: 5145589AG
- Replaces: 5145589AB, 5145589AA, RL145589AA, RL145589AB, 5145589AC, 5145589AD, 5145589AE


Jeep Fuel Pump Part Number: 5143579AQ
$396.70 MSRP: $604.00You Save: $207.30 (35%)Ships in 1-2 Business DaysProduct Specifications- Other Name: Module - Fuel Pump/Level Unit; Fuel Pump Assembly; Electric Fuel Pump; Fuel Sending Unit.; Fuel Pump Assembly
- Replaces: 5143579AJ, 5143579AN, 5143579AE, 5143579AD, 5143579AF, 5143579AI, 5143579AH, 5143579AL, 68024558AA, RL143579AL, 5143579AC, 5143579AP, 5143579AK, 5143579AM, RL143579AK

Jeep Module - Fuel Pump/Level Unit Part Number: 68003339AG
$391.17 MSRP: $590.00You Save: $198.83 (34%)Ships in 1-2 Business DaysProduct Specifications- Other Name: MODULE-FUEL PUMP/LEVEL UNIT


Jeep Fuel Pump Part Number: 68541370AD
$159.45 MSRP: $243.00You Save: $83.55 (35%)Ships in 1-2 Business DaysProduct Specifications- Other Name: Module - Auxiliary Level Unit; Level Sensor
- Replaces: 68541370AB, 68541370AA, 68541370AC

Jeep Fuel Pump Part Number: 68368228AC
$310.51 MSRP: $473.00You Save: $162.49 (35%)Product Specifications- Other Name: Module - Fuel Pump/Level Unit; Fuel Pump Assembly
- Replaced by: 68368228AD
- Replaces: 68368228AA, 68368228AB
Jeep Fuel Pump Part Number: 68439223AA
$330.40 MSRP: $505.00You Save: $174.60 (35%)Product Specifications- Other Name: Module - Fuel Pump/Level Unit; Fuel Pump and Strainer Set; Fuel Pump Assembly; Module Fuel Pump/Level Unit
- Replaced by: 68767264AA

Jeep Module - Fuel Pump/Level Unit Part Number: 5183201AH
$355.81 MSRP: $543.00You Save: $187.19 (35%)Ships in 1-2 Business DaysProduct Specifications- Other Name: MODULE-FUEL PUMP/LEVEL UNIT

Jeep Fuel Gauge Sending Unit Part Number: 68278801AA
$367.97 MSRP: $560.00You Save: $192.03 (35%)Ships in 1-3 Business DaysProduct Specifications- Other Name: Level Unit - Fuel; Fuel Sender and Hanger Assembly; Level Sensor; Sending Unit Fuel; Level Unit Fuel

Jeep Fuel Pump Part Number: 5003861AB
$357.24 MSRP: $520.00You Save: $162.76 (32%)Product Specifications- Other Name: Module - Fuel Pump/Level Unit; Fuel Pump Assembly; Fuel Level Sensor; Electric Fuel Pump; Hanger Assembly.; Fuel Gauge Sending Unit; Sending Unit
- Replaces: 5003861AA


Jeep Fuel Pump Part Number: RL012952AE
$413.35 MSRP: $603.00You Save: $189.65 (32%)Product Specifications- Other Name: Module - Fuel Pump/Level Unit; Fuel Pump Assembly; Electric Fuel Pump; Fuel Sending Unit.; Fuel Pump Assembly
- Replaces: 5012952AE, 5012952AD, RL012952AD


Jeep Fuel Pump Assembly, Driver Side Part Number: 68310001AB
$488.92 MSRP: $715.00You Save: $226.08 (32%)Product Specifications- Other Name: Module - Fuel Pump/Level Unit; Fuel Pump and Sender Assembly; Electric Fuel Pump, Left; Module Kit Fuel Pump/Level Unit; Fuel Pump
- Position: Driver Side
- Replaced by: 68310001AC
- Replaces: 68310001AA


Jeep Fuel Pump Part Number: 5018056AD
Product Specifications- Other Name: Module Kit - Fuel Pump/Level Unit; Fuel Pump Assembly; Electric Fuel Pump; Fuel Sending Unit.; Fuel Pump Assembly
- Replaces: R5018056AC


Jeep Fuel Pump Part Number: RL140832AB
Product Specifications- Other Name: Module - Fuel Pump/Level Unit; Fuel Pump Module Assembly; Fuel Transfer Unit; Fuel Sending Unit; Fuel Pump Assembly
- Replaces: 5140832AB


Jeep Fuel Pump Part Number: 4637192
Product Specifications- Other Name: Pump/Kit - Fuel In - Tank; Fuel Pump Assembly with Sender, Strainer, and Hanger.; Fuel Gauge Sending Unit; Pump Package, Fuel - W/Fuel Injected Engine; Pump Package - Efi Engine; Pump, Fuel

Jeep Fuel Pump Part Number: 4897754AB
Product Specifications- Other Name: Module - Fuel Tank; Fuel Pump and Sender Assembly; Electric Fuel Pump; Fuel Sending Unit; Module Package Fuel Tank
- Replaces: 4897754AA

Jeep Module - Fuel Pump/Level Unit Part Number: 68535771AB
$182.41 MSRP: $272.00You Save: $89.59 (33%)Product Specifications- Other Name: MODULE-FUEL PUMP/LEVEL UNIT
| Page 1 of 5 |Next >
1-20 of 92 Results
Jeep Fuel Pump
OEM parts sourced directly from Jeep deliver superior quality, long lasting strength, and a precise fit you can trust. Each item goes through strict quality checks to ensure safety, toughness, and performance that matches your factory equipment. At JeepPartsDeal online shop, you'll get top-quality, budget-friendly OEM Jeep Fuel Pump for your vehicle. We focus on giving you a high standard without pushing up the price. Our full selection of genuine factory products comes backed by the original manufacturer's warranty. You'll love our fast delivery, seamless shopping experience, and convenient return policy, saving you all the hassle.
Jeep Fuel Pump has the ability to expel gasoline as fast as possible between tank and engine to provide power as quickly as you turn the key. Jeep was born in 1945 with battle-born bones and was then transferred to the hands of civilian drivers who cherished the square-shouldered stance, the good ground clearance, and the freedom of the open air which are still fundamental in the line-up today. Jeep couples that offroad competence with urban acumen with available modes of drive that can alternate snow to sand to mud with a swivel of a dial. Jeep drivers are now able to talk to the dashboard using voice commands and during the night the over-the-air software is downloaded and new tricks are added. Jeep loyalty is easy to spread as everyone explores the same trails and uses a salute on the passing waves so that every parking space seems a campfire circle. The starter motor turns on before pressure is built up in the tank due to the electric Fuel Pump priming, such that injectors do not starve at ignition. The current Fuel Pump parts incorporate high-speed impeller, internal check valve, and electronic designation sensors to provide uniform pressure in changing RPMs, which refines combustion and fine-tunes emissions. The aging of the Fuel Pump causes the pressure to decrease, the pump begins to extend and acceleration becomes flattened until a replacement reinstates the snap. Changing the Fuel Pump today to a new one will safeguard the wallet tomorrow as it would avoid the ripple effect the lean running causes in future.
Jeep Fuel Pump Parts and Q&A
- Q: How to Service the Fuel Pump and Gauge Sender on Jeep Liberty?A:It is important to release the fuel system pressure before servicing the fuel gauge sender, since the system stays under pressure all the time. Remove the fuel tank from the bike and let it dry. Take note of the module's rotation using the arrow shown just above it before removing it. Place the special Lockring Remover/Installer tool 9340 in between the notches that appear around the edge of the lockring. Place a 1/2 inch drive breaker bar on tool 9340 and then turn the breaker bar counter-clockwise to get rid of Lockring. With the lockring gone, the module will lift a bit, lifting the fuel tank and allowing the float arm to be removed safely.
- Q: How to Service the Fuel Pump and Gauge Sender on Jeep Wrangler?A:Before servicing the fuel gauge sender, take out and drain the fuel tank. It's recommended to spray compressed air around the fuel tank to remove dirt and dust prior to proceeding. Insert the notched end of lock-ring remover/installer 9340 into the grooves on the lock-ring's rim and fit a 1/2 inch drive breaker bar into the tool. Turn the breaker bar in a counterclockwise direction to take off the lock-ring. Correctly positioning the fuel pump module in the tank is necessary so the gauge detects the fuel correctly. Note that a drop in tank level won't lead to the fuel pump module reservoir being completely empty, so when the module is taken out, make sure fuel doesn't end up inside the vehicle. Lift the fuel pump module from the tank, tipping it on its side to empty all the fuel from the reservoir. After that, pull out the fuel pump module, taking care not to harm the float arm and throw out the rubber O-ring seal.


Related Jeep Parts
 Jeep Gas Cap
 Jeep Intake Manifold
 Jeep Fuel Injector
 Jeep Air Intake Hose
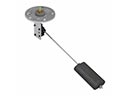 Jeep Fuel Sending Unit
 Jeep Idle Control Valve
 Jeep Intake Manifold Gasket
 Jeep Air Filter Box
 Jeep Fuel Pressure Sensor
 Jeep Fuel Pump Gasket
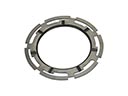 Jeep Fuel Tank Lock Ring
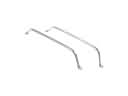 Jeep Fuel Tank Strap