JeepParts
My Garage
My Account
Cart
OEM 2004 Dodge Durango A/C Hose
Air Conditioning Hose- Select Vehicle by Model
- Select Vehicle by VIN
Select Vehicle by Model
orMake
Model
Year
Select Vehicle by VIN
For the most accurate results, select vehicle by your VIN (Vehicle Identification Number).
9 A/C Hoses found


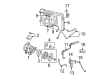
2004 Dodge Durango A/C Hoses Part Number: 55056210AB
Product Specifications- Other Name: Line - A/C Suction & Discharge; A/C Refrigerant Liquid Hose; A/C Hose; Suction Line; Compressor; Line A/C Suction & Discharge; Line A/C Suction And Liquid
- Item Weight: 3.50 Pounds
- Item Dimensions: 42.0 x 17.5 x 10.7 inches
- Condition: New
- Fitment Type: Direct Replacement
- SKU: 55056210AB
- Warranty: This genuine part is guaranteed by Mopar's factory warranty.

2004 Dodge Durango A/C Hoses Part Number: 55056255AB
Product Specifications- Other Name: Line - A/C Suction & Discharge; A/C Refrigerant Liquid Hose; A/C Compressor; A/C Hose; Suction Line; Compressor; Line A/C Suction & Discharge; Line A/C Suction And Liquid
- Item Weight: 3.40 Pounds
- Item Dimensions: 37.9 x 20.4 x 6.1 inches
- Condition: New
- Fitment Type: Direct Replacement
- SKU: 55056255AB
- Warranty: This genuine part is guaranteed by Mopar's factory warranty.

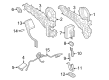
2004 Dodge Durango A/C Hoses Part Number: 55056256AD
Product Specifications- Other Name: Line - A/C Discharge; A/C Refrigerant Discharge Hose; A/C Refrigerant Liquid Hose; A/C Hose; Discharge Line; Line A/C Discharge
- Replaces: 55056256AC
- Item Weight: 1.00 Pounds
- Item Dimensions: 10.0 x 1.5 x 1.3 inches
- Condition: New
- Fitment Type: Direct Replacement
- SKU: 55056256AD
- Warranty: This genuine part is guaranteed by Mopar's factory warranty.
2004 Dodge Durango Discharge Line Part Number: 55056257AC
Product Specifications- Other Name: Line - A/C Discharge; A/C Refrigerant Discharge Hose; A/C Refrigerant Liquid Hose; A/C Hose; Line A/C Discharge
- Replaces: 55056257AB
- Item Weight: 1.10 Pounds
- Item Dimensions: 2.9 x 10.4 x 37.1 inches
- Condition: New
- Fitment Type: Direct Replacement
- SKU: 55056257AC
- Warranty: This genuine part is guaranteed by Mopar's factory warranty.

2004 Dodge Durango Liquid Line Part Number: 55056434AB
Product Specifications- Other Name: Line - A/C Liquid; A/C Refrigerant Liquid Hose; A/C Refrigerant Hose; A/C Hose; Line A/C Liquid
- Item Weight: 0.80 Pounds
- Item Dimensions: 30.0 x 4.1 x 1.8 inches
- Condition: New
- Fitment Type: Direct Replacement
- SKU: 55056434AB
- Warranty: This genuine part is guaranteed by Mopar's factory warranty.
2004 Dodge Durango A/C Hoses Part Number: 55056324AB
Product Specifications- Other Name: Line - A/C Suction & Discharge; A/C Refrigerant Liquid Hose; A/C Hose; Suction Line; Line A/C Suction & Discharge; Line A/C Suction And Liquid
- Item Weight: 4.30 Pounds
- Item Dimensions: 39.5 x 10.3 x 6.6 inches
- Condition: New
- Fitment Type: Direct Replacement
- SKU: 55056324AB
- Warranty: This genuine part is guaranteed by Mopar's factory warranty.
2004 Dodge Durango A/C Hoses Part Number: 55056254AB
Product Specifications- Other Name: Line - A/C Suction & Discharge; A/C Refrigerant Suction Hose; A/C Refrigerant Liquid Hose; A/C Hose; Suction Line; Line A/C Suction & Discharge; Line A/C Suction And Liquid
- Item Weight: 3.60 Pounds
- Item Dimensions: 43.0 x 21.1 x 5.7 inches
- Condition: New
- Fitment Type: Direct Replacement
- SKU: 55056254AB
- Warranty: This genuine part is guaranteed by Mopar's factory warranty.
2004 Dodge Durango A/C Hoses Part Number: 55056208AB
Product Specifications- Other Name: Line - A/C Suction & Discharge; A/C Refrigerant Suction Hose; A/C Refrigerant Liquid Hose; A/C Hose; Suction Line; Line A/C Suction & Discharge; Line A/C Suction And Liquid
- Item Weight: 3.20 Pounds
- Item Dimensions: 26.6 x 9.0 x 6.4 inches
- Condition: New
- Fitment Type: Direct Replacement
- SKU: 55056208AB
- Warranty: This genuine part is guaranteed by Mopar's factory warranty.

2004 Dodge Durango A/C Line Part Number: 5134397AA
Product Specifications- Other Name: Tube - Auxiliary A/C Extension; A/C Hose; Line A/C
- Item Weight: 0.70 Pounds
- Item Dimensions: 12.1 x 10.2 x 1.4 inches
- Condition: New
- Fitment Type: Direct Replacement
- SKU: 5134397AA
- Warranty: This genuine part is guaranteed by Mopar's factory warranty.
2004 Dodge Durango A/C Hose Parts and Q&A
- Q: How to Repair an A/C Hose in the Underbody Refrigerant System on 2004 Dodge Durango?A: The initial task when fixing an underbody refrigerant line is to recover the refrigerant from the refrigerant system. Drain the engine cooling system to get the underbody coolant line clear. Disconnect the minus end of the battery and then raise and support the vehicle. If you need to access the line that needs repair, take off the underbody brackets. Put a dot or mark next to the cut line and see the tube chart for straight tube length constraints. Make a small cut at the marked place on the pipe by using the pipe cutter tool. Ensure the new line has the same length and diameter as the first and clean at least 3/4 in of the end for good sealing. The ends of the line should be cleaned using the Sooth-Bright pad from Kit 8456-A, making sure you don't scratch in a straight line. Pick the right connector for the line size and then use just one drop of Lokprep on each line end. Slide the line ends into the connector and rotate it to get the sealing compound along all the ends. From Tool Kit 8456-A, pick the proper size jaws and lock them into the body of Special Tool 8456-3. When you install your camera normally, put the rubber grip pads so they face away from the camera. Slide the connector fitting ends into the counterbore of the jaws, maintain the tool body with a 3/8 inch breaker bar and turn the forcing screw clockwise until the hammer lines are all inserted into the fitting. Turn until the connector and hose getting attached both come to rest directly on the center shoulder. Back off the tightening screw and take out the tool body as well as the jaws. Fit the underbody mounting brackets back in, lower the vehicle and link the negative battery cable once more. If you're dealing with a coolant line, add coolant to the engine after the repair; if dealing with a refrigerant, remove all remaining refrigerant and refill it after repairing the line.
Related 2004 Dodge Durango Parts
 2004 Dodge Durango Blower Motor
 2004 Dodge Durango Blend Door Actuator
 2004 Dodge Durango Heater Core
 2004 Dodge Durango Blower Motor Resistor
 2004 Dodge Durango Evaporator
 2004 Dodge Durango A/C Accumulator
 2004 Dodge Durango A/C Clutch
 2004 Dodge Durango A/C Condenser
 2004 Dodge Durango A/C Expansion Valve
 2004 Dodge Durango A/C Service Cap
 2004 Dodge Durango A/C Switch
 2004 Dodge Durango Blower Control Switches