JeepParts
My Garage
My Account
Cart
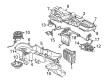
OEM 2004 Jeep Liberty Blend Door Actuator
Air Blend Door Actuator- Select Vehicle by Model
- Select Vehicle by VIN
Select Vehicle by Model
orMake
Model
Year
Select Vehicle by VIN
For the most accurate results, select vehicle by your VIN (Vehicle Identification Number).
3 Blend Door Actuators found

2004 Jeep Liberty Actuator Part Number: 5066510AA
$101.11 MSRP: $128.18You Save: $27.07 (22%)Ships in 1-2 Business DaysProduct Specifications- Other Name: Actuator - A/C And Heater; HVAC Defrost Mode Door Actuator; HVAC Heater Blend Door Actuator; HVAC Blend Door Actuator; Actuator A/C And Heater
- Item Weight: 0.80 Pounds
- Item Dimensions: 10.1 x 4.0 x 3.8 inches
- Condition: New
- Fitment Type: Direct Replacement
- SKU: 5066510AA
- Warranty: This genuine part is guaranteed by Mopar's factory warranty.


2004 Jeep Liberty Actuator Part Number: 5066519AA
Product Specifications- Other Name: Actuator - A/C And Heater; HVAC Blend Door Actuator; HVAC Heater Blend Door Actuator; Actuator A/C And Heater
- Item Weight: 0.80 Pounds
- Item Dimensions: 5.2 x 4.0 x 3.8 inches
- Condition: New
- Fitment Type: Direct Replacement
- SKU: 5066519AA
- Warranty: This genuine part is guaranteed by Mopar's factory warranty.

2004 Jeep Liberty Floor Duct Part Number: 5066518AA
Product Specifications- Other Name: Actuator - A/C And Heater; HVAC Air Inlet Door Actuator; HVAC Heater Blend Door Actuator; Actuator; A/C and Heater Floor and Defrost Door.
- Item Weight: 0.80 Pounds
- Item Dimensions: 8.2 x 4.2 x 3.9 inches
- Condition: New
- Fitment Type: Direct Replacement
- SKU: 5066518AA
- Warranty: This genuine part is guaranteed by Mopar's factory warranty.
2004 Jeep Liberty Blend Door Actuator Parts and Q&A
- Q: How to Replace a Blend Door Actuator on 2004 Jeep Liberty?A: When the vehicle is equipped with air bags, you should first remove its battery negative cable, wait two minutes for the air bag system to discharge and then proceed. With your key in the on position, place the A/C-heater control in the middle setting and wait 10 seconds before turning the key off. Ensure the negative cable is removed from the battery and then you will remove the wire harness connector from the blend door actuator by operating from the driver's side glove box. Take the HVAC housing off the car, then unscrew the actuator from the top of the housing and remember its position. Before installation, make sure the actuator spline lines up with the door spline inside the HVAC box. When in place, screw it down with a tightness of 3.2 Nm (20 in.lbs.). Install the entire HVAC box back into place, clip the wire connector from the blow harness to the actuator inside the glove box and finally reconnect the negative side of the battery cable.
Related 2004 Jeep Liberty Parts
 2004 Jeep Liberty Heater Core
 2004 Jeep Liberty A/C Compressor
 2004 Jeep Liberty Blower Motor
 2004 Jeep Liberty Blower Motor Resistor
 2004 Jeep Liberty A/C Accumulator
 2004 Jeep Liberty A/C Clutch
 2004 Jeep Liberty A/C Condenser
 2004 Jeep Liberty A/C Hose
 2004 Jeep Liberty A/C Service Cap
 2004 Jeep Liberty A/C Switch
 2004 Jeep Liberty Evaporator
 2004 Jeep Liberty HVAC Pressure Switch