JeepParts
My Garage
My Account
Cart
OEM 2006 Jeep Commander A/C Clutch
Air Conditioning Clutch- Select Vehicle by Model
- Select Vehicle by VIN
Select Vehicle by Model
orMake
Model
Year
Select Vehicle by VIN
For the most accurate results, select vehicle by your VIN (Vehicle Identification Number).
5 A/C Clutches found


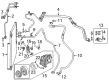
2006 Jeep Commander Clutch Coil Part Number: 5003681AA
$186.95 MSRP: $279.00You Save: $92.05 (33%)Ships in 1-2 Business DaysProduct Specifications- Other Name: Coil - A/C Clutch; A/C Compressor Clutch Coil; Clutch; Coil; Coil A/C Clutch; A/C Compressor Clutch
- Replaces: 5072863AA
- Item Weight: 2.10 Pounds
- Item Dimensions: 5.1 x 4.7 x 2.3 inches
- Condition: New
- Fitment Type: Direct Replacement
- SKU: 5003681AA
- Warranty: This genuine part is guaranteed by Mopar's factory warranty.

2006 Jeep Commander Clutch Kit Part Number: 5140428AA
$4.56 MSRP: $36.75You Save: $32.19 (88%)Ships in 1-2 Business DaysProduct Specifications- Other Name: Clutch Package - A/C Compressor; A/C Compressor Clutch; Hardware Kit; Clutch Overhaul Kit A/C Compressor with Snap Rings, Washers, Screws, Pulley Bolt.
- Item Weight: 1.20 Pounds
- Item Dimensions: 2.8 x 2.7 x 0.6 inches
- Condition: New
- Fitment Type: Direct Replacement
- SKU: 5140428AA
- Warranty: This genuine part is guaranteed by Mopar's factory warranty.


2006 Jeep Commander Hub Assembly Part Number: 5140426AA
Product Specifications- Other Name: Pulley Kit - A/C Compressor; A/C Compressor Clutch Pulley; Clutch Plate & Hub Assembly; Pulley; Pulley Hub Kit A/C Compressor; A/C Compressor Clutch
- Item Weight: 3.80 Pounds
- Item Dimensions: 7.3 x 7.1 x 3.2 inches
- Condition: New
- Fitment Type: Direct Replacement
- SKU: 5140426AA
- Warranty: This genuine part is guaranteed by Mopar's factory warranty.


2006 Jeep Commander Clutch Kit Part Number: 5066225AA
Product Specifications- Other Name: Clutch Kit - A/C Compressor; A/C Compressor Clutch; Repair Kit; Hardware Kit; Clutch; Clutch Overhaul Kit A/C Compressor
- Item Weight: 0.50 Pounds
- Item Dimensions: 2.4 x 1.8 x 0.8 inches
- Condition: New
- Fitment Type: Direct Replacement
- SKU: 5066225AA
- Warranty: This genuine part is guaranteed by Mopar's factory warranty.


2006 Jeep Commander Pulley Part Number: 5161810AA
Product Specifications- Other Name: Pulley Kit - A/C Compressor; A/C Compressor Clutch; Pulley Hub Kit A/C Compressor
- Item Weight: 4.50 Pounds
- Item Dimensions: 7.1 x 7.0 x 3.3 inches
- Condition: New
- Fitment Type: Direct Replacement
- SKU: 5161810AA
- Warranty: This genuine part is guaranteed by Mopar's factory warranty.
2006 Jeep Commander A/C Clutch Parts and Q&A
- Q: How to Service the A/C Clutch on 2006 Jeep Commander?A: Before servicing the compressor clutch, first disconnect the negative battery cable and take off the accessory drive belt. Unplug the engine wire harness from the compressor clutch field coil connector sitting at the top of the A/C compressor. Once that's done, disconnect the bolts holding the compressor to the engine and support it as you work. Take off the clutch field coil connector and wire lead safely from the connector bracket, then release the compressor shaft by holding the clutch plate in place with an oil filter wrench or strap wrench to avoid movement. Don't try to lift the clutch plate from the pulley to stop it from breaking. Tap lightly on the clutch plate with a plastic mallet so it comes off the splines on the compressor shaft and then remove the clutch plate along with its two shims. Snap ring pliers are needed to remove the snap ring holding the pulley and bearing assembly to the front of the A/C compressor before you can take off the whole assembly. The next step is to use a tool to unseat the snap ring holding the front A/C compressor part and remove the field coil from the compressor's front. For juxtaposition, place the dowel pin between the clutch field coil and A/C compressor so that the wire lead has space. Insert and snap the new snap ring in place around the clutch field coil in the manner it is designed for. Place the pulley and bearing set at the front of the A/C compressor, tapping lightly if you need to and fasten it with a new ring. If you are using the original clutch plate, pulley and bearing parts, put back the original shim(s); but if using replacements, use a stack of new shims 2.54 mm in thickness to begin. Fit the clutch plate onto the front of the A/C compressor and fix the shaft bolt securely at 19 N.m. After fixing, inspect the air gap at several points to be sure it's within the correct range, between 0.35 - 0.60 mm. Place shims wherever necessary to fix any gaps until the clutch coil wire is properly led. Bring the wire lead between the compressor and connector bracket, followed by attaching the compressor clutch field coil connector. Put the A/C compressor next to the engine, attach the retaining bolts, rehook the wire harness to the engine, install the accessory drive belt and then reconnect the battery terminal labeled "negative".
Related 2006 Jeep Commander Parts
 2006 Jeep Commander Blend Door Actuator
 2006 Jeep Commander Blower Motor
 2006 Jeep Commander Blower Motor Resistor
 2006 Jeep Commander Heater Core
 2006 Jeep Commander A/C Accumulator
 2006 Jeep Commander A/C Compressor
 2006 Jeep Commander A/C Condenser
 2006 Jeep Commander A/C Expansion Valve
 2006 Jeep Commander A/C Hose
 2006 Jeep Commander A/C System Valve Core
 2006 Jeep Commander Evaporator
 2006 Jeep Commander HVAC Pressure Switch