JeepParts
My Garage
My Account
Cart
OEM 2006 Jeep Liberty A/C Switch
Air Conditioning Switch- Select Vehicle by Model
- Select Vehicle by VIN
Select Vehicle by Model
orMake
Model
Year
Select Vehicle by VIN
For the most accurate results, select vehicle by your VIN (Vehicle Identification Number).
2 A/C Switches found


2006 Jeep Liberty Heater Control Part Number: 55037533AG
$259.30 MSRP: $328.72You Save: $69.42 (22%)Ships in 1-2 Business DaysProduct Specifications- Other Name: Control - A/C And Heater; HVAC Temperature Control Panel; Climate Control Module; Blower Control Switch; Dash Control Unit; Control A/C And Heater With A/C; Control A/C And Heater
- Item Weight: 1.90 Pounds
- Item Dimensions: 12.5 x 6.2 x 4.3 inches
- Condition: New
- Fitment Type: Direct Replacement
- SKU: 55037533AG
- Warranty: This genuine part is guaranteed by Mopar's factory warranty.


2006 Jeep Liberty Heater Control Knob Part Number: 5069169AA
Product Specifications- Other Name: Knob - A/C And Heater Control - Ro; HVAC Heater Control Knob; Knob A/C And Heater Control - Rotary
- Item Weight: 0.40 Pounds
- Item Dimensions: 2.1 x 2.1 x 1.4 inches
- Condition: New
- Fitment Type: Direct Replacement
- SKU: 5069169AA
- Warranty: This genuine part is guaranteed by Mopar's factory warranty.
2006 Jeep Liberty A/C Switch Parts and Q&A
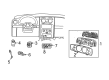
- Q: How to Maintain the A/C Switch for Optimal Performance on 2006 Jeep Liberty?A: The first step in servicing the A/C-heater control is to cut power to the air bag by disconnecting and isolating the negative battery cable and wait for two minutes so the system's capacitor fully discharges to ensure air bag safety. Take out the center bezel, then remove the four screws holding the A/C-heater control in place at its mounting sites along the instrument panel (7). Remove the AC-heater control gently to expose the harness connectors at its back (3, 6 and 5). Remove the vacuum and wire connectors from the A/C-heater control and take the control device from the car. Should access be required, you must remove the two illumination lamps (2 and 4) located on the A/C-heater control. After you remove the illumination lamps, reinstall them in the rear of the A/C-heater control (1). Match the wire harness and vacuum connectors to the ones in slots 3, 5 and 6 at the back of the A/C-heater control. Reinstall the A/C-heater control on the dashboard and hold it with four retaining screws in the indicated areas (7). Adjust each screw so that they reach 2 N.m (17 in. lbs.) of torque. Afterward, replace the bezel for the instrument panel center and reconnect the negative cable of the battery.
Related 2006 Jeep Liberty Parts
 2006 Jeep Liberty A/C Compressor
 2006 Jeep Liberty Blend Door Actuator
 2006 Jeep Liberty Blower Motor
 2006 Jeep Liberty Blower Motor Resistor
 2006 Jeep Liberty A/C Accumulator
 2006 Jeep Liberty A/C Clutch
 2006 Jeep Liberty A/C Condenser
 2006 Jeep Liberty A/C Hose
 2006 Jeep Liberty A/C Service Cap
 2006 Jeep Liberty Ambient Temperature Sensor
 2006 Jeep Liberty Evaporator
 2006 Jeep Liberty HVAC Pressure Switch