JeepParts
My Garage
My Account
Cart
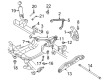
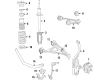
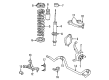
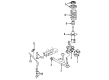
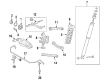
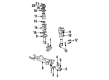
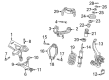
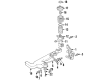
OEM Chrysler Control Arm Bushing
Suspension Arm Bushing- Select Vehicle by Model
- Select Vehicle by VIN
Select Vehicle by Model
orMake
Model
Year
Select Vehicle by VIN
For the most accurate results, select vehicle by your VIN (Vehicle Identification Number).
36 Control Arm Bushings found


Chrysler Rear Bushings Part Number: 52113214AA
$60.63 MSRP: $109.00You Save: $48.37 (45%)Ships in 1-2 Business DaysProduct Specifications- Other Name: Bushing - Control Arm; Control Arm Bushing; Axle Pivot Bushing; Lower Control Arm Rear Bushing; Bushing Control Arm


Chrysler Lower Control Arm Bushing Part Number: 4684120
$13.54 MSRP: $24.00You Save: $10.46 (44%)Ships in 1-2 Business DaysProduct Specifications- Other Name: Bushing - Pivot; Suspension Control Arm Bushing; Control Arm Bushing; Axle Pivot Bushing; Lower Control Arm Front Bushing; Spring Front Bushing; Bushings; Arm, Front Lower Control (LCA) , Right; Bushing Pivot


Chrysler Lower Control Arm Bushing Part Number: 4743556AA
$24.46 MSRP: $37.90You Save: $13.44 (36%)Ships in 1-2 Business DaysProduct Specifications- Other Name: Bushing - Pivot; Suspension Control Arm Bushing; Control Arm Bushing; Axle Pivot Bushing; Lower Control Arm Rear Bushing; Bushings; Bushing Pivot


Chrysler Lower Control Arm Rear Bushing, Front Part Number: 4782991AD
$57.26 MSRP: $85.70You Save: $28.44 (34%)Ships in 1-2 Business DaysProduct Specifications- Other Name: Bushing - Pivot; Suspension Control Arm Bushing, Front Lower Rearward; Axle Pivot Bushing; Bushings; Bushing Pivot; Control Arm Bushing
- Position: Front Lower
- Replaces: 4782991AC

Chrysler Lower Control Arm Front Bushing Part Number: 4895090AD
$50.10 MSRP: $72.35You Save: $22.25 (31%)Ships in 1-2 Business DaysProduct Specifications- Other Name: Bushing - Pivot; Suspension Control Arm Bushing, Front Lower Forward; Axle Pivot Bushing; Bushings
- Position: Front Lower
- Replaces: 4895090AC

Chrysler Bushings Part Number: 4656012AF
$21.25 MSRP: $45.80You Save: $24.55 (54%)Ships in 1-2 Business DaysProduct Specifications- Other Name: Bushing - Control Arm; Control Arm/Trailing Arm Bushing; Suspension Control Arm Bushing; Control Arm Bushing; Bushing Control Arm
- Replaces: 4656012AD, 4656012AC, 4656012AE

Chrysler Knuckle Bushing, Rear Part Number: 68071135AA
$150.45 MSRP: $198.00You Save: $47.55 (25%)Ships in 1-2 Business DaysProduct Specifications- Other Name: Bushing - Control Arm; Rear Lower Outer Bushing; Rear Suspension Knuckle Bushing.; Bushing
- Position: Rear
- Replaces: 5114234AC, 5114234AA, 5114234AD, 5114234AB

Chrysler Control Arm Bushing Part Number: 5272084
$7.36 MSRP: $9.34You Save: $1.98 (22%)Ships in 1-2 Business DaysProduct Specifications- Other Name: Bushing - Front Suspension Control Arm Pivot; Suspension Control Arm Bushing Kit; Axle Pivot Bushing.; Lower Control Arm Bushing; Front Control Arm and Crossmember Bushings.

Chrysler Lower Control Arm Bushing, Front Outer Part Number: 4695116
$15.67 MSRP: $19.87You Save: $4.20 (22%)Ships in 1-2 Business DaysProduct Specifications- Other Name: Bushing - Lower Control Arm; Front Lower Outer, Strut Fork, Axle Pivot Bushing.; Lower Control Arm Front Bushing; Right Shock Absorber to LCA Bushing; Control Arm Bushing.
- Position: Front Lower Outer

Chrysler Lower Control Arm Bushing, Front Inner Part Number: 4616736
$18.88 MSRP: $23.94You Save: $5.06 (22%)Ships in 1-2 Business DaysProduct Specifications- Other Name: Bushing - Lower Control Arm; Suspension Control Arm Bushing, Front Lower Inner Rearward; Trailing Arm Bushing; Lower Control Arm Bushings; Seal for Front Suspension Control Arm Ball Joint.
- Position: Front Lower Inner

Chrysler Front Bushings Part Number: 52855292AA
$68.10 MSRP: $86.33You Save: $18.23 (22%)Ships in 1-2 Business DaysProduct Specifications- Other Name: Bushing - Control Arm; Suspension Control Arm Bushing Kit; Control Arm Bush Kit; Control Arm Bushing; Axle Pivot Bushing; Lower Control Arm Front Bushing; Bushing Control Arm


Chrysler Lower Control Arm, Front Part Number: 4616383
Product Specifications- Other Name: Bushing - Lower Control Arm; Suspension Strut Rod Bushing, Front Forward; Strut Rod Bushing; Front, Inner, Rear, and Cradle Rear Bushings; Lower Control Arm Bushing.
- Position: Front Lower


Chrysler Lower Control Arm, Front Part Number: 4616380
Product Specifications- Other Name: Bushing - Lower Control Arm; Suspension Strut Rod Bushing, Front Rearward; Strut Rod Bushing; Strut Bar Front Bushing; Strut Rod Outer Bushing; Lower Control Arm Bushing.
- Position: Front Lower

Chrysler Lower Control Arm Part Number: 4616382
Product Specifications- Other Name: Bushing - Lower Control Arm; Bushing, Strut To Cradle Front; Bushing Lower Control Arm; Control Arm
- Position: Lower

Chrysler Lower Control Arm Bushing, Front Inner Part Number: 4764453AA
Product Specifications- Other Name: Bushing - Lower Control Arm; Suspension Control Arm Bushing, Front Lower Inner Forward; Axle Pivot Bushing; Lower Control Arm Front Bushing; Bushing Lower Control Arm; Suspension Control Arm Bushing; Control Arm Bushing
- Position: Front Lower Inner


Chrysler Bushing, Front Passenger Side Part Number: MR554382
Product Specifications- Other Name: Bushing - Control Arm; Suspension Control Arm Bushing, Front Right, Front Right Lower; Axle Pivot Bushing; Bushing Control Arm
- Position: Front Passenger Side
Chrysler Bushing, Front Lower Driver Side Part Number: MR554381
Product Specifications- Other Name: Bushing - Control Arm; Suspension Control Arm Bushing, Front Left, Front Left Lower; Axle Pivot Bushing; Bushing Control Arm
- Position: Front Lower Driver Side
Chrysler Bushing, Front Part Number: MR455736
Product Specifications- Other Name: Bushing Control Arm; Suspension Control Arm Bushing, Front, Front Rearward
- Position: Front


Chrysler Front Lower Control Arm Bushing Part Number: MB809170
Product Specifications- Other Name: Bushing - Control Arm; Control Arm Bushing; Axle Beam Mount; Bushings; Bushing Rear Suspension Lower Arm; Bushing Control Arm

Chrysler Control Arm Bushing Part Number: 5272098
Product Specifications- Other Name: Bushing - Front Suspension Control Arm Pivot - Rear; Suspension Control Arm Bushing Kit.; Lower Control Arm Bushing; Rear Bushing for Standard Suspension.
| Page 1 of 2 |Next >
1-20 of 36 Results
Chrysler Control Arm Bushing
OEM parts sourced directly from Chrysler deliver superior quality, long lasting strength, and a precise fit you can trust. Each item goes through strict quality checks to ensure safety, toughness, and performance that matches your factory equipment. At JeepPartsDeal online shop, you'll get top-quality, budget-friendly OEM Chrysler Control Arm Bushing for your vehicle. We focus on giving you a high standard without pushing up the price. Our full selection of genuine factory products comes backed by the original manufacturer's warranty. You'll love our fast delivery, seamless shopping experience, and convenient return policy, saving you all the hassle.
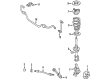
Chrysler Control Arm Bushing ensures that steering is sharp and road shocks are dampened to allow smoother day-to-day driving. Since 1925, Chrysler began with solid cars and never gave up on creating smoother rides and true value. A Floating Power engine shake taming and airflow styling pushed cabins cool and drag cut was played by Chrysler. Chrysler then introduced the first viable minivan, demonstrating that a roomy interior and easy access make sense in real life. Low cost and easy purchases made shoppers comfortable and enhanced cross-generational loyalty. Commuters and families alike have confidence in Chrysler durability that manifests itself whenever the key is turned on. The interior space continues to expand and ride maintains a steady self with even cracked pavement. Control Arm Bushing is between the subframe and the suspension arm, which allows the arm to pivot without grind metal-on-metal. Control Arm Bushing is also applied to hold the steering feedback as the arm is held straight even when the road surface is resisting. Control Arm Bushing is applied to deal with heat, water, and grit, thus drivers cover thousands of miles before changing time. Control Arm Bushing inserts without hassle in a variety of models and ensures both ease and affordability in maintaining the same generation ride character.
Chrysler Control Arm Bushing Parts and Q&A
- Q: How to Remove and Replace Control Arm Bushing on Chrysler Sebring?A:Removing the lower control arm bottle is needed before replacing the isolator bushings. First, you should hand-install the front bushing into the lower control arm, making sure it lines up with the hole and use the machined surface as your installation point. Use Special Tool 6876 attached to the screw portion of Remover/Installer Special Tool C-4212-F to drive the front bushing deep enough that it sits flush with the machined surface. This time, concentrate on the rear bushing, setting it up so the empty part of the rubber is far from the ball joint; use Special Tool 6760 again. Push the unidentified clevis bushing by hand into the lower control arm and use Special Tool 6877 to press it until it is flush. Secure the rear of the lower control arm onto the front suspension crossmember after installing all the bushings. Next, fasten the front with nuts and bolts, but don't tighten the front bolts yet. Apply 95 Nm (70 ft. lbs.) of torque to the rear attaching nut and bolt, then place the control arm ball joint stud into the steering knuckle and fasten the castle nut but don't tighten yet. Position the outer tie rod stud in the steering knuckle, turn on the nut for a quarter-turn only and tighten it to 61 Nm (45 ft. lbs.) of torque. Turn the ball joint castle nut on the lower control arm till it reaches 74 Nm (55 ft. lbs.) and then insert a cotter pin. Put the stabilizer bar link through the lower control arm's mounting hole, match the stabilizer bar bushing clamp to the mounting holes and tighten the bolts with 61 Nm (45 ft. lbs.) torque. Loosen the tightening tool while holding the stud stationary and apply torque to the stabilizer bar link-to-lower bolt to achieve 102 Nm (75 ft. lbs.) pressure. Fit the shock absorber clevis to the bushing located in the bottom control arm and then add the thru-bolt and nut, but don't tighten them. Put a leveled jack stand under the lower control arm, let the car down when it is on the stand and adjust the clevis-to-lower control arm bushing thru bolt nut to 88 Nm (65 ft. lbs.) torque. First, tighten the nut and bolt on the front lower control arm to 135 ft. lbs. (182 Nm) and then take away the jack stand. Afterward, connect the wheel and tire, progressively tighten up the lug nuts to 135 Nm (100 ft. lbs.) and during the last stage, lower the vehicle and check the wheel alignment specifications.
- Q: How to Service and Repair a Control Arm Bushing for the Rear Hydro Bushing on Chrysler Town & Country?A:To deal with the rear hydro bushing in the control arm, start by taking the lower control arm out of the front suspension cradle and fixing it to a vise so it's clamped but not too strongly. Using Remover, Special Tool 8460, secure it on the hydrobushing, while Extension Pin, Special Tool 8460-3, goes through the hole in the rear bushing. Loosen the bushing holding screw on Bridge, Special Tool 8460-1, to take out the lower control arm bushing. During assembly, do not put on any grease close to where the bushing will join the arm stem since this will not allow a strong hold. Hold the lower control arm in a vise, noticing that each side's hydro bushings and the control arms stem grooves are different; on the left side, master spline and the top stainless steel bobbin bearings are closer to the body when mounted, but on the right side, they are on the bottom close to the crossmember. Make sure the master spline on the inner sleeve fits in the groove of the lower control arm's rear bushing stem. Then, start pushing the bushing onto the stem by hand. Place Remover/Installer, Special Tool 8460, over the bushing and lower control arm, match the flange on the lower control arm to the points on Bridge, Special Tool 8460-1 and insert the cupped part of Installer Cup, Special Tool 8460-2, against the bushing's back end. Once the bushing is just about to touch the lower control arm flange, insert Spacer Plate, Special Tool 8460-4, between the flange and sleeve, so that both are straddling the bushing stem. Set the bushing onto the Spacer Plate and then tighten the bridge forcing screw with a torque wrench to about 50 Nm (37 ft. lbs.) to position the bushing properly between the stem and the flange. Furthermore, loosen the forcing screw, take out the tool and put the lower control arm onto the vehicle.


Related Chrysler Parts
 Chrysler Lug Nuts
 Chrysler Axle Support Bushings
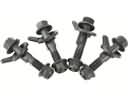 Chrysler Camber and Alignment Kit
 Chrysler Control Arm Bolt
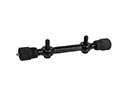 Chrysler Control Arm Shaft Kit
 Chrysler Intermediate Shaft
 Chrysler Leaf Spring
 Chrysler Leaf Spring Bushing
 Chrysler Spindle
 Chrysler Sway Bar Bushing
 Chrysler Sway Bar Link
 Chrysler Sway Bar Link Bushing