JeepParts
My Garage
My Account
Cart
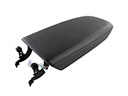
OEM Dodge Center Console Base
- Select Vehicle by Model
- Select Vehicle by VIN
Select Vehicle by Model
orMake
Model
Year
Select Vehicle by VIN
For the most accurate results, select vehicle by your VIN (Vehicle Identification Number).
113 Center Console Bases found


Dodge Console Assembly, Black, Rear Center Part Number: 1WQ01DX9AB
$110.64 MSRP: $164.00You Save: $53.36 (33%)Product Specifications- Other Name: Console - Floor; Seat Console, Rear Center; Center Console Base; Console; Console Floor Rear
- Position: Rear Center
- Replaces: 1WQ011T5AA, 1WQ01DX9AA, 1WQ011L1AB, 1WQ011T5AB


Dodge Console Base, Gray, Center Part Number: 1NN14XDVAB
$344.65 MSRP: $503.00You Save: $158.35 (32%)Ships in 1-3 Business DaysProduct Specifications- Other Name: Console - Base; Center Console, Center; Center Console Base
- Position: Center
- Replaces: 1NN141DVAA, 1NN141D3AA, 1NN14XDVAA

Dodge Console Assembly, Gray Part Number: 1WQ011D3AB
$13.75 MSRP: $87.20You Save: $73.45 (85%)Ships in 1-2 Business DaysProduct Specifications- Other Name: Console - Floor; Center Console Base; Console Floor Rear; Console
- Replaces: 1WQ011D3AA

Dodge Console Assembly, Beige Part Number: 1ZX24HL1AA
$71.54 MSRP: $454.00You Save: $382.46 (85%)Ships in 1-2 Business DaysProduct Specifications- Other Name: Console - Floor; Center Console Base; Console Floor Rear; Console

Dodge Console, Front Center Part Number: 1JG361DBAA
$17.75 MSRP: $102.00You Save: $84.25 (83%)Ships in 1-2 Business DaysProduct Specifications- Other Name: Console - Base; Seat Console, Front Center; Center Console, Center; Center Console Base; Console Base
- Position: Front Center
- Replaces: 1FZ981DBAA

Dodge Console Base, Gray Part Number: 1LN36XDVAA
$23.55 MSRP: $136.00You Save: $112.45 (83%)Ships in 1-2 Business DaysProduct Specifications- Other Name: Base - Floor Console; Center Console Base; Base Floor Console
- Replaces: 1LN361DVAA

Dodge Base, Center Part Number: 1LD99DX9AA
$35.47 MSRP: $204.00You Save: $168.53 (83%)Ships in 1-2 Business DaysProduct Specifications- Other Name: Bin - Floor Console; Center Console, Front Center; Seat Console, Center; Console Compartment; Bin; Bin Floor Console
- Position: Center
- Replaces: 1LD991DVAA, 1LD991R4AA, 1LD991D5AA, 1LB961J8AA, 1LB961DVAA, 1LB961D5AA, 1LD991J8AA, 1LD991K5AA

Dodge Center Console, Dark Gray Part Number: 1LK291DVAA
$36.03 MSRP: $207.00You Save: $170.97 (83%)Ships in 1-2 Business DaysProduct Specifications- Other Name: Base - Floor Console; Base Floor Console
- Replaces: 1RK46XDVAA, 1LK29XDVAA
Dodge Console, Center Part Number: ZM421DBAA
$26.96 MSRP: $134.00You Save: $107.04 (80%)Ships in 1-2 Business DaysProduct Specifications- Other Name: Console - Base; Seat Console, Front Center; Center Console, Center; Center Console Base; Console Base
- Position: Center

Dodge Console Base, Front Center Lower Part Number: 1BP561J8AB
$31.98 MSRP: $147.00You Save: $115.02 (79%)Ships in 1-2 Business DaysProduct Specifications- Other Name: Console - Floor Console; Center Console, Center Front, Front Lower Center; Center Console Base; Base Floor Console
- Position: Front Center Lower
- Replaces: 1BP561J8AA

Dodge Front Console, Beige Part Number: 1UQ30HL1AA
$78.90 MSRP: $250.00You Save: $171.10 (69%)Ships in 1-2 Business DaysProduct Specifications- Other Name: Base - Floor Console; Base Floor Console
Dodge Console Assembly, Black Part Number: 1ZX24DX9AA
$143.58 MSRP: $455.00You Save: $311.42 (69%)Ships in 1-2 Business DaysProduct Specifications- Other Name: Console - Floor; Center Console Base; Console Floor Rear; Console

Dodge Console Base, Beige, Center Part Number: 1YZ07LA3AC
$102.56 MSRP: $217.00You Save: $114.44 (53%)Ships in 1-2 Business DaysProduct Specifications- Other Name: Console - Base; Center Console, Center; Center Console Base
- Position: Center
Dodge Console Base, Black/Gray, Center Part Number: 1YZ07DX9AC
$232.23 MSRP: $343.00You Save: $110.77 (33%)Ships in 1-2 Business DaysProduct Specifications- Other Name: Console - Base; Center Console, Center; Center Console Base
- Position: Center
- Replaces: 1YZ07DX9AB
Dodge Console Base, Beige, Center Part Number: 1ZV18LA8AC
$86.62 MSRP: $157.00You Save: $70.38 (45%)Ships in 1-2 Business DaysProduct Specifications- Other Name: Console - Base; Center Console, Center; Center Console Base
- Position: Center
- Replaces: 1ZV18LA8AB

Dodge Console Base, Center Part Number: 68048518AA
$78.48 MSRP: $120.00You Save: $41.52 (35%)Ships in 1-2 Business DaysProduct Specifications- Other Name: Console - Base; Center Console, Center; Center Console Base
- Position: Center


Dodge Console, Taupe, Center Part Number: RZ921L5AC
Product Specifications- Other Name: Base - Floor Console; Center Console, Center; Base Floor Console
- Position: Center
- Replaces: RZ921L5AB


Dodge Console Base, Front Center Part Number: 5KK91ZJ8AA
Product Specifications- Other Name: Console - Floor; Center Console, Center Front; Seat Console, Front; Center Console Base; Console; Console Floor Rear; Console Floor
- Position: Front Center


 Product Specifications
- Other Name: Console - Floor; Center Console, Center Front; Seat Console, Front; Center Console Base; Console; Console Floor Rear; Console Floor
- Position: Front Center


Dodge Console Base, Beige, Center Part Number: 1NN14DK2AB
Product Specifications- Other Name: Console - Base; Center Console, Center; Center Console Base
- Position: Center
- Replaces: 1NN14DK2AA, 1NN141TVAA
| Page 1 of 6 |Next >
1-20 of 113 Results
Dodge Center Console Base
OEM parts sourced directly from Dodge deliver superior quality, long lasting strength, and a precise fit you can trust. Each item goes through strict quality checks to ensure safety, toughness, and performance that matches your factory equipment. At JeepPartsDeal online shop, you'll get top-quality, budget-friendly OEM Dodge Center Console Base for your vehicle. We focus on giving you a high standard without pushing up the price. Our full selection of genuine factory products comes backed by the original manufacturer's warranty. You'll love our fast delivery, seamless shopping experience, and convenient return policy, saving you all the hassle.
The Dodge Center Console Base keeps loose gear in check to maintain a distraction-free cabin. In 1914, Dodge fired the first shots in history with the first mass-produced all-steel body and showed that his cars could take a beating. Dodge continued to add on the muscle, cramming HEMI powerplants beneath the hood and unleashing the rogue Viper to give regular roads the feeling of a racetrack. Dodge now charges that intensity to tomorrow in the electric lineup with the Fratzonic Chambered Exhaust which barks, whispers, or remains quiet at a tap and can match the Drag, Donut, or Stealth moods without a drop of burning it burns. Always a combination of fringe and common sense, the badge has encouraged drivers to drive hard, without fear. The Center Console Base will be between the seats and will look like a rugged mini vault designed to absorb phones, wallets, and those coins that otherwise dart about the floor during hard launches. The Center Console Base keeps objects in an accessible area to ensure that eyes are kept forward and hands are not put in pockets. The Center Console Base, scuff-resistant muddy shoe scuff-resistant, wipes up in seconds, clicks together with no tools after spillage. The owners of Dodge can replace or upgrade the Center Console Base without any drilling, and the cabin can change as fast as the life of its owner.
Dodge Center Console Base Parts and Q&A
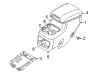
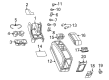
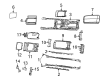
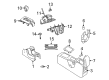
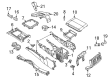
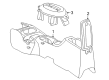
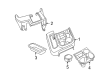
- Q: How to Install a Center Console Base on Dodge Durango?A:In Nafta and Export vehicles, put the floor console in place and then hook up the black electrical connector 4. After that, push the console toward you until it meets the instrument panel. Once you have screws 3, 2 and 1 in place, connect the liners of the rubber cup holders. For Export vehicles, after fixing the console, replace the storage bin assembly 1 at the back and guarantee that all the clips are secured.
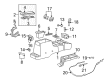
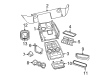
- Q: How to Install a Center Console Base on Dodge Charger?A:With the floor console in place, reconnect the jumper wire on connector 4 to the accessory power outlet beneath it and for models with rear heated seats, connect the connector there as well. Put each side of the console into your hands, then press the ears at the front of the console into the slots at the lower instrument panel. When that's done, line up the front of the console with the two alignment holes over the instrument panel's pins. Insert the locating pin from the underside of the console rear bin into the slot in the top of the floor panel transmission tunnel and screw and tighten the two screws (3) that anchor the front of the console to the instrument panel to a torque of 3 Nm (23 in. lbs.). Install and tighten all three 8 mm bolts (2) in the rear bin to attach the console to the floor panel transmission tunnel. Torque these bolts to 5 Nm (40 in. lbs.). Set the console shifter bezel over the gear selector lever and snap the brackets on the bottom of the bezel into the holes in the console. Screw in and tighten the two front screws on both sides of the console to 3 Nm (23 in. lbs.). In the rear bin of the console, place the mat (5) so the curved edge faces forward and slide the other mat (2) into the cubby bin in the front of the console, both flatwise. Hold down the shifter trim ring and guide it onto the gear selector while putting the gear selector lever into Park. Any time the door module loses power and then regains it, vehicles with Automatic Express Up should be calibrated. After that, reconnect the battery negative cable. To install the DVD center console cover, fit it on, fix it in place with the six screws and replace the original side covers.