JeepParts
My Garage
My Account
Cart
OEM Dodge Dakota Cam Gear
Camshaft Gear- Select Vehicle by Model
- Select Vehicle by VIN
Select Vehicle by Model
orMake
Model
Year
Select Vehicle by VIN
For the most accurate results, select vehicle by your VIN (Vehicle Identification Number).
9 Cam Gears found


Dodge Dakota Camshaft Gear, Driver Side Part Number: 53021290AA
$23.66 MSRP: $34.95You Save: $11.29 (33%)Ships in 1-2 Business Days


Dodge Dakota Camshaft Gear Part Number: J3242280


Dodge Dakota Camshaft Gear Part Number: 53021393AA


Dodge Dakota Camshaft Gear Part Number: 53020938


Dodge Dakota Camshaft Gear Part Number: 53021965AA


Dodge Dakota Camshaft Gear, Passenger Side Part Number: 53021291AD


Dodge Dakota Camshaft Gear Part Number: 53021968AA

Dodge Dakota Camshaft Gear Part Number: 4448690


Dodge Dakota Camshaft Gear Part Number: 4201974
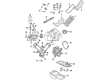
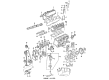
Dodge Dakota Cam Gear
Choose OEM Cam Gear that meet Dodge factory standards. Dodge designs and tests every component for precision and durability. Each Cam Gear follows strict manufacturing steps to lock in quality and fit. If your Dodge Dakota matters to you, OEM parts make the smart choice. You'll get the exact look, feel, and performance you expect. Shop genuine Dakota parts at the highly competitive prices online. Enjoy a manufacturer's warranty, a hassle-free return policy, and rapid delivery. No more guesswork with off brands. Get genuine parts with exact fit and true factory performance. Shop with confidence today at JeepPartsDeal.com.
The Cam Gear can be classified as an expensive part, which, however, boosts the performance and durability of Dodge Dakota cars. This important segment is fastened to the camshaft; fine adjustments of the valves determine the torque and horsepower. Essentially, the Cam Gear is used in altering the timing when it comes to the revving of the engine, hence enabling extra power and efficiency across the 1986-2010 Dakota series. The car has been built to withstand almost any kind of pressure and the Cam Gear plays a vital role in this, and therefore the drivers will enjoy a safe and efficient driving experience on the road. It has compatibility of multiple Dakota models and as such the Cam Gear can be used across the different frame sizes which has surely increased the versatility of this mid-size pickup. Most importantly, Cam Gear is an auto part that has specific mechanisms corresponding to different engine types, which renders the product even more significant in the automobile industry. One must not underestimate the function to regulate the engine power for it not only increases the horsepower but also helps to save fuel which is quite useful for any owner of Dodge Dakota. Cam Gear perhaps remains as amongst the critical components that contribute to the reliability, performance and other important facials of the Dodge Dakota, which can keep satisfying its users.
Dodge Dakota Cam Gear Parts and Q&A
- Q: How to Remove and Replace a Cam Gear on Dodge Dakota?A:Removing and replacing the camshaft gear/sprocket needs you to start by disconnecting the negative cable from the battery and moving the Radiator to an empty container so the coolant gets saved. Disconnect the tubes and hoses connected to the radiator, leave those attached to the fans and pull out the radiator. If there is air conditioning in the vehicle, leave all the air conditioner system fittings alone; instead, lift the condenser and receiver/drier assembly, remove the A/C serpentine drive belt idler pulley, disconnect and remove the generator and then release the A/C Condenser bolts to remove the assembly. After that, take out the serpentine drive belt, crankshaft vibration damper and timing cover and clear any gasket material on the cover. Rotate the crankshaft to make the crankshaft timing mark match with the camshaft timing mark before you take out the camshaft sprocket retaining bolt, both slingers and the assembly of chain and sprockets. For a camshaft pin that is a spring, just use a screw to remove it; and for a dowel-type camshaft pin, center-punch it, use a 4 mm (5/32 inch) drill bit to start a hole and then screw the removal out with a self-tapper. Remove dirt from the camshaft pin hole, squash the middle part of the replacement pin using vise grips and push the pin through the hole until set. Place the camshaft sprocket, crankshaft sprocket and Timing Chain so the timing notches are in line, leaving 20 pins of the chain between them. Place the crankshaft oil slinger and fasten the camshaft sprocket bolt to 108 Nm (80 ft. lbs.) of torque. After that, you should inspect the valve timing. On each side, add gasket sealer to the new timing case cover gasket with a bead measuring 3 mm (1/8 inch) in thickness onto the joint between the timing case cover and cylinder block. Apply the timing case cover over the oil pan gasket and cylinder block, put the Timing Case Cover Alignment and Seal Installation Tool 6139 in the crankshaft opening and attach both sets of bolts. The 1/4 inch bolts connecting the cover to the block should be tightened to 7 Nm (60 in. lbs.), the 5/16 inch front cover-to-block bolts should be tightened to 22 Nm (192 in. lbs.), the 1/4 inch oil pan-to-cover bolts to 14 Nm (120 in. lbs.) and the 5/16 inch oil pan-to-cover bolts to 18 Nm (156 in. lbs.) torque. Remove the cover alignment tool and fit a new oil seal into the cover after that, then add the vibration damper on the crankshaft and tighten the bolt to 108 Nm (80 ft. lbs.) When you are using air conditioning, add the A/C compressor serpentine drive belt idler pulley, the generator and put in the A/C condenser and receiver/drier assembly. Slide the serpentine drive belt onto the pulleys and secure them as stated by the instructions. Now, set up the radiator, attach the radiator hoses and coolant pipes if needed, complete the radiator level, place the fan and shroud and attach the negative side of the battery cable.

Related Dodge Dakota Parts
 Dodge Dakota Oil Pan
 Dodge Dakota Oil Pump
 Dodge Dakota Camshaft Bearing
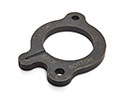 Dodge Dakota Camshaft Thrust Plate
 Dodge Dakota Crankshaft
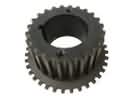 Dodge Dakota Crankshaft Gear
 Dodge Dakota Cylinder Head Gasket
 Dodge Dakota Piston
 Dodge Dakota Piston Ring Set
 Dodge Dakota Pushrod
 Dodge Dakota Rocker Arm
 Dodge Dakota Rod Bearing