JeepParts
My Garage
My Account
Cart
OEM Dodge Neon Brake Disc
Disc Rotor- Select Vehicle by Model
- Select Vehicle by VIN
Select Vehicle by Model
orMake
Model
Year
Select Vehicle by VIN
For the most accurate results, select vehicle by your VIN (Vehicle Identification Number).
7 Brake Discs found


Dodge Neon Rotor, Rear Part Number: 5085651AD
$132.49Ships in 1-2 Business DaysDodge Neon Rotor, Front Part Number: 5273141AB
$101.50 MSRP: $142.00You Save: $40.50 (29%)Ships in 1-2 Business Days
Dodge Neon Rotor, Rear Part Number: 5085652AB
$191.99 MSRP: $247.00You Save: $55.01 (23%)Ships in 1-2 Business Days

Dodge Neon Rotor, Front Part Number: 5273038AA
$48.66 MSRP: $61.70You Save: $13.04 (22%)Ships in 1-2 Business Days
Dodge Neon Rotor Part Number: 4509718
Dodge Neon Rotor, Rear Part Number: 4509553AC

Dodge Neon Rotor Part Number: 4509327
Dodge Neon Brake Disc
Choose OEM Brake Disc that meet Dodge factory standards. Dodge designs and tests every component for precision and durability. Each Brake Disc follows strict manufacturing steps to lock in quality and fit. If your Dodge Neon matters to you, OEM parts make the smart choice. You'll get the exact look, feel, and performance you expect. Shop genuine Neon parts at the highly competitive prices online. Enjoy a manufacturer's warranty, a hassle-free return policy, and rapid delivery. No more guesswork with off brands. Get genuine parts with exact fit and true factory performance. Shop with confidence today at JeepPartsDeal.com.
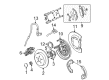
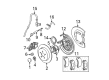
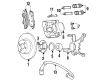
The Brake Disc of Dodge Neon vehicles is one of the parts of the disc brake system which act as the base where brake pad can apply friction to have an efficiency to stop or slow down the vehicle. Attached to the axle or the hub, the Dodge Neon Brake Disc as a component of the wheel assembly just rotates with it, power by hydraulic pressure from the calipers squeezes the pads into contacting the rotor when brake is applied. This design helps in the dissipation of heat in particular in the vented rotors tagged with cooling fins. Dodge Neon vehicles have from time to time made use of both the solid and vented Brake Discs, the solid rotors are commonly used in non-performance oriented cars, and the vented rotors used at the front for cooling purposes. Most rotors are generally made of cast iron while certain areas might employ the use of composites to enhance the efficiency of the rotor. It is imperative that one should inspect and maintain the Dodge Neon Brake Disc from time to time because certain problems like scoring or warping, or excessive runout of the Brake Disc will lead to diminished braking capability and in such cases the Brake Disc must be replaced for safety measure.
Dodge Neon Brake Disc Parts and Q&A
- Q: When is Brake Disc Refacing Necessary and How to Remove and Install Them on Dodge Neon?A:Servicing and repairing a brake rotor can be done by refacing it when the rotor is warped, deeply scored or the brakes report roughness or a pulsating pedal, but generally not with each pad replacement. Make sure you use a hub-mounted on-car brake lathe to correct the alignment and runout, because it trues the rotor to the hub and the vehicle's bearings. Every rotor should show its minimum allowable thickness marking on its un-machined side or on the hat section and you should not machine past this level. Since dirt, rust and chips on the rotor face and hub adapters can harm the lathe, clean them before the lathe is put in and adjust them according to the manufacturer's instructions. You should machine both sides of the rotor together to prevent them from being cut differently, so that the tolerances and thickness limits are met. To take off the front brake rotor, lift the car, take off the front tire and wheel, remove the caliper, take away the retaining clips and simply draw the rotor off the mounting studs. Removing the rear brake rotor also involves raising the vehicle, removing the rear tire and wheel assembly, taking off the caliper assembly, taking out any clips and simply tugging the rotor off the wheel studs. Begin by placing the front brake rotor over the studs attached to the hub, followed by the Brake Caliper, the wheel and tire assembly, 135 Nm (100 ft. lbs.) tightening of wheel mounting nuts, lowering the vehicle and finally pumping the brake pedal. Inspect the disc and parking brake shoes for the rear brake rotor before installing it, then attach the rotor to the studs on the hub, install the rear disc brake caliper, set the tire and wheel assembly in place, tighten the wheel nuts to 135 Nm (100 ft. lbs.), adjust the brake shoe clearance, lower the vehicle and pump the brake pedal to set the brake shoes.
- Q: How to Service a Front Brake Disc on Dodge Neon?A:You should lift the car, then take off the front wheel and tire to change the brake disc. After that, remove the front Brake Caliper part from the brake disc and put it aside. Pull out the clips securing the brake disc to the wheel and then lift the disc straight off its attachment points on the wheel. When installing, fit the new disc to the mounting studs which are on the hub itself. Set up the front disc brake caliper, while retracting the brake caliper piston to allow the shoes to fit on the disc when needed. After the procedure is complete, install the wheel and tire assembly, tighten the wheel mounting nuts to 135 Nm (100 ft. lbs.). When you're ready, drop the car and hold the brake pedal to make the brake shoes connect to the brake disc as you drive out.


Related Dodge Neon Parts
 Dodge Neon Brake Caliper
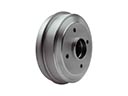 Dodge Neon Brake Drum
 Dodge Neon Wheel Cylinder
 Dodge Neon ABS Control Module
 Dodge Neon ABS Relay
 Dodge Neon Brake Caliper Bolt
 Dodge Neon Brake Caliper Piston
 Dodge Neon Brake Dust Shield
 Dodge Neon Brake Line
 Dodge Neon Brake Pad
 Dodge Neon Hydraulic Hose
 Dodge Neon Wheel Bearing Dust Cap