JeepParts
My Garage
My Account
Cart
OEM Dodge Ram 1500 A/C Condenser
Air Conditioning Condenser- Select Vehicle by Model
- Select Vehicle by VIN
Select Vehicle by Model
orMake
Model
Year
Select Vehicle by VIN
For the most accurate results, select vehicle by your VIN (Vehicle Identification Number).
6 A/C Condensers found


Dodge Ram 1500 Condenser Part Number: 55056824AB
$463.73 MSRP: $675.00You Save: $211.27 (32%)

Dodge Ram 1500 Condenser Part Number: 55055824AE

Dodge Ram 1500 Condenser Part Number: 55055592

Dodge Ram 1500 Fan Assembly Part Number: 5072993AB
Dodge Ram 1500 Condenser Part Number: 55036275AC

Dodge Ram 1500 Condenser Part Number: 5290385AD
Dodge Ram 1500 A/C Condenser
Choose OEM A/C Condenser that meet Dodge factory standards. Dodge designs and tests every component for precision and durability. Each A/C Condenser follows strict manufacturing steps to lock in quality and fit. If your Dodge Ram 1500 matters to you, OEM parts make the smart choice. You'll get the exact look, feel, and performance you expect. Shop genuine Ram 1500 parts at the highly competitive prices online. Enjoy a manufacturer's warranty, a hassle-free return policy, and rapid delivery. No more guesswork with off brands. Get genuine parts with exact fit and true factory performance. Shop with confidence today at JeepPartsDeal.com.
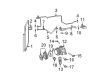
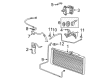
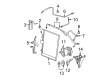
The A/C Condenser in Dodge Ram 1500 vehicles mainly performs the role of a heat exchanger converting the gaseous refrigerant into liquid, and serves for the purpose of serving the required refrigerant to the accumulator. Usually located at the front part of the automobile to be precise just in front of the radiator, the A/C Condenser is a system of tubes through which this cooling takes place. As for the details of this component, it is not mentioned that there are different types or styles of A/C condensers installed in different Ram 1500 models, but the basic structure of each model is aimed at heat exchange, so as to provide the optimal air conditioning performance. This part is useful to the functionality of these A/C Condenser since it determines how well a cabin is conditioned for comfort.
Dodge Ram 1500 A/C Condenser Parts and Q&A
- Q: What Are the Best Practices for Installing an A/C Condenser to Ensure Optimal Performance and Avoid Damage on Dodge Ram 1500?A:Before installing the condenser, adjust the refrigerant oil to guard against A/C damage and possible harm to the compressor. If you change the A/C condenser, fill the system with 30 milliliters (1 fluid ounce) more of the recommended refrigerant oil. Be sure to put in new O-ring seals and gaskets when you disconnect refrigerant lines so you don't have leaks. Make sure the Radiator and condenser air seals are correctly located to allow for maximum cooling. Attach the A/C condenser to the front side of the radiator and fix it in place with two bolts held to 2.2 Nm (20 in. lbs.). Remove all plugs or tape from the jumper line fittings and condenser ports, lubricate the O-ring seals and set them and the gaskets onto the fittings. Set the bolts on the jumper lines to 23 Nm (17 ft. lbs.) after connecting them to the A/C condenser. Put in the bolt that holds the condenser jumper line tapping block to the radiator. If your car has transmission cooler ports, remove the plugs from them, fit new O-ring seals and join the ends of the automatic transmission jumper lines firmly. Put together the radiator and the A/C condenser as an assembly. If there are jumpers available, wire the cooler lines to them before connecting the hoses. Unplug or remove any tape from the fittings and ports, add a drop of clean refrigerant oil to the O-rings and replace both with new gaskets. Link the A/C discharge line and the A/C liquid line to the tapping block on the condenser jumper line and tighten the nuts with a torque of 23 Nm. Attach the negative Battery Cable back to its terminal, fill the coolant if necessary and check and adjust the automatic transmission fluid, if you have one. Remove all refrigerant and if the condenser is being replaced, add 30 milliliters (1 fluid ounce) of refrigerant oil. Adjust the volume when replacing more than one unit, according to the Refrigerant Oil Capacities chart. Now, the job of a technician is to charge up the refrigerant system.
- Q: How to Remove the A/C Condenser from 3.7L, 4.7L, and 5.7L Engines on Dodge Ram 1500?A:You should first disconnect and isolate the negative Battery Cable to remove the A/C condenser from 3.7L/4.7L/5.7L engines. After that, get the refrigerant from the system it is in. Remove the A/C discharge line and the A/C liquid line from the A/C condenser. After that, remove the wire harness connector from the A/C condenser cooling fan motor. Loosen and take away the two bolts that fasten the A/C condenser to the front upper crossmember. Raise the A/C condenser and Cooling Fan Assembly, pull off the lower mounting tabs from the lower mounting flanges and remove the assembly from the engine bay. Should the cooling fan be your problem, place the A/C and cooling fan on a workbench and remove the four screws securing the fan to the condenser to separate them.


Related Dodge Ram 1500 Parts
 Dodge Ram 1500 Blower Motor
 Dodge Ram 1500 Blend Door Actuator
 Dodge Ram 1500 Heater Core
 Dodge Ram 1500 A/C Compressor Clutch
 Dodge Ram 1500 Blower Motor Resistor
 Dodge Ram 1500 A/C Compressor
 Dodge Ram 1500 A/C Accumulator
 Dodge Ram 1500 A/C Expansion Valve
 Dodge Ram 1500 A/C Hose
 Dodge Ram 1500 A/C System Valve Core
 Dodge Ram 1500 Evaporator
 Dodge Ram 1500 HVAC Pressure Switch