JeepParts
My Garage
My Account
Cart
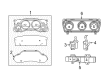
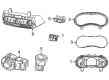
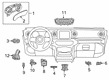
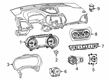
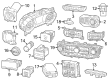
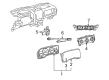
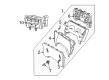
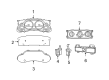
OEM Jeep Instrument Cluster
Speedometer Instrument Cluster- Select Vehicle by Model
- Select Vehicle by VIN
Select Vehicle by Model
orMake
Model
Year
Select Vehicle by VIN
For the most accurate results, select vehicle by your VIN (Vehicle Identification Number).
359 Instrument Clusters found


Jeep Lens Part Number: 68294529AA
$95.57 MSRP: $143.00You Save: $47.43 (34%)Ships in 1-3 Business DaysProduct Specifications- Other Name: Lens - Instrument Cluster; Instrument Panel Lens; Mask And Lens Instrument Cluster


Jeep Cluster Lens Part Number: 68216990AA
$200.54 MSRP: $295.00You Save: $94.46 (33%)Ships in 1-3 Business DaysProduct Specifications- Other Name: Lens - Instrument Cluster; Instrument Panel Lens; Lens; Mask And Lens Instrument Cluster

Jeep Cluster Lens Part Number: 68382520AA
$56.32 MSRP: $80.95You Save: $24.63 (31%)Ships in 1-3 Business DaysProduct Specifications- Other Name: Lens - Instrument Cluster; Instrument Panel Lens; Mask And Lens Instrument Cluster

Jeep Cluster Assembly, Black Part Number: 68226541AB
$122.36 MSRP: $182.00You Save: $59.64 (33%)Ships in 1-3 Business DaysProduct Specifications- Other Name: Mask And - Instrument Cluster; Instrument Cluster; Lens; Mask And Lens Instrument Cluster
- Replaces: 68226541AA

Jeep Instrument Cluster Part Number: 68060709AD
$145.02 MSRP: $214.00You Save: $68.98 (33%)Ships in 1-3 Business DaysProduct Specifications- Other Name: Cluster - Instrument Panel; Cluster Instrument Panel
- Replaces: 68060709AA, 68060709AC, 68060709AB


Jeep Instrument Cluster, Silver Accents Part Number: 68067707AC
$172.22 MSRP: $254.00You Save: $81.78 (33%)Ships in 1-3 Business DaysProduct Specifications- Other Name: Cluster - Instrument Panel
- Replaces: 68067707AB, 68067707AA

Jeep Cluster Assembly Part Number: 68080414AF
$175.62 MSRP: $259.00You Save: $83.38 (33%)Ships in 1-3 Business DaysProduct Specifications- Other Name: Cluster - Instrument Panel; Instrument Cluster
- Replaces: 68080414AD, 68080414AB, 68080414AE, 68080414AC, 68080414AA
Jeep Instrument Cluster, Silver Accents Part Number: 68080412AF
$175.62 MSRP: $259.00You Save: $83.38 (33%)Ships in 1-3 Business DaysProduct Specifications- Other Name: Cluster - Instrument Panel; Cluster Assembly
- Replaces: 68080412AA, 68080412AB, 68080412AD, 68080412AE, 68080412AC

Jeep Cluster - Instrument Panel Part Number: 68614601AE
$211.87 MSRP: $314.00You Save: $102.13 (33%)Ships in 1-2 Business DaysProduct Specifications- Other Name: CLUSTER-INSTRUMENT PANEL
- Replaces: 68614601AB, 68614601AD, 68614601AC

Jeep Instrument Cluster, Silver Accents Part Number: 68223324AB
$211.87 MSRP: $312.00You Save: $100.13 (33%)Ships in 1-3 Business DaysProduct Specifications- Other Name: Cluster - Instrument Panel
- Replaces: 68223324AA
Jeep Cluster Assembly Part Number: 68432305AC
$249.26 MSRP: $367.00You Save: $117.74 (33%)Ships in 1-3 Business DaysProduct Specifications- Other Name: Cluster - Instrument Panel
- Replaces: 68432305AB
Jeep Instrument Cluster, Silver Part Number: 56054258AE
$259.46 MSRP: $382.00You Save: $122.54 (33%)Ships in 1-3 Business DaysProduct Specifications- Other Name: Cluster - Instrument Panel
- Replaces: 56054258AC, 56054258AD
Jeep Instrument Cluster, Silver Part Number: 56054259AE
$260.59 MSRP: $384.00You Save: $123.41 (33%)Ships in 1-3 Business DaysProduct Specifications- Other Name: Cluster - Instrument Panel
- Replaces: 56054259AC, 56054259AD
Jeep Instrument Cluster, Silver Part Number: 56054257AE
$260.59 MSRP: $384.00You Save: $123.41 (33%)Ships in 1-3 Business DaysProduct Specifications- Other Name: Cluster - Instrument Panel; Cluster Assembly
- Replaces: 56054257AD, 56054257AC
Jeep Instrument Cluster, Silver Accents Part Number: 56054369AE
$261.72 MSRP: $385.00You Save: $123.28 (33%)Ships in 1-3 Business DaysProduct Specifications- Other Name: Cluster - Instrument Panel
- Replaces: 56054369AD, 56054369AC

Jeep Cluster - Instrument Panel Part Number: 68525952AE
$266.26 MSRP: $396.00You Save: $129.74 (33%)Ships in 1-2 Business DaysProduct Specifications- Other Name: CLUSTER-INSTRUMENT PANEL


Jeep Instrument Cluster Part Number: 56010678AE
Product Specifications- Other Name: Cluster; Cluster Assembly


Jeep Cluster Lens Part Number: 68079233AA
$39.38 MSRP: $56.55You Save: $17.17 (31%)Product Specifications- Other Name: Lens - Instrument Cluster; Instrument Panel Lens; Lens; Mask And Lens Instrument Cluster


Jeep Instrument Cluster Part Number: 68055902AC
$499.22 MSRP: $727.00You Save: $227.78 (32%)Product Specifications- Other Name: Cluster - Instrument Panel; Cluster Assembly; Cluster Instrument Panel
- Replaces: 68055902AA, 68055902AB


Jeep Instrument Cluster Part Number: 68060702AD
$610.29 MSRP: $894.00You Save: $283.71 (32%)Product Specifications- Other Name: Cluster - Instrument Panel; Cluster Instrument Panel
- Replaces: 68060702AA, 68060702AC, 68060702AB
| Page 1 of 18 |Next >
1-20 of 359 Results
Jeep Instrument Cluster
OEM parts sourced directly from Jeep deliver superior quality, long lasting strength, and a precise fit you can trust. Each item goes through strict quality checks to ensure safety, toughness, and performance that matches your factory equipment. At JeepPartsDeal online shop, you'll get top-quality, budget-friendly OEM Jeep Instrument Cluster for your vehicle. We focus on giving you a high standard without pushing up the price. Our full selection of genuine factory products comes backed by the original manufacturer's warranty. You'll love our fast delivery, seamless shopping experience, and convenient return policy, saving you all the hassle.
Jeep Instrument Cluster gives every driver the ability to observe speed, engine performance and warning indicators in a single hub at a glance. Since the launching of the civilian version in 1945, up to the trail rides today, Jeep is keeping the rough pledge of what it offered. Jeep is trusted by drivers who are interested in open-air cabin, boxy strength and Selec-Terrain dial, which snaps between snow, sand or mud. There is a strong sense of community because Jeep owners share tips, waves on backroads and take rocky passes no one would dare to. Heavy axles shake off potholes as short overhangs maintain approach angles keen on sudden creek crossings. Even the muddy ride is given a technology heartbeat through Uconnect screens, voice prompts and stealthy over the air code drops. Instrument Cluster is positioned behind the wheel with RPM arcs, fuel level, oil life and tire pressure. Since it is connected to vehicle networks, Instrument Cluster can switch crystal-clear pixels onto analog needles in a flash. The changing priorities on the Instrument Cluster are achieved by software-driven gauges that rearrange the priorities immediately when Selec-Terrain switches to a different map or when downhill assist is turned on, and again when it is turned off. Night ambient LEDs are applied to reduce strain and Instrument Cluster dimmers maintain vision sharp to keep the focus on the path.
Jeep Instrument Cluster Parts and Q&A
- Q: How to Remove the Instrument Cluster on Jeep Grand Cherokee?A:Starting with the front wheels alignment to the straight ahead position and fix the steering column, using the jumper cables, disconnect the negative terminal on the battery, and then disable the air bag system. Next, pull vertically down the right and left side cowl trim panels; with the front end of the door sill plates popped up, follower also exposed the rear screw on each kick panel; and last, insert a flat blade and carefully pop of the instrument panel end caps. When a glove box, instrument cluster bezel, bolster and knee bolster reinforcement, and the instrument cluster can be removed. Continue to the removal of the steering column covers and lower the steering column as you obtain more room to work with if you move the front seats back or even fully remove the driver seat. At the driver's side of the instrument panel, you are required to remove the large electrical bulkhead centre screw plus two other large connectors on each side. Tag and disconnect all other electrical connectors while under the instrument panel being careful of grounds straps. Pull the parking brake rod out of the release lever, then delete the brake light switch, and at the back of the pedal support bracket, there are 3 bolts. Some of the steps include the following, the center console and the A-pillar trim are to be detached usually by the elimination of the bolts that are used in this case, it is also necessary to pull out fasteners that are located in the A-pillar support. Before then, gently remove the defroster grilles and it's possible to get access to the nuts below. Remove all the wiring connections that are still plugged in, then unbolt all the licensed instrument retaining fasteners that are there behind the center instrument bezel and from behind the glove box. The radio and the two HVAC bolts need to be unbolted from the radio opening and then the instrument panel needs to be unbolted from the car. Installation is done in reverse order as removal is done.
- Q: How to Remove the Instrument Cluster on Jeep Wrangler?A:On models prior to 1995, begin with disconnecting the negative battery cable, then, taking out screws situated at the instrument panel, jerk out the individual panels at the top to come off the dash, while the process of installation is just the reverse of the mentioned process. For the models from 1997 to 2010, it is difficult to accomplish this procedure because of the concealed fasteners and electrical connectors; Pop the nut on the negative terminal of the battery, raise the tilt steering Wheeler if installed, and take out the headlight switch knob and coverscrews. Pull the cover of the steering column back, unscrew the knee blocker screws, and turn the key to 'On'. On the 2006 and earlier models, it is necessary to take out the lock cylinder using a pin punch; after that, it is possible to separate the covers of the steering column and disconnect the electrical connectors. It is, therefore, recommended that the steering wheel is unbolted and disposed to avoid spoiling the airbag, and the seat position fixed using cable ties. Disconnect the heater control cable, then take off the pinch bolt and nuts of the steering column mounts. Lift the glove box upward and pull it with its hooks, then separate it, then disconnect the air bag module bracket nuts and take off the instrument panel top cover. On the 2007 models, remove or unplug the antenna lead, and electrical connectors on the HVAC or you can take the screws out of the instrument panel. In the case with the 2011 and later models pay attention to the process of removing the air outlets and the main trim panel INSTALLING THE STEERING WHEEL and disconnecting diverse wires and components. Lastly, do not forget to label all connections, and before doing this, disconnect all connections, and to remove the instrument panel, reverse the steps involved, and also ensure the use of torque wrench whenever tightening or loosening any fasteners.


Related Jeep Parts
 Jeep License Plate
 Jeep Fuel Door
 Jeep Windshield Wiper
 Jeep Air Deflector
 Jeep Cigarette Lighter
 Jeep Door Check
 Jeep Door Lock Cylinder
 Jeep Glove Box
 Jeep Seat Heater
 Jeep Fender Splash Shield
 Jeep Seat Switch
 Jeep Shift Linkage Boot