JeepParts
My Garage
My Account
Cart
OEM Jeep Liberty Brake Booster
Brake Power Booster- Select Vehicle by Model
- Select Vehicle by VIN
Select Vehicle by Model
orMake
Model
Year
Select Vehicle by VIN
For the most accurate results, select vehicle by your VIN (Vehicle Identification Number).
3 Brake Boosters found

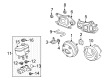
Jeep Liberty Brake Booster Part Number: 68039279AC
$222.61 MSRP: $501.00You Save: $278.39 (56%)Ships in 1-2 Business Days
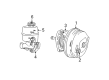
Jeep Liberty Brake Booster Part Number: 5134120AA
Jeep Liberty Brake Booster Part Number: 5072521AA
Jeep Liberty Brake Booster
Choose OEM Brake Booster that meet Jeep factory standards. Jeep designs and tests every component for precision and durability. Each Brake Booster follows strict manufacturing steps to lock in quality and fit. If your Jeep Liberty matters to you, OEM parts make the smart choice. You'll get the exact look, feel, and performance you expect. Shop genuine Liberty parts at the highly competitive prices online. Enjoy a manufacturer's warranty, a hassle-free return policy, and rapid delivery. No more guesswork with off brands. Get genuine parts with exact fit and true factory performance. Shop with confidence today at JeepPartsDeal.com.
Jeep Liberty cars equip the Brake Booster, which is useful in providing better braking force while at the same time the driver does not apply much pressure. It largely employs vacuum action where by it uses variation between the vacuum created by the engine and the normal atmosphere pressure to enhance the force that is applied on the brake pedal. Such a system makes it easier and efficient to apply force for instance it was easier and efficient to apply force during braking. Some of the Brake Boosters used in Jeep Liberty models may include Vacuum operated Brake Booster and hydraulic Brake Booster. The vacuum boosters are usually dependable nevertheless can fail at times, the hydraulic boosters employ the fluid pressure of the power steering pump or an electric assembly. Single and dual diaphragm boosters are some of the options that are available and depending on the size of the booster, the diameter size, there is usually a boost in assist and depending on the size of the booster, larger diameters are more powerful provide more power assist, but if the space is limited, then dual diaphragm boosters are more favorable. In general, the Brake Booster is one of the vital components in the Jeep Liberty's braking system, making the vehicle safer and easier to handle.
Jeep Liberty Brake Booster Parts and Q&A
- Q: How to Service and Repair a Vacuum Brake Booster on a Left-Hand Drive on Jeep Liberty?A:For left-hand vehicles, first remove the wire linked to the fluid level switch at the bottom of the reservoir before pulling out the master cylinder. Also, take the vacuum hoses off the booster check valve and pull out the Brake Lines connecting the master cylinder and HCU. Untie the HCU from the mounts and take it out of the way so you can remove the booster. Open the knee block under the steering column and then ease out the retaining clip on the booster push rod from the brake pedal. Upend the booster by unfastening the nuts holding it to the dash panel, pulling the studs out of the dash and sliding it upward out of the engine. To put in the booster, line and fix it on the dash panel and thread the mounting nuts in just enough to keep it from moving. Slide the booster push rod onto the brake pedal and then secure it with a retaining clip. But don't forget to apply Mopar multi-mileage grease to the pedal pin beforehand. Tighten the nuts for the booster to 25 Nm (220 inch lbs.) and finally snap the knee blocker back in place. When the master cylinder is saved and reused, check the rear seal and change it if it looks bad. Moisten a washcloth with brake cleaner and wipe the cylinder mounting surface on the brake booster to remove dirt and prevent vacuum problems. For the first step, put the master cylinder on the booster studs and for the second step, attach and tighten the mounting nuts to 25 Nm (220 inch lbs.). QhaLWHjH4BpriJGnv Next, link the brake lines to the HCU, junction block or master cylinder and begin tightening each connection with your hands, so you don't cross-thread them. After that, reattach the wire to the fluid level switch, fill the base brakes, bleed them, check the brakes are working and then move the vehicle.
- Q: How to Remove and Install a Vacuum Brake Booster in a Left-Hand Drive on Jeep Liberty?A:First, cut off the electrical wire from the switch at the lowest part of the brake fluid reservoir, then pull out the master cylinder to service the brake booster on a left-hand drive car. Following that, separate the hoses from the booster check valve and remove both the Brake Lines from the master cylinder and the HCU for some space. First, loosen the HCU from its mounts and move it out of the way to give yourself space for the booster. After that, remove the pin that holds the booster push rod to the brake pedal from the steering column. Pull off the nuts holding the booster to the dash panel, lift the studs out of the panel in the engine compartment, lift the booster gently and pull it out. To install, place the booster on the upright dash panel, add the mounting nuts and don't tighten them more than needed to hold the booster in place. With the brake pedal up, place the booster push rod in there, attach the clip and grease the pedal pin using Mopar multi-mileage grease to prevent any hassles. Step 2 is to snug the booster mounting nuts to 25 Nm (220 in. lbs.) and install the knee blocker. Whenever possible, examine the rear seal on the original master cylinder and change it if it's cut or ripped. Use a shop towel wet with brake cleaner on the cylinder mounting area of your brake booster to avoid vacuum leaks. Set the master cylinder onto the booster studs and attach and tighten its mounting nuts to 25 Nm (220 in. lbs.). Take the vacuum hose and put it on the booster check valve, securely fasten the HCU and make sure to tighten those nuts to 14 Nm (125 in. lbs.). Attach and link the brake lines to the HCU or junction block and master cylinder, making sure to twist them by hand so you don't cross-thread them. After that, link the wire to the fluid level switch found on the bottom of the reservoir, bleed and refill the base braking system and confirm the brakes are working correctly before going on the road.

Related Jeep Liberty Parts
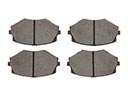 Jeep Liberty Brake Pads
 Jeep Liberty Brake Caliper
 Jeep Liberty Brake Line
 Jeep Liberty ABS Control Module
 Jeep Liberty Brake Caliper Piston
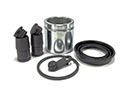 Jeep Liberty Brake Caliper Repair Kit
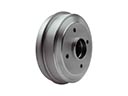 Jeep Liberty Brake Drum
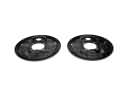 Jeep Liberty Brake Dust Shields
 Jeep Liberty Brake Master Cylinder
 Jeep Liberty Brake Proportioning Valve
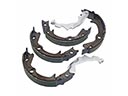 Jeep Liberty Parking Brake Shoes
 Jeep Liberty Yaw Sensor