JeepParts
My Garage
My Account
Cart
OEM Jeep Liberty TPMS Sensor
Tire Pressure Monitoring System Sensor- Select Vehicle by Model
- Select Vehicle by VIN
Select Vehicle by Model
orMake
Model
Year
Select Vehicle by VIN
For the most accurate results, select vehicle by your VIN (Vehicle Identification Number).
3 TPMS Sensors found


Jeep Liberty TPMS Sensor Part Number: 68406530AA
$71.69 MSRP: $108.00You Save: $36.31 (34%)Ships in 1-2 Business Days


Jeep Liberty TPMS Sensor Part Number: 68406531AA
$47.40 MSRP: $102.00You Save: $54.60 (54%)Ships in 1-2 Business Days


Jeep Liberty TPMS Sensor Part Number: 68078861AC
$105.93 MSRP: $159.00You Save: $53.07 (34%)Ships in 1-2 Business Days
Jeep Liberty TPMS Sensor
Choose OEM TPMS Sensor that meet Jeep factory standards. Jeep designs and tests every component for precision and durability. Each TPMS Sensor follows strict manufacturing steps to lock in quality and fit. If your Jeep Liberty matters to you, OEM parts make the smart choice. You'll get the exact look, feel, and performance you expect. Shop genuine Liberty parts at the highly competitive prices online. Enjoy a manufacturer's warranty, a hassle-free return policy, and rapid delivery. No more guesswork with off brands. Get genuine parts with exact fit and true factory performance. Shop with confidence today at JeepPartsDeal.com.
The Jeep Liberty TPMS Sensor is one of the used car parts that clearly reflects on the reliability and performance of Jeep Liberty, which is a compact SUV manufactured by Jeep between 2002 and 2012. This TPMS Sensor proves to be very important in ensures that the pressure of the tire is well checked and makes sure that drivers do not continue with high or low pressure which helps in safety and extending the life of the tire. The Jeep Liberty models utilize two types of TPMS: And there are two types of TPMS: Indirect TPMS (iTPMS) and Direct TPMS (dTPMS) which have their own benefit & limitations. Whereas dTPMS targets on using the hardware sensors for detecting pressures in real-time therefore is accurate and efficient the iTPMS uses software estimation for checking pressures making it friendly to the users. The TPMS Sensor requires routine servicing and approximately a battery change-up every five years as battery power is usually drawn from them. The Jeep Liberty comes with different trim levels where consumers can be able to choose from and can supports both types of systems depending with the needs of consumers. This adaptability when coupled with the over-all physical capacity of the Jeep Liberty and other desirable inserts like Electronic Stability control and traction control to name a few makes it far better drive. Therefore, Jeep Liberty TPMS Sensor has carved a niche in the automotive industry market since people can drive their cars with ease and security without worrying about the inefficiency of the car's systems. Given the model's solid credentials in both performance and adaptability to various Liberty models, this Jeep Liberty TPMS Sensor is a must-have for any Jeep buff.
Jeep Liberty TPMS Sensor Parts and Q&A
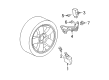
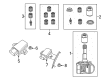
- Q: How to Service a TPMS Sensor on Jeep Liberty?A:First, lift the vehicle and support it on jack stands, remove the tire and wheel and hold onto the valve stem cap and its seal while you do this so no contamination occurs. Replacing the nickel-plated brass core in the aluminum valve stem is important to stop corrosion inside the valve. Take the tire off the wheel gently, not using the Bead Breaker in the area of the sensor and positioning the dismounting/mounting tool at the valve stem with an angle of ±10°. With pressure on the metal valve stem so you don't bend the antenna strap, detach the sensor nut, then take out the sensor from within the wheel. After you remove the existing sensor, be sure to change the washer and seal at the base of the sensor valve stem before installing it back. Make the area around the sensor/valve stem mounting hole in the wheel (5) clean and check that it's not damaged. As you pass the sensor through the wheel, keep pressing at the back of the metal valve stem and point the side with the potted part of the sensor down toward the hub. Place the sensor nut (with washer already pressed in) (3) by hand where its gyro needs to go, then lightly push down the sensor housing (2) into the wheel while tightening the nut to 6.5 Nm (58 inch lbs.). Watch the amount of torque applied, because too much pressure may separate the sensors. When using a rotating wheel tire changer, set the sensor valve stem (2) about 210° from the changer's head, while for rotating tool tire changers, keep the valve stem out of the way of the lower bead breaker. After placing the tires, measure the air pressure using the sticker on the supporting side of the tire and replace the original style valve stem cap. Gently put the tire and wheel back on the vehicle, lower it and drive continuously above 20 mph (32 km/h) for five minutes to give the system time to identify the sensor and correct errors. When sensors cannot be trained, they must be tested.
- Q: How to Install a TPMS Sensor on Jeep Liberty?A:In case you are changing the spare tire pressure sensor, note the ID. It is important to replace the valve cap, valve core, nut and sensor seal just before reinstalling the tire pressure sensor. Make sure the notch/flat is turned closer to the wheel while you are installing it. Thoroughly clean the approximately 1 inch around the sensor/valve stem mounting hole, so that there is no damage to the wheel. Feed the sensor into the wheel with your finger held against the back of the metal valve, so that the potted side of the sensor faces the wheel and prevents it from touching the valve stem. There should be a straight line from the sensor housing to the back of the flat on the seal seat. Push the sensor housing downward while tightening the nut so that it fits well inside the wheel, then tighten the nut until you reach 6 Nm (53 in. lbs.) Do not tighten the bolts past 10 Nm (88 in. lbs.) so the sensor and valve stem do not separate. On rotating wheel tire changers, the sensor valve stem should face the head and be approximately 180° from it and on rotating tool tire changers, the sensor should avoid the lower bead breaker area. Match the tire pressure to what is on the Tire Inflation Pressure Label and put the valve stem cap in place. Put the tire and wheel assembly onto the vehicle, take off the support and drop the vehicle. The sensor ID needs to be learned by the system through the Scan Tool, 9936, on the TPM-RKE Analyzer or by observing a steady speed of over 15 mph (24 km/h) for at least 10 minutes after the vehicle has been stationary for 20 minutes. If you cannot teach a sensor, use the appropriate diagnostic information.


Related Jeep Liberty Parts
 Jeep Liberty Airbag
 Jeep Liberty Body Control Module
 Jeep Liberty Brake Controller
 Jeep Liberty Radiator Fan Relay
 Jeep Liberty Throttle Position Sensor
 Jeep Liberty Ignition Lock Cylinder
 Jeep Liberty Air Bag Sensor
 Jeep Liberty Back Up Light Switch
 Jeep Liberty Hazard Warning Switch
 Jeep Liberty Ignition Lock Assembly
 Jeep Liberty Oil Pressure Switch
 Jeep Liberty Parking Assist Sensor