JeepParts
My Garage
My Account
Cart
OEM Jeep Timing Chain
Engine Timing Chain- Select Vehicle by Model
- Select Vehicle by VIN
Select Vehicle by Model
orMake
Model
Year
Select Vehicle by VIN
For the most accurate results, select vehicle by your VIN (Vehicle Identification Number).
24 Timing Chains found


Jeep Timing Chain Part Number: 5047366AA
$115.57 MSRP: $170.00You Save: $54.43 (33%)Product Specifications- Other Name: Chain - Timing; Chain Timing


Jeep Timing Chain Part Number: 4884868AC
$68.35 MSRP: $103.00You Save: $34.65 (34%)Product Specifications- Other Name: Chain - Timing; Engine Timing Chain; Chain Timing


Jeep Timing Chain Part Number: 5184355AF
$34.43 MSRP: $50.85You Save: $16.42 (33%)Ships in 1-3 Business DaysProduct Specifications- Other Name: Chain - Timing Primary; Engine Timing Chain; Chain Timing Primary
- Replaces: 5184355AE


Jeep Timing Chain Part Number: 5184352AF
$147.90 MSRP: $259.00You Save: $111.10 (43%)Ships in 1-3 Business DaysProduct Specifications- Other Name: Chain - Timing Secondary; Engine Timing Chain; Chain Timing Secondary
- Replaces: 5184352AE


Jeep Timing Chain Part Number: 53020444
$37.28 MSRP: $54.80You Save: $17.52 (32%)Ships in 1-2 Business DaysProduct Specifications- Other Name: Chain - Timing; Engine Timing Chain; Chain, Timing; Chain Timing


Jeep Timing Chain Part Number: 4884870AB
$50.62 MSRP: $74.35You Save: $23.73 (32%)Ships in 1-2 Business DaysProduct Specifications- Other Name: Chain - Balance Shaft; Engine Oil Pump Chain; Chain; Chain Balance Shaft

Jeep Timing Chain Part Number: 5047907AA
$41.74 MSRP: $84.60You Save: $42.86 (51%)Ships in 1-2 Business DaysProduct Specifications- Other Name: Chain - Timing Primary; Engine Timing Chain; Chain Timing Primary


Jeep Timing Chain Part Number: 68515619AA
$84.45 MSRP: $128.00You Save: $43.55 (35%)Product Specifications- Other Name: Chain - Timing Primary; Engine Timing Chain; Chain Timing Primary
- Replaces: 68483379AA, 68147488AA

Jeep Chain Part Number: 4893699AA
$98.60 MSRP: $150.00You Save: $51.40 (35%)Ships in 1-2 Business DaysProduct Specifications- Other Name: Chain - Oil Pump Drive; Chain Oil Pump Drive Secondary
Jeep Timing Chain Part Number: 5047963AB
$71.36 MSRP: $107.00You Save: $35.64 (34%)Product Specifications- Other Name: Chain - Timing Secondary; Engine Timing Chain; Chain Timing Secondary
- Replaces: 5047963AA


Jeep Timing Chain Part Number: 4666059AA
$49.99 MSRP: $73.50You Save: $23.51 (32%)Ships in 1-2 Business DaysProduct Specifications- Other Name: Chain - Timing; Engine Timing Chain; Chain Timing


Jeep Timing Chain Part Number: 68087863AA
$427.35 MSRP: $565.00You Save: $137.65 (25%)Ships in 1-2 Business DaysProduct Specifications- Other Name: Chain - Timing; Engine Timing Chain
- Replaces: 5175510AA

Jeep Timing Chain Part Number: 5048151AA
$88.89 MSRP: $136.00You Save: $47.11 (35%)Product Specifications- Other Name: Chain - Timing Primary; Chain Timing Primary Primary; Chain Timing Primary
Jeep Chain Part Number: 68472751AA
$22.12 MSRP: $32.50You Save: $10.38 (32%)Ships in 1-2 Business DaysProduct Specifications- Other Name: Chain - Oil Pump Drive
Jeep Timing Chain Part Number: 68462686AB
$31.18 MSRP: $45.65You Save: $14.47 (32%)Ships in 1-2 Business DaysProduct Specifications- Other Name: Chain - Timing Primary
Jeep Timing Chain Part Number: 68462682AB
$53.69 MSRP: $78.65You Save: $24.96 (32%)Ships in 1-2 Business DaysProduct Specifications- Other Name: Chain - Timing Secondary


Jeep Timing Chain Part Number: 53022316AC
$65.71 MSRP: $96.70You Save: $30.99 (33%)Product Specifications- Other Name: Chain - Timing; Engine Timing Chain; Chain Timing


Jeep Timing Chain Part Number: 83507095
Product Specifications- Other Name: Sprocket Package - Timing; Engine Timing Chain Kit; Timing Gear; Gear Assembly; Timing Gear Set; Includes Cam And Crankshaft Sprockets; Chain, Timing

Jeep Timing Chain Part Number: 4884868AB
Product Specifications- Other Name: Chain - Timing; Engine Timing Chain; Chain Timing


Jeep Gear Assembly Part Number: 68001402AA
Product Specifications- Other Name: Chain - Engine Timing; Engine Timing Chain Kit; Timing Drive Package; Includes all parts except bolts and dowel.
| Page 1 of 2 |Next >
1-20 of 24 Results
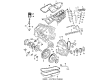
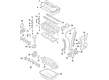
Jeep Timing Chain
OEM parts sourced directly from Jeep deliver superior quality, long lasting strength, and a precise fit you can trust. Each item goes through strict quality checks to ensure safety, toughness, and performance that matches your factory equipment. At JeepPartsDeal online shop, you'll get top-quality, budget-friendly OEM Jeep Timing Chain for your vehicle. We focus on giving you a high standard without pushing up the price. Our full selection of genuine factory products comes backed by the original manufacturer's warranty. You'll love our fast delivery, seamless shopping experience, and convenient return policy, saving you all the hassle.
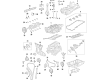
Jeep Timing Chain makes engine valves and pistons march in time to ensure power. Jeep does not need smoothing, which is why it brushes off the road, stones, and ruts, and has easy-going dash technology, voice control, and over the air features that make it not stale. Fans rely on Jeep to be free in the open air, turn the top down, roll up the doors, turn on the music, and who wants to be dramatic, run after sunsets. Local events, surfing rituals, and the watchful Selec-Terrain dial demonstrate how Jeep does not merely get around, it creates ownership everywhere they go day in day out. The Timing Chain connects the crankshaft and the camshaft in every gasoline powered model and has the advantage of being made of metal that is as strong as rubber belts are weak. Jeep owners are happy that this Timing Chain does not require a replacement that often and therefore saves time and keeps the adventures going each year. Adequate lubrication ensures that the Timing Chain remains silent, ensuring the valve timing and avoiding the expensive misfires of the wide range of products. Timing Chain is made of hardened steel links and rails, and it is sturdy and can endure high revs, sudden throttle bursts, deep water crossings, and dusty climbs, hence drivers can push their rigs to the limits without worrying about lost teeth or bent valves.
Jeep Timing Chain Parts and Q&A
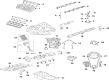
- Q: How to remove and install the timing chain, sprockets, and vibration damper in V6 engine on Jeep Cherokee?A:First of all, disconnect the negative battery terminal and remove the vibration damper and timing chain cover. Inspect the sprockets and chain for wear or looseness. Remove the camshaft sprocket and timing chain. Remove the crankshaft sprocket with a puller. Reinstall the remaining components.
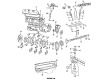
- Q: How to replace the timing chain and ensure proper alignment of the camshaft and crankshaft sprockets in 2.5L four cylinder engine on Jeep Wrangler?A:Set the number one piston at Top Dead Center (TDC) and remove the timing chain cover. Reinstall the vibration damper bolt and rotate the crankshaft until the zero timing mark on the crankshaft sprocket aligns with the timing mark on the camshaft sprocket, ensuring the timing marks on the sprockets are lined up. Slide the oil slinger off the crankshaft, then turn the tensioner lever to the unlock position. Pull the tensioner block toward the lever to compress the spring, hold the block, and turn the lever to the lock position. If necessary, use a small screwdriver to remove the retaining clip and take the tensioner off the block. Remove the camshaft retaining bolt and slip both sprockets and the chain off as an assembly. Clean the components and inspect for wear and damage; excessive chain slack and deformed, chipped, pitted, or discolored teeth require replacement, and always replace the sprockets and chain as a set. Inspect the tensioner for excessive wear and replace it if necessary. Install the tensioner, crankshaft camshaft sprockets, and timing chain, ensuring the marks on the sprockets are properly aligned. Install the camshaft sprocket retaining bolt and washer, tightening to the specified torque. For 1996 and earlier models, verify correct installation of the timing chain by turning the crankshaft to place the camshaft sprocket timing mark at approximately the one o'clock position, positioning the crankshaft timing mark where the adjacent tooth meshes with the chain at the three o'clock position, and count the number of chain pins between the timing marks of both sprockets, ensuring there are 20 pins. Release the tensioner by turning the lever to the unlock position, ensuring it is released before installing the timing cover. Finally, install the oil slinger and the remaining parts in the reverse order of removal.


Related Jeep Parts
 Jeep Cylinder Head
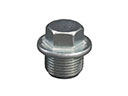 Jeep Oil Drain Plug
 Jeep Valve Cover Grommet
 Jeep Engine Mount Bracket
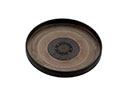 Jeep Camshaft Plug
 Jeep Crankshaft Seal
 Jeep Crankshaft Thrust Washer
 Jeep Oil Pump Rotor Set
 Jeep Rocker Arm Pivot
 Jeep Spool Valve
 Jeep Timing Chain Guide
 Jeep Variable Timing Solenoid