JeepParts
My Garage
My Account
Cart
OEM Jeep Wrangler Parking Brake Shoe
Emergency Parking Brake Shoe- Select Vehicle by Model
- Select Vehicle by VIN
Select Vehicle by Model
orMake
Model
Year
Select Vehicle by VIN
For the most accurate results, select vehicle by your VIN (Vehicle Identification Number).
2 Parking Brake Shoes found


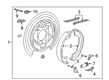
Jeep Wrangler Parking Brake Shoes, Rear Part Number: 68003589AA
$47.95 MSRP: $72.20You Save: $24.25 (34%)Ships in 1-2 Business Days
Jeep Wrangler Parking Brake Shoes, Rear Part Number: 5093390AC
$61.21 MSRP: $153.00You Save: $91.79 (60%)Ships in 1-2 Business Days
Jeep Wrangler Parking Brake Shoe
Choose OEM Parking Brake Shoe that meet Jeep factory standards. Jeep designs and tests every component for precision and durability. Each Parking Brake Shoe follows strict manufacturing steps to lock in quality and fit. If your Jeep Wrangler matters to you, OEM parts make the smart choice. You'll get the exact look, feel, and performance you expect. Shop genuine Wrangler parts at the highly competitive prices online. Enjoy a manufacturer's warranty, a hassle-free return policy, and rapid delivery. No more guesswork with off brands. Get genuine parts with exact fit and true factory performance. Shop with confidence today at JeepPartsDeal.com.
Common to most automobiles, the Parking Brake Shoe in Jeep Wrangler is important since it immobilizes the wheels of a parked car. This is attained through brake lining that rubs on the drum wall and which creates friction hence preventing the wheels from moving when the parking brake is applied. Different designs of Parking Brake Shoe have been used over the years in Jeep Wrangler models with an aim of improving on their performance and durability. Despite the lack of differentiation between these types, changes in the development of the Parking Brake Shoe relates to the improvement of the braking system and car design for safe usage and reliable operation of Jeep Wrangler.
Jeep Wrangler Parking Brake Shoe Parts and Q&A
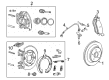
- Q: How to Remove and Replace a Parking Brake Shoe on Jeep Wrangler?A:When changing the parking brake shoe, start by raising and supporting the car, taking the wheel and tire off. After that, take the disc brake caliper adapter off and then remove the disc brake rotor. After that, take out the wheel speed sensor (3) and the center floor console. At the lever, lock out the park brake system with a proper tool (1) as you pull the brake cable up (3). Eliminate both the rear Parking Brake Cables (2) from the equalizer and the parking brake cable (1) from the axle brake shoe lever (2). Pull out the Axle Shaft (1) and rap the seal plate (1) from the brake support on the axle shaft (2) with a hammer. Unplug the support plate with the brake shoes (1) from the axle shaft (1) and take out the rear park brake shoes.
- Q: How to Maintain and Fix a Parking Brake Shoe on Jeep Wrangler?A:First, lift and prop up the vehicle, wheel off the tire and remove the wheel assembly, then the Brake Caliper and the brake rotor. Detach the rear park brake shoes and use either water-soaked cloth or brake cleaner to wash the individual brake components and the support plate exterior, making sure not to use other chemicals. If you see light rust and scale on the brake shoe contact pads, use very fine sandpaper to take them off the support plate. Riveted brake shoes are changed at 0.78 mm (1/32 in.) from the rivet head and bonded lining is updated when the worn area reaches 1.6 mm (1/16 in.). Screening for bent shoes or a tapered drum involves comparing the lining contact to the drum. The contact should cover the entire width of the lining-if it doesn't, the pointed drum may cause the shoes to wear on one side and should be replaced. Inspect all the parts of the adjuster screw assembly. If you see damage to the star wheel or threads or if the assembly is very rusted, replace it. Remove springs or retainer clips that are bent or worn and change all springs if you experience brake drag, since very hot brakes can make the springs bend. Check the brake shoe contact pads on the support plate. If any pads are out of shape or large parts are missing, then replace the support plate. When reassembling, first prove your rear park brake shoes, then adjust them, fit the disc brake rotor and caliper, after that fix the wheel and tire and finally bring your car back to the ground. Taking a stop from 25 mph on dry concrete or pavement using a moderate touch on the parking brake lever is recommended after lining replacement or upon purchase of a new vehicle.


Related Jeep Wrangler Parts
 Jeep Wrangler Brake Caliper
 Jeep Wrangler Brake Line
 Jeep Wrangler ABS Control Module
 Jeep Wrangler Parking Brake Cable
 Jeep Wrangler Wheel Cylinder
 Jeep Wrangler Wheel Stud
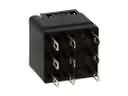 Jeep Wrangler ABS Relay
 Jeep Wrangler Brake Caliper Bolt
 Jeep Wrangler Brake Caliper Bracket
 Jeep Wrangler Brake Caliper Piston
 Jeep Wrangler Brake Disc
 Jeep Wrangler Brake Proportioning Valve