JeepParts
My Garage
My Account
Cart
OEM Jeep Wrangler Radiator
Cooling Radiator- Select Vehicle by Model
- Select Vehicle by VIN
Select Vehicle by Model
orMake
Model
Year
Select Vehicle by VIN
For the most accurate results, select vehicle by your VIN (Vehicle Identification Number).
23 Radiators found


Jeep Wrangler Radiator Part Number: 68143886AA
$444.26 MSRP: $649.00You Save: $204.74 (32%)

Jeep Wrangler Radiator, Front Part Number: 68314786AC
$295.04 MSRP: $445.00You Save: $149.96 (34%)Ships in 1-2 Business Days
Jeep Wrangler Auxiliary Radiator Part Number: 68541729AA
$169.58 MSRP: $223.00You Save: $53.42 (24%)
Jeep Wrangler Radiator Assembly Part Number: 68272749AF
$269.85 MSRP: $568.00You Save: $298.15 (53%)
Jeep Wrangler Radiator Assembly, Front Part Number: 68283398AF
$722.67 MSRP: $1095.00You Save: $372.33 (34%)Ships in 1-2 Business Days
Jeep Wrangler Auxiliary Radiator Part Number: 68568795AA
$168.45 MSRP: $252.00You Save: $83.55 (34%)Ships in 1-2 Business Days

Jeep Wrangler Radiator Assembly Part Number: 68541836AA
$455.26 MSRP: $687.00You Save: $231.74 (34%)Ships in 1-2 Business DaysJeep Wrangler Radiator Assembly Part Number: 68272750AF
$530.40 MSRP: $800.00You Save: $269.60 (34%)
Jeep Wrangler Radiator Assembly Part Number: 68541835AA
$576.81 MSRP: $870.00You Save: $293.19 (34%)Ships in 1-2 Business Days
Jeep Wrangler Auxiliary Radiator, Front Part Number: 68335909AC
$122.41 MSRP: $182.00You Save: $59.59 (33%)Ships in 1-2 Business Days
Jeep Wrangler Radiator Assembly Part Number: 68400268AD
$331.32 MSRP: $442.00You Save: $110.68 (26%)Ships in 1-2 Business Days


Jeep Wrangler Radiator Part Number: 55037652AA


Jeep Wrangler Radiator Part Number: 55037653AB


Jeep Wrangler Radiator Part Number: 55037653AC


Jeep Wrangler Radiator Part Number: 55037654AB

Jeep Wrangler Radiator Part Number: 68481174AB
$223.20 MSRP: $329.00You Save: $105.80 (33%)Jeep Wrangler Radiator Assembly Part Number: 68400269AD
$312.71 MSRP: $460.00You Save: $147.29 (33%)
Jeep Wrangler Radiator Assembly Part Number: 68481138AB
$808.37 MSRP: $1180.00You Save: $371.63 (32%)
Jeep Wrangler Radiator Part Number: 52028112AC
Jeep Wrangler Radiator Part Number: 52028120AC
| Page 1 of 2 |Next >
1-20 of 23 Results
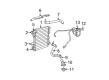
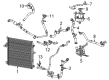
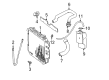
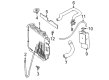
Jeep Wrangler Radiator
Choose OEM Radiator that meet Jeep factory standards. Jeep designs and tests every component for precision and durability. Each Radiator follows strict manufacturing steps to lock in quality and fit. If your Jeep Wrangler matters to you, OEM parts make the smart choice. You'll get the exact look, feel, and performance you expect. Shop genuine Wrangler parts at the highly competitive prices online. Enjoy a manufacturer's warranty, a hassle-free return policy, and rapid delivery. No more guesswork with off brands. Get genuine parts with exact fit and true factory performance. Shop with confidence today at JeepPartsDeal.com.
Jeep Wrangler Radiator is another vital part of the car which plays the role of cooling the hot coolant of the car engine in order to have a proper working temperature. When the inner conditions of the radiator are wrong, the automobile will present some obvious symptoms such as overheating, rust, leakage, and so on, which will bring certain risks to the engine running. Thus, the repeated inspection of the equipment is suggested to detect difficulties in the initial stages. It is beneficial to use radiator sealants in case of emergencies, but its consequence is that the coil of the thermostat will have to be coated and this will affect the cooling ability. To also free it up from trapped air, it is recommended to bleed the radiator every three month. Furthermore, rubbing it with silver and gold polisher has also been found to clean up nickel plated radiator and make it to shine again.
Jeep Wrangler Radiator Parts and Q&A
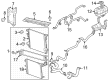
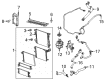
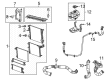
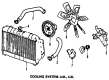
- Q: How to Effectively Service and Repair a Radiator on Jeep Wrangler?A:The first thing to do when servicing the radiator is to remove the negative Battery Cable and take off the Radiator Cap, to ensure the system is safe by making sure it is not hot. Unscrew the lower seal from the lower core support, put a drain pan below the draincock and drain the radiator. You can keep any clean coolant for future use. Then, take out the top hose clamp and hose, then remove the lower ones and unhook the coolant reserve/overflow tank hose from the radiator. Unfasten the four bolts that secure the shroud to the car and, if necessary, tie back the power steering fluid reservoir tank, then return the shroud on top of the fan. Should you have the radiator cooler, separate and safely pull the lines, then remove the six bolts holding the radiator. Leave the front axle vent hose on the radiator. Raise the radiator straight out of the car, making sure to remember the place of the rubber seals on the top and bottom for installation again. To fit the radiator, place it and tighten each of its six mounting bolts to 8 Nm (72 inch lbs.) torque before closing the draincock. Lift up the fan shroud and the power steering reservoir tank, tighten the bolts to 8 Nm (72 inch lbs.) and secure them back into position. Should the equipment need this, take out the plugs and join the automatic transmission fluid cooler lines as well as the constant tension clamps. Attach the radiator hoses and put in the hose clamps; next, slip on the condenser lower seal. Secure the negative battery cable, add the proper coolant to your cooling system and then link the hose on your coolant recovery bottle. When everything is done, attach the new radiator cap, see if you have an automatic transmission, adjust its fluid level if so, start the engine and check for leaks.
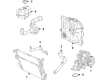
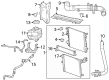
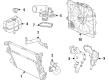
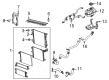
- Q: How to Remove the Radiator from an Engine Cooling System on Jeep Wrangler?A:Before getting rid of the engine cooling radiator, ensure you take out the negative Battery Cable. Leave the fridge to cool and then pour out the liquid in the cooling system into a new container. After that, take out the cooling container and then take off the radiator upper seal and electric cooling fan. With that done, remove the lower radiator seal and the lower radiator hose. Disconnect the front grill from the bumper, remove the two A/C Condenser mounting bolts and lift the A/C condenser out of the J-clips. Relax the Horn mount bolt and gently turn the horn to one side and then remove the A/C tubing bracket bolt. After that, take out the radiator mounting bolts. At the bottom of the radiator, alignment dowels are contained inside the radiator tank and slot into the rubber grommets pressed on the radiator crossmember. Lift the radiator out of the vehicle remembering to carefully avoid hurting the fins. Remember to put the rubber seals on top and bottom of the radiator back into their original places after you have removed them to avoid overheating.


Related Jeep Wrangler Parts
 Jeep Wrangler Thermostat
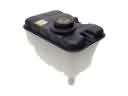 Jeep Wrangler Coolant Reservoir
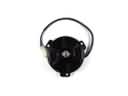 Jeep Wrangler Fan Motor
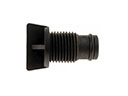 Jeep Wrangler Radiator Drain Plug
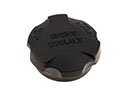 Jeep Wrangler Coolant Reservoir Cap
 Jeep Wrangler Coolant Reservoir Hose
 Jeep Wrangler Cooling Hose
 Jeep Wrangler Oil Cooler Hose
 Jeep Wrangler Thermostat Gasket
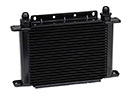 Jeep Wrangler Transmission Oil Cooler
 Jeep Wrangler Water Pump Gasket
 Jeep Wrangler Water Pump Pulley