JeepParts
My Garage
My Account
Cart
OEM 2005 Jeep Grand Cherokee A/C Accumulator
Accumulator- Select Vehicle by Model
- Select Vehicle by VIN
Select Vehicle by Model
orMake
Model
Year
Select Vehicle by VIN
For the most accurate results, select vehicle by your VIN (Vehicle Identification Number).
1 A/C Accumulator found


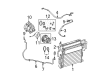
2005 Jeep Grand Cherokee Drier Part Number: 55038085AA
$112.62 MSRP: $170.00You Save: $57.38 (34%)Ships in 1-2 Business DaysProduct Specifications- Other Name: Line - Receiver; A/C Accumulator; Drier Desiccant Element; A/C Receiver Drier; Accumulator; Drier Receiver Includes: Liquid Line To Condenser; Drier Receiver
- Replaces: 55116723AE, 55116723AC, 55116723AD
- Item Weight: 3.00 Pounds
- Item Dimensions: 17.7 x 10.5 x 10.6 inches
- Condition: New
- Fitment Type: Direct Replacement
- SKU: 55038085AA
- Warranty: This genuine part is guaranteed by Mopar's factory warranty.
2005 Jeep Grand Cherokee A/C Accumulator Parts and Q&A
- Q: How to Service and Repair an A/C Accumulator on 2005 Jeep Grand Cherokee?A: Before servicing or repairing the A/C accumulator, pull out the refrigerant from the refrigerant system and disconnect the negative battery cable. Take out the grille, air cleaner housing, and air inlet tube. Then, unfasten the nut connecting the A/C liquid line to the A/C accumulator, separate the A/C line, and properly dispose of the dual-plane seal. Unscrew the nut keeping the A/C accumulator secured to the A/C condenser, remove the retaining screw that secures it to the radiator/fan shroud, and disconnect the A/C accumulator from the condenser, tossing out the dual-plane gasket. Put tape or plugs over the fitting for the A/C accumulator, the port, and the condenser port so that nothing gets inside while you're working. When mounting a new A/C accumulator, pour 30 milliliters of compatible refrigerant oil into the coolant. With the A/C accumulator positioned in the engine compartment, remove any tape or plugs from the A/C accumulator fitting and port; also remove any from the port on the A/C condenser. Apply a small amount of clean refrigerant oil to a new dual-plane seal and work it onto the A/C accumulator fitting with the recommended type of seal designed for an R-134a system. Link the A/C accumulator to the far end of the A/C condenser and tighten the securing nut to 20 N.m. Connect a screw to the A/C accumulator and secure it to the radiator and fan shroud, making sure to tighten that screw to 5 N.m. Use clean oil on a new dual-plane seal and attach it to the A/C liquid line, then fit the securing nut, tightening to 20 N.m. Restore the air cleaner and tube, plus the grille, and place the negative battery cable back on. After that, evacuate the gas and then charge the refrigerant parts.
Related 2005 Jeep Grand Cherokee Parts
 2005 Jeep Grand Cherokee Blend Door Actuator
 2005 Jeep Grand Cherokee Blower Motor
 2005 Jeep Grand Cherokee Heater Core
 2005 Jeep Grand Cherokee Evaporator
 2005 Jeep Grand Cherokee A/C Condenser
 2005 Jeep Grand Cherokee A/C Clutch
 2005 Jeep Grand Cherokee A/C Compressor
 2005 Jeep Grand Cherokee A/C Expansion Valve
 2005 Jeep Grand Cherokee A/C Hose
 2005 Jeep Grand Cherokee A/C Service Cap
 2005 Jeep Grand Cherokee A/C System Valve Core
 2005 Jeep Grand Cherokee HVAC Pressure Switch