JeepParts
My Garage
My Account
Cart
OEM Jeep Grand Cherokee A/C Accumulator
Accumulator- Select Vehicle by Model
- Select Vehicle by VIN
Select Vehicle by Model
orMake
Model
Year
Select Vehicle by VIN
For the most accurate results, select vehicle by your VIN (Vehicle Identification Number).
13 A/C Accumulators found


Jeep Grand Cherokee Drier Part Number: 55038085AA
$112.62 MSRP: $170.00You Save: $57.38 (34%)Ships in 1-2 Business Days
Jeep Grand Cherokee Dehydrator Part Number: 68376233AA
$84.46 MSRP: $128.00You Save: $43.54 (35%)Ships in 1-2 Business Days
Jeep Grand Cherokee Drier Part Number: 55115910AC
$202.81 MSRP: $299.00You Save: $96.19 (33%)Ships in 1-2 Business Days
Jeep Grand Cherokee Drier Part Number: 68084180AA
$173.35 MSRP: $255.00You Save: $81.65 (33%)
Jeep Grand Cherokee Dehydrator Part Number: 68545935AA
$41.12 MSRP: $59.15You Save: $18.03 (31%)
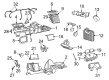
Jeep Grand Cherokee Dash Control Unit Part Number: 55036152

Jeep Grand Cherokee Drier Part Number: 68054877AA
$245.86 MSRP: $366.00You Save: $120.14 (33%)
Jeep Grand Cherokee Receiver Part Number: 55116120

Jeep Grand Cherokee Receiver Part Number: 4740773
Jeep Grand Cherokee Receiver Part Number: 4740767
Jeep Grand Cherokee Receiver Part Number: 4720847
Jeep Grand Cherokee Accumulator Part Number: 55115909AC
Jeep Grand Cherokee Accumulator Part Number: 68054875AA
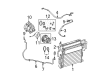
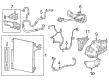
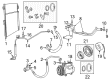
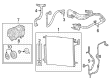
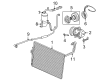
Jeep Grand Cherokee A/C Accumulator
Choose OEM A/C Accumulator that meet Jeep factory standards. Jeep designs and tests every component for precision and durability. Each A/C Accumulator follows strict manufacturing steps to lock in quality and fit. If your Jeep Grand Cherokee matters to you, OEM parts make the smart choice. You'll get the exact look, feel, and performance you expect. Shop genuine Grand Cherokee parts at the highly competitive prices online. Enjoy a manufacturer's warranty, a hassle-free return policy, and rapid delivery. No more guesswork with off brands. Get genuine parts with exact fit and true factory performance. Shop with confidence today at JeepPartsDeal.com.
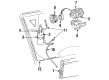
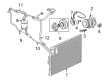
The fac Lever A/C Accumulator installed in Jeep Grand Cherokee plays an important part in not only the performance but also the life and the durability of the air conditioning system. Its main task is to clean the system and excess moisture so as to protect the subcomponents of the A/C system. There are passages in this cylindrical part which interconnect the component with the condenser and expansion valve to help in the circulation of refrigerant. For several years various types of A/C Accumulator have been fitted to Jeep Grand Cherokee vehicles, which, have been developed to improve efficiency and longevity. The overall function is kept constant but there exist some variations in aspects of the design or the material that defines it, this may be as a result of change in technology, or changes in characteristics of vehicles. In general, the A/C Accumulator plays an important role of keeping the Jeep Grand Cherokee A/C system in the optimal state.
Jeep Grand Cherokee A/C Accumulator Parts and Q&A
- Q: How to Remove the A/C Accumulator on Jeep Grand Cherokee?A:Before you remove the A/C accumulator, cut the negative cable from the battery first. Following this, extract the refrigerant from the refrigerant system. Once that's done, the next action is to remove the Grille, then the air cleaner housing and the air inlet tube. Get rid of the nut fixing the A/C liquid line to the A/C accumulator, after which you can take out the A/C liquid line and dispose of the dual-plane seal. Take off the screw that holds the A/C accumulator to the Radiator and fan shroud and remove the nut that attaches it to the A/C Condenser. Unplug the accumulator from the air conditioner condenser and throw out the dual-plane seal. Also, make certain to install a plug or cover in or over the accumulator fittings as well as in the condenser port.
- Q: How to Service and Repair an A/C Accumulator on Jeep Grand Cherokee?A:Begin the servicing and repair of an accumulator HVAC by first taking time to study all necessary warnings and cautions. Any problems with either the suction line from the evaporator outlet tube to the accumulator or the line from the accumulator to the compressor manifold mean the whole accumulator must be changed. Refrigerator plumbing should be free of sharp bends as they reduce the refrigerator's capacity; always ensure the bend is ten times the hose diameter and the line is a safe distance from the exhaust manifold. Because of the high pressure in the refrigeration system, all connections must be sealed and annual checks of flexible hoses are recommended. First, disconnect the negative Battery Cable, take out the low pressure cycling clutch switch from the accumulator, remove the refrigerant from the system, disconnect the evaporator outlet tube's refrigerant piping fitting and seal or tape all uncovered fittings. Following this, take out the screw connecting the suction line block fitting to the compressor manifold, weaken the screw holding the support bracket and take away the accumulator. When you install the accumulator, put it through the support bracket band, line it up to the notch and tighten the clamp screw to 12 Nm (105 in. lbs.). Attach the suction line block fitting back to the compressor manifold, set the screw to 28 Nm (250 in. lbs.) and take off any tape or plugs from the refrigerant-line fittings. Set up the low pressure cycling clutch switch on the accumulator fitting, reconnect the negative battery terminal, purge the system of refrigerant and top up the lines with it. When the accumulator is changed, include 120 ml (4 fluid ounces) of refrigerant oil into the refrigerator.


Related Jeep Grand Cherokee Parts
 Jeep Grand Cherokee Cabin Air Filter
 Jeep Grand Cherokee Blend Door Actuator
 Jeep Grand Cherokee Blower Motor
 Jeep Grand Cherokee Heater Core
 Jeep Grand Cherokee Evaporator
 Jeep Grand Cherokee A/C Condenser
 Jeep Grand Cherokee A/C Compressor
 Jeep Grand Cherokee A/C Compressor Clutch
 Jeep Grand Cherokee A/C Hose
 Jeep Grand Cherokee A/C Service Cap
 Jeep Grand Cherokee A/C System Valve Core
 Jeep Grand Cherokee HVAC Pressure Switch