JeepParts
My Garage
My Account
Cart
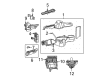
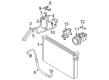
OEM 2006 Chrysler Pacifica A/C Hose
Air Conditioning Hose- Select Vehicle by Model
- Select Vehicle by VIN
Select Vehicle by Model
orMake
Model
Year
Select Vehicle by VIN
For the most accurate results, select vehicle by your VIN (Vehicle Identification Number).
7 A/C Hoses found

2006 Chrysler Pacifica A/C Hoses Part Number: 5005068AE
$6.19 MSRP: $35.55You Save: $29.36 (83%)Ships in 1-2 Business DaysProduct Specifications- Other Name: Line - A/C Discharge; A/C Refrigerant Discharge Hose; A/C Refrigerant Liquid Hose; A/C Hose; Discharge Line
- Replaces: 5005068AC, 5005068AD
- Item Weight: 0.50 Pounds
- Item Dimensions: 24.2 x 3.2 x 1.0 inches
- Condition: New
- Fitment Type: Direct Replacement
- SKU: 5005068AE
- Warranty: This genuine part is guaranteed by Mopar's factory warranty.
2006 Chrysler Pacifica A/C Hoses Part Number: 5005271AE
$43.04 MSRP: $90.05You Save: $47.01 (53%)Ships in 1-2 Business DaysProduct Specifications- Other Name: Line - A/C Discharge; A/C Refrigerant Liquid Hose; A/C Hose
- Replaced by: 5005271AF
- Item Weight: 0.90 Pounds
- Item Dimensions: 4.2 x 5.8 x 24.5 inches
- Condition: New
- Fitment Type: Direct Replacement
- SKU: 5005271AE
- Warranty: This genuine part is guaranteed by Mopar's factory warranty.


2006 Chrysler Pacifica A/C Hoses Part Number: 5103430AA
Product Specifications- Other Name: Line - A/C Liquid; A/C Refrigerant Liquid Hose; A/C Hose; Liquid Line; Line A/C Liquid Drier To Condenser
- Item Weight: 0.90 Pounds
- Item Dimensions: 32.9 x 9.1 x 5.0 inches
- Condition: New
- Fitment Type: Direct Replacement
- SKU: 5103430AA
- Warranty: This genuine part is guaranteed by Mopar's factory warranty.
2006 Chrysler Pacifica Discharge Line Part Number: 5005271AF
Product Specifications- Other Name: Line - A/C Discharge; A/C Refrigerant Discharge Hose; A/C Refrigerant Liquid Hose; A/C Hose
- Replaces: 5005271AC, 5005271AE, 5005271AD
- Item Weight: 0.90 Pounds
- Item Dimensions: 24.0 x 5.9 x 4.3 inches
- Condition: New
- Fitment Type: Direct Replacement
- SKU: 5005271AF
- Warranty: This genuine part is guaranteed by Mopar's factory warranty.

2006 Chrysler Pacifica A/C Hoses Part Number: 68002822AA
Product Specifications- Other Name: Line - A/C Suction; A/C Refrigerant Suction Hose; A/C Refrigerant Liquid Hose; A/C Hose; Suction Line; Line A/C Suction
- Item Weight: 1.60 Pounds
- Item Dimensions: 43.8 x 10.6 x 5.1 inches
- Condition: New
- Fitment Type: Direct Replacement
- SKU: 68002822AA
- Warranty: This genuine part is guaranteed by Mopar's factory warranty.

2006 Chrysler Pacifica A/C Hoses Part Number: 5103432AA
Product Specifications- Other Name: Line - A/C Liquid; A/C Refrigerant Liquid Hose; A/C Hose; Liquid Line; Line A/C Liquid Drier To Expansion Valve
- Condition: New
- Fitment Type: Direct Replacement
- SKU: 5103432AA
- Warranty: This genuine part is guaranteed by Mopar's factory warranty.
2006 Chrysler Pacifica Suction Line Part Number: 5103431AA
Product Specifications- Other Name: Line - A/C Suction; A/C Refrigerant Suction Hose; A/C Refrigerant Liquid Hose; A/C Hose; Line A/C Suction
- Item Weight: 1.50 Pounds
- Item Dimensions: 38.6 x 12.6 x 6.0 inches
- Condition: New
- Fitment Type: Direct Replacement
- SKU: 5103431AA
- Warranty: This genuine part is guaranteed by Mopar's factory warranty.
2006 Chrysler Pacifica A/C Hose Parts and Q&A
- Q: How to Service and Repair an A/C Hose in an HVAC System on 2006 Chrysler Pacifica?A: To handle the A/C liquid line which forms the front by going from the condenser to the receiver/drier and the rear from the receiver/drier to the expansion valve, start with making sure the refrigerant is recovered from the system and the negative battery cable has been disconnected. Removing the air cleaner, the front fascia and the radiator sight shield assembly with all its pins, along with the radiator air seal on the right. After that, pull the nut securing the A/C line to the A/C condenser free, unhook the line and throw away the O-ring seal and gasket. Use plugs to fill in your openings or put tape over the equipment. Unclip the clip that holds the refrigerant line, remove the bolt securing the front section to the receiver/drier, disconnect the line and throw away the O-ring seal before removing the front part from the engine area. In the rear section, drain the refrigerant as well, remove the positive and negative battery terminals, take off the air cleaner housing and unhook the A/C pressure transducer. Get rid of the clip that holds the suction and liquid lines to the expansion valve, unlink the two lines and toss out the O-ring seals. Loosen the cable tie wrapped around the rear section, remove the bolt securing that section to the receiver/drier and disconnect everything from both the receiver/drier and A/C expansion valve. For the front part, place it in the engine compartment, remove the tapes or plugs, lubricate the O-ring seal with clean refrigerant oil, fit it to the liquid line fitting and screw it to the receiver/drier in 11 N.m (100 in. lbs.) of torque. Attach one end of the line to the routing clip, join it to the A/C condenser and tighten the nut to 23 N.m (17 ft. lbs.). After that, fit the right side radiator air seal, radiator sight shield, front fascia and air cleaner housing before you reconnect the negative battery cable. Pull out the vehicular and charge the refrigerant system. For the rear assembly, place it on the engine in the engine compartment, remove whatever is keeping the O-ring sealed, put new O-ring seals inside and hook the liquid and suction lines up to the A/C expansion valve, tightening the nut to a torque of 23 N.m (17 ft. lbs.). Apply lubricant, slip in the new O-ring seal, join the liquid line fitting to the receiver/drier and tighten the bolt using 11 N.m (100 in. lbs.). Set up the A/C pressure transducer and air cleaner housing, re-link up the negative battery cable and repeat the process of depressurizing and charging the refrigerant.
Related 2006 Chrysler Pacifica Parts
 2006 Chrysler Pacifica Cabin Air Filter
 2006 Chrysler Pacifica Blend Door Actuator
 2006 Chrysler Pacifica Blower Motor
 2006 Chrysler Pacifica A/C Accumulator
 2006 Chrysler Pacifica A/C Clutch
 2006 Chrysler Pacifica A/C Compressor
 2006 Chrysler Pacifica A/C Expansion Valve
 2006 Chrysler Pacifica A/C Switch
 2006 Chrysler Pacifica Blower Control Switches
 2006 Chrysler Pacifica Evaporator
 2006 Chrysler Pacifica Heater Core
 2006 Chrysler Pacifica HVAC Pressure Switch