JeepParts
My Garage
My Account
Cart
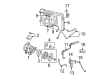
OEM 2006 Dodge Durango A/C Condenser
Air Conditioning Condenser- Select Vehicle by Model
- Select Vehicle by VIN
Select Vehicle by Model
orMake
Model
Year
Select Vehicle by VIN
For the most accurate results, select vehicle by your VIN (Vehicle Identification Number).
1 A/C Condenser found


2006 Dodge Durango Condenser Part Number: 55056165AB
$89.92 MSRP: $110.00You Save: $20.08 (19%)Ships in 1-2 Business DaysProduct Specifications- Other Name: Condenser - A/C; A/C Condenser
- Replaces: 55056165AA
- Item Weight: 9.50 Pounds
- Item Dimensions: 43.5 x 17.5 x 3.7 inches
- Condition: New
- Fitment Type: Direct Replacement
- SKU: 55056165AB
- Warranty: This genuine part is guaranteed by Mopar's factory warranty.
2006 Dodge Durango A/C Condenser Parts and Q&A
- Q: How to Remove and Install an A/C Condenser on 2006 Dodge Durango?A: Before the A/C condenser is removed, empty the refrigerant from the system and unplug the negative battery cable. Take out the push-pins, the upper condenser/radiator seal and then disconnect the connectors on the wire harnesses for the fan and transducer. Get rid of the two retainers from the condenser fan shroud and move the wire harness so it's not in your way. Following that, break free the nuts holding the A/C discharge line and A/C liquid line to the A/C condenser, disconnect the lines and throw away the O-ring seals and the gaskets. Delink the A/C discharge line from its holder on the condenser fan shroud and cover both the opened line and port with plugs or tape. Take out the three bolts holding the upper radiator support to the upper front crossmember, then remove the support and place the radiator overflow hose out of the path of work. Take out the bolt attaching the condenser/cooling fan assembly to the upper left fender rail, ease the radiator back so it's out of the way, then pull the fan assembly away from the engine. Attach the assembly to a workbench and get rid of the screws that connect the A/C condenser to the condenser fan shroud. When placing a new A/C condenser, install 30 milliliters of refrigerant oil in the system. Set the A/C condenser into place in the condenser fan shroud and secure it with the two bolts, turning them no more than 5 N.m. Pull the radiator back to make room and fit the condenser/cooling fan assembly into its lower tabs in the front lower crossmember. Put the bolt on the left upper fender rail and tighten it to 9.5 N.m. Place the radiator overflow hose in its correct place, fit the upper mounting tab of the assembly into the hole on the top of the radiator support and add the upper radiator support. Install three bolts into the upper radiator support and tighten them to 23 N.m. Remove any tape or plugs from the discharge and liquid line fittings and condenser, apply oil to the rubber seals and add the seals along with the new gaskets. Next, join both the A/C discharge line and the liquid line to the condenser and attach the nuts so the lines remain fixed, tighten them until you reach 22 nm. After that, fit the discharge line into the retainer on the condenser fan shroud and place the wire harnesses there too, tighten all the wire harness retainers to the shroud with a torque wrench. Match the wire harness connectors with the condenser cooling fan motor and the A/C pressure transducer, fit the top seal between the condenser and radiator and click in each push-pin retainer. Reattach the negative battery cable, remove all the refrigerant from the system and put it back in with a charge.
Related 2006 Dodge Durango Parts
 2006 Dodge Durango Blower Motor
 2006 Dodge Durango Heater Core
 2006 Dodge Durango Blower Motor Resistor
 2006 Dodge Durango A/C Accumulator
 2006 Dodge Durango A/C Clutch
 2006 Dodge Durango A/C Compressor
 2006 Dodge Durango A/C Expansion Valve
 2006 Dodge Durango A/C Hose
 2006 Dodge Durango A/C Service Cap
 2006 Dodge Durango A/C Switch
 2006 Dodge Durango Blower Control Switches
 2006 Dodge Durango HVAC Pressure Switch