JeepParts
My Garage
My Account
Cart
OEM Chrysler PT Cruiser Shock Absorber
Suspension Shock Absorber- Select Vehicle by Model
- Select Vehicle by VIN
Select Vehicle by Model
orMake
Model
Year
Select Vehicle by VIN
For the most accurate results, select vehicle by your VIN (Vehicle Identification Number).
7 Shock Absorbers found


Chrysler PT Cruiser Shock Absorber, Rear Part Number: 5105114AC
$40.21 MSRP: $148.00You Save: $107.79 (73%)Ships in 1-2 Business DaysChrysler PT Cruiser Shock Absorber, Rear Part Number: 4656678AI
$71.38 MSRP: $159.00You Save: $87.62 (56%)Ships in 1-2 Business DaysChrysler PT Cruiser Shock, Rear Part Number: 4656612AH
$68.07 MSRP: $102.00You Save: $33.93 (34%)Ships in 1-2 Business DaysChrysler PT Cruiser Shock Absorber, Rear Part Number: 4656439AH
$115.77 MSRP: $153.00You Save: $37.23 (25%)Ships in 1-2 Business Days

Chrysler PT Cruiser Shock Absorber, Rear Part Number: 5105115AC
Chrysler PT Cruiser Shock Absorber, Rear Part Number: 5085324AC
Chrysler PT Cruiser Shock Absorber, Rear Part Number: 5272982AF
Chrysler PT Cruiser Shock Absorber
Choose OEM Shock Absorber that meet Chrysler factory standards. Chrysler designs and tests every component for precision and durability. Each Shock Absorber follows strict manufacturing steps to lock in quality and fit. If your Chrysler PT Cruiser matters to you, OEM parts make the smart choice. You'll get the exact look, feel, and performance you expect. Shop genuine PT Cruiser parts at the highly competitive prices online. Enjoy a manufacturer's warranty, a hassle-free return policy, and rapid delivery. No more guesswork with off brands. Get genuine parts with exact fit and true factory performance. Shop with confidence today at JeepPartsDeal.com.
A Shock Absorber is an important component of Chrysler PT Cruiser vehicles that is used in the suspension system of a car, together with struts. These mechanical or hydraulic devices take shocks impulses, kinetic energy and transform it all into heat to enhance ride quality and control. For instance, Chrysler PT Cruiser Shock Absorbers have developed from twin tube shocks to mono tube ones due to the enhancement of performance as well as durability. Special features such asp-Position Sensitive Damping (PSD) and Acceleration Sensitive Damping (ASD) takes the Shock Absorber to new levels of tune, making it even more apt for the roads it is designed to traverse.
Chrysler PT Cruiser Shock Absorber Parts and Q&A
- Q: How to Remove a Shock Absorber from a Strut Assembly on Chrysler PT Cruiser?A:For the strut assembly to be dismantled, it must be taken from the car or truck first. You should use a strut spring compressor, teamPSE tool 223-7400 or another tool of the same type to compress the spring after reading the manufacturer's instructions carefully. Be sure not to take out the strut shaft nut first, as the coil spring is still under pressure and must have the upper mount and pivot bearing lower before you can do so. If either side is serviced, take note of which spring and strut goes with which side. While setting the strut coil spring compressor, slide the whole strut assembly in and line up the lower hooks and strut clevis bracket on the outside. Hold the strut in position by clamping the lower end of the coil spring after you've removed the nut from the strut shaft. Put the top hooks on the coil spring and push on the spring until you can move the top mount freely. Replacement of the strut internal bearings only adds to the overall cost, so avoid using tools that could impact them. After compressing the spring, place Strut Nut Wrench 6864 onto the strut shaft retaining nut and remove it by holding the shaft. After that, get rid of the upper mount, then unfasten the upper spring seat and bearing along with the upper spring isolator from the strut. Ease the dust shield and jounce bumper off the shaft of the strut, then pull the clamp off the coil spring and remove the strut by lifting from the coil spring's base. Take out the lower spring isolator from the fitting underneath the lower spring seat on the strut. To service the coil spring, fully back off the compressor drive, pull the compressor hook back and then remove the coil. Check the strut assembly parts for tightness in the shaft, any noticeable cracks, bending or wear and damage on the jounce bumper, top mount, top spring seat, dust shield, spring isolators and coating on the coil spring, replacing what needs to be replaced.
- Q: How to Properly Install a Shock Absorber on Chrysler PT Cruiser?A:Start by attaching the top shock absorber eye to the body bracket with the upper mounting bolt, but don't tighten it completely yet. Keep turning the jack until you can place the shock absorber lower mounting bolt through the axle flange and the shock absorber lower mounting eye. Next, fit the washer and nut onto the lower mounting bolt, tighten it to 88 Nm and end by tightening the upper shock absorber mounting bolt to 99 Nm. Take out the jack, set the tire and wheel assembly into place and tighten all the wheel mounting nuts to 135 Nm (100 ft. lbs.), before you lower the car.

Related Chrysler PT Cruiser Parts
 Chrysler PT Cruiser Wheel Bearing
 Chrysler PT Cruiser Wheel Hub
 Chrysler PT Cruiser Ball Joint
 Chrysler PT Cruiser Coil Springs
 Chrysler PT Cruiser Control Arm Bushing
 Chrysler PT Cruiser Spindle
 Chrysler PT Cruiser Steering Knuckle
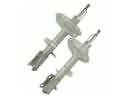 Chrysler PT Cruiser Strut Housing
 Chrysler PT Cruiser Strut Mounts
 Chrysler PT Cruiser Sway Bar Bushing
 Chrysler PT Cruiser Sway Bar Link Bushing
 Chrysler PT Cruiser Sway Bars