JeepParts
My Garage
My Account
Cart
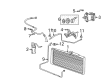
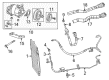
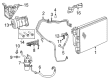
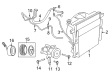
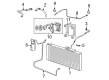
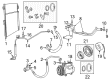
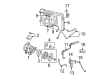
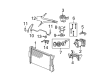
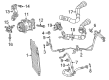
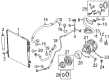
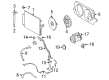
OEM Dodge A/C Compressor
Air Conditioning Compressor- Select Vehicle by Model
- Select Vehicle by VIN
Select Vehicle by Model
orMake
Model
Year
Select Vehicle by VIN
For the most accurate results, select vehicle by your VIN (Vehicle Identification Number).
124 A/C Compressors found


Dodge Compressor Part Number: 55055339AH
$588.91 MSRP: $887.00You Save: $298.09 (34%)Ships in 1-3 Business DaysProduct Specifications- Other Name: Compressor - A/C; A/C Compressor; Compressor A/C
- Replaces: 55055339AI, 55055339AG, 55055339AE, 55055339AD, 55055339AF


Dodge Compressor Part Number: 68193949AA
$608.80 MSRP: $917.00You Save: $308.20 (34%)Ships in 1-2 Business DaysProduct Specifications- Other Name: Compressor - A/C; A/C Compressor; Compressor A/C


Dodge Compressor Part Number: 55111410AF
$638.64 MSRP: $962.00You Save: $323.36 (34%)Ships in 1-2 Business DaysProduct Specifications- Other Name: Compressor - A/C; A/C Compressor; Compressor A/C Complete
- Replaced by: 55111410AG
- Replaces: 55111410AE, R5111410AE, 55111410AD, RL111410AE


Dodge Compressor Part Number: 55111506AC
$552.94 MSRP: $811.00You Save: $258.06 (32%)Ships in 1-3 Business DaysProduct Specifications- Other Name: Compressor - A/C; A/C Compressor
- Replaces: 55111506AA, R5111506AD, RL111506AB, R5111506AC, R5111506AB, 55111506AB


Dodge Compressor Part Number: 55111411AH
$654.85 MSRP: $957.00You Save: $302.15 (32%)Ships in 1-3 Business DaysProduct Specifications- Other Name: Compressor - A/C; A/C Compressor; Compressor A/C With Clutch
- Replaces: 68139057AA, R5111411AM, R5111411AI, R5111411AK, R5111411AL, R5111411AH, 55111411AC, 55111411AG, 55111411AD, 55111411AF, 55111411AE, RL111411AH, R5111411AJ


Dodge Compressor Assembly Part Number: 68294506AC
$760.58 MSRP: $1040.00You Save: $279.42 (27%)Ships in 1-2 Business DaysProduct Specifications- Other Name: Compressor - A/C; A/C Compressor; Compressor; Compressor A/C
- Replaces: 68294506AA, R8021637AD, 68021637AG, 68021637AD, 68294506AB, RL021637AD, 68021637AF, 68021637AE


Dodge Compressor Part Number: 55111440AC
$443.87 MSRP: $539.00You Save: $95.13 (18%)Ships in 1-2 Business DaysProduct Specifications- Other Name: Compressor - A/C; A/C Compressor; Compressor A/C Complete; Compressor A/C
- Replaces: 55111440AB, RL111440AC, R5111440AC


Dodge Dash Control Unit Part Number: 55111610AC
$512.02 MSRP: $1095.00You Save: $582.98 (54%)Ships in 1-2 Business DaysProduct Specifications- Other Name: Compressor - A/C; A/C Compressor; Climate Control Module; Compressor; Compressor A/C
- Replaced by: 55111610AD
- Replaces: RL111610AB, 55111610AB, R5111610AB, 55111610AA

Dodge Compressor Part Number: 55055540AM
$326.47 MSRP: $690.00You Save: $363.53 (53%)Ships in 1-3 Business DaysProduct Specifications- Other Name: Compressor - A/C; A/C Compressor; Compressor A/C
- Replaces: 4849040AD, 55055540AL, 55055540AF, 55055540AG, 55055802AG, 55055802AD, 55055802AF, 55055540AH, 55055540AJ, RL055540AM, V8515540AA, 55055802AE, 4849040AC, 55056241AD, 55055540AE, 55055540AK, 55055540AC, 55055540AI, 55056241AC

Dodge Compressor Part Number: 68193950AA
$403.45 MSRP: $845.00You Save: $441.55 (53%)Ships in 1-2 Business DaysProduct Specifications- Other Name: Compressor - A/C; A/C Compressor; Compressor A/C

Dodge Compressor Part Number: 55111514AG
$550.24 MSRP: $835.00You Save: $284.76 (35%)Ships in 1-2 Business DaysProduct Specifications- Other Name: Compressor - A/C
- Replaces: 55111514AF, 55111514AE, R5111514AB
Dodge Compressor Part Number: 68383659AC
$587.29 MSRP: $859.00You Save: $271.71 (32%)Ships in 1-2 Business DaysProduct Specifications- Other Name: Compressor - A/C; A/C Compressor
- Replaced by: 57009598AA
- Replaces: 68383659AB, 68383659AA

Dodge Compressor - A/C Part Number: 68160395AH
$917.10 MSRP: $1410.00You Save: $492.90 (35%)Ships in 1-2 Business DaysProduct Specifications- Other Name: COMPRESOR-AIR CONDITIONING
- Replaced by: 68160395AI
Dodge Compressor Part Number: 68102839AE
$962.40 MSRP: $1470.00You Save: $507.60 (35%)Ships in 1-2 Business DaysProduct Specifications- Other Name: Compressor - A/C; A/C Compressor
- Replaces: 68102839AD
Dodge Compressor Part Number: 55056288AF
$297.90 MSRP: $440.00You Save: $142.10 (33%)Ships in 1-2 Business DaysProduct Specifications- Other Name: Compressor - A/C
- Replaces: 55056288AD, 55056288AC, R5056288AD, RL056288AD, 55056288AE, 55056288AB
Dodge Compressor Part Number: 55056288AD
$297.90 MSRP: $440.00You Save: $142.10 (33%)Ships in 1-2 Business DaysProduct Specifications- Other Name: Compressor - A/C; A/C Compressor
- Replaced by: 55056288AF


Dodge Compressor Part Number: 55057334AA
Product Specifications- Other Name: Compressor - A/C; A/C Compressor; Compressor A/C


Dodge Compressor Part Number: 68081094AD
Product Specifications- Other Name: Compressor - A/C; A/C Compressor; Compressor A/C


Dodge Compressor Part Number: 68006192AA
Product Specifications- Other Name: Compressor - A/C; A/C Compressor; Compressor A/C

Dodge Compressor - A/C Part Number: 57009598AA
$587.29 MSRP: $859.00You Save: $271.71 (32%)Product Specifications- Other Name: AIR CONDITIONING
| Page 1 of 7 |Next >
1-20 of 124 Results
Dodge A/C Compressor
OEM parts sourced directly from Dodge deliver superior quality, long lasting strength, and a precise fit you can trust. Each item goes through strict quality checks to ensure safety, toughness, and performance that matches your factory equipment. At JeepPartsDeal online shop, you'll get top-quality, budget-friendly OEM Dodge A/C Compressor for your vehicle. We focus on giving you a high standard without pushing up the price. Our full selection of genuine factory products comes backed by the original manufacturer's warranty. You'll love our fast delivery, seamless shopping experience, and convenient return policy, saving you all the hassle.
Dodge A/C Compressor maintains the temperatures in the cabin constant and hot and sticky air is turned into cool relief. Dodge began as an unsophisticated machine shop and within a short time, they produced the first all-steel automobile in 1914. Power and toughness remained in the middle, and roaring muscle style that never apologized. Dodge was the one that tested the limits with the HEMI mills that sent you back in the seat on throttle. Dreams recorded on the roads when the Viper program came in showed that brute force could corner. Dodge is now throbbing synthetic thunder through its wild Fratzonic Chambered Exhaust so that even electric models snarl. When it is time to be sportive, the drive modes switch to Sport and the hush to Stealth, providing the drivers with attitude on command. The A/C Compressor is positioned at the center of the climate loop and forces refrigerant through coils causing severe pressure. The clutch is engaged and the A/C Compressor is applied to force the chilled fluid out of the evaporator into the condenser where the heat is dumped to the passing airflow, and the cabin vents blow clear dry air even at blazing pavement. The load is monitored by sensors and causes the A/C Compressor to increase output rather than stealing horsepower per mile. Continued monitoring of belt strain, refrigerant quantity and bearing screech ensure that the A/C Compressor is readily rotating through millions of summers. It also counts with every Dodge on the street, the one who drives to work on a Monday and the one who drives to the mountain on a weekend.
Dodge A/C Compressor Parts and Q&A
- Q: How to Service the Clutch on a Visteon A/C Compressor Without Discharging the Refrigerant System on Dodge Ram 1500?A:To service the A/C clutch on the Visteon A/C Compressor and keep the refrigerant charged, remove the negative battery cable, take out the accessory drive belt and lift your vehicle up. Start by disconnecting the wire from the clutch field harness and then removing the compressor's mounting bolts from the bracket. Remove the A/C compressor from its mount, holding it safely straight above while you replace the clutch. Attach the compressor clutch holding fixture (Special Tool 9351 that is found in Kit 9349) and then take out the securing bolt from the shaft using an appropriate tool. You can remove the clutch plate without tools or, if required, take it off with an 8 x 1.25 mm bolt as long as you remove all the clutch plate shims from the hub or compressor shaft end. After that, remove both the clutch plate and associated shim out of the A/C compressor by loosening the 8 x 1.25 mm bolt and rotating the clutch plate counterclockwise. You can use Snap Ring Pliers 9764 or any similar tool to release the snap ring keeping the pulley and bearing assembly attached to the A/C compressor's front. The pulley and bearings together can be taken off by hand or with a two jaw puller if required. Following the removal of the array, pull out the plastic clip and screw that attaches the clutch field coil wire lead and connector to the A/C compressor. Pull the clutch field coil off from the front of the compressor, using Special Tool 9354 included in Kit 9349 and a two jaw puller.
- Q: How to Remove and Replace a Visteon A/C Compressor Clutch on Dodge Nitro?A:Make certain that the front of the A/C compressor is directly under the A/C clutch field coil, with the positioning tabs and wire harness correct. Fit the positioning tabs on the field coil into the grooves on the front of the compressor and use a two jaw puller, compressor field coil installer and spacer to tighten the coil beneath the front cover. Attach the clutch field coil wire lead and bracket to the A/C compressor using a 4 Nm (35 in. lbs.) tightened screw. Adjust the pulley and bearing assembly in the front of the A/C compressor while tapping, since a clear sound change signals the assembly is properly set. Use the included special tool and a hammer to fix the pulley and bearing assembly against the outside of the compressor until the snap ring is fully in the groove, to make sure the clutch won't fail. Place the snap ring (2) with the help of pliers such as Special Tool 9764 or its equivalent, to attach the pulley and bearing to the compressor. See that there is sufficient space between the compressor housing and the pulley and bearing assembly for the clutch field coil wire. To replace a clutch assembly, start with the original shims-if it is the first time and no clutch was before, use the 1.0, 0.50 and 0.13 millimeter shims from the kit instead. Put the clutch shims onto the compressor shaft and, using a strap wrench, fasten the bolt that attaches the clutch plate to the compressor to 15 Nm (133 in. lbs.). Lay a 90° wire gauge between the clutch plate and the pulley and bearing assembly; if the gap is too small, add shims and if the gap is too large, remove shims until the gap is 0.35 to 0.65 millimeter (0.014 to 0.025 inch). Place the A/C compressor onto the bracket and bolt it in place. Attach the engine wire harness to the compressor clutch field coil, position the accessory drive belt and again link the negative battery cable to the battery. After that, complete the Clutch Break-in Procedure.


Related Dodge Parts
 Dodge Blend Door Actuator
 Dodge Blower Motor
 Dodge Blower Motor Resistor
 Dodge Evaporator
 Dodge A/C Accumulator
 Dodge A/C Expansion Valve
 Dodge A/C Hose
 Dodge A/C Service Cap
 Dodge A/C Switch
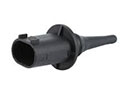 Dodge Ambient Temperature Sensor
 Dodge Blower Control Switches
 Dodge HVAC Pressure Switch
Browse Dodge A/C Compressor by Models
Charger Challenger Ram 1500 Dakota Durango Viper Dart Grand Caravan Ram 2500 Journey Caravan Avenger Magnum Neon Nitro Caliber Dynasty Intrepid Ram 3500 Shadow Spirit Stratus Ram 50 W250 B250 B350 Charger Daytona Colt D250 D350 Daytona Hornet Ram 1500 Van Sprinter 2500 Sprinter 3500 W350 B2500 B150 B1500 B3500 Ram 2500 Van Ram 3500 Van