JeepParts
My Garage
My Account
Cart
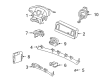
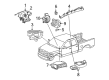
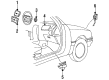
OEM Dodge Dakota Clock Spring
Spiral Cable Clock Spring- Select Vehicle by Model
- Select Vehicle by VIN
Select Vehicle by Model
orMake
Model
Year
Select Vehicle by VIN
For the most accurate results, select vehicle by your VIN (Vehicle Identification Number).
7 Clock Springs found


Dodge Dakota Clockspring Part Number: 56045455AH
$256.06 MSRP: $377.00You Save: $120.94 (33%)Ships in 1-3 Business Days
Dodge Dakota Clockspring Part Number: 56045403AG
$501.32Ships in 1-2 Business Days


Dodge Dakota Clockspring Part Number: 56049795AE
$226.60 MSRP: $334.00You Save: $107.40 (33%)

Dodge Dakota Clockspring Part Number: 56007626

Dodge Dakota Clockspring Part Number: 56007623
Dodge Dakota Clockspring Part Number: 56045456AG
Dodge Dakota Clockspring Part Number: 56045454AG
Dodge Dakota Clock Spring
Choose OEM Clock Spring that meet Dodge factory standards. Dodge designs and tests every component for precision and durability. Each Clock Spring follows strict manufacturing steps to lock in quality and fit. If your Dodge Dakota matters to you, OEM parts make the smart choice. You'll get the exact look, feel, and performance you expect. Shop genuine Dakota parts at the highly competitive prices online. Enjoy a manufacturer's warranty, a hassle-free return policy, and rapid delivery. No more guesswork with off brands. Get genuine parts with exact fit and true factory performance. Shop with confidence today at JeepPartsDeal.com.
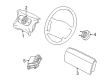
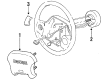
Supplemental Restraint System in Dodge Dakota relies on the Clock Spring because it provides reliable electrical communication between the airbag module and electrical system. The vital link guarantees prompt airbag activation during accidents and thus ensures greater security for Dodge Dakota passengers. The Clock Spring exists as a flat coil-shaped multicore cable that operates when steering wheel rotations occur since this operation ensures proper Dodge Dakota performance. Modern Dakota models have incorporated multiple versions of the Clock Spring which incorporate upgraded materials and production approaches to boost durability and reliability. The Dodge Dakota Clock Spring cooperates with different version of the automobile vehicles which enables drivers to maintain their vehicles' operational security and effectiveness. The automotive safety needs of the market are protected by the Clock Spring since it enables airbag deployment. The car Clock Spring establishes itself through its strong construction combined with reliability features which make it a dependable solution for preserving vehicle safety alongside performance quality of Dodge car models. The automaker model owners should consider buying a Clock Spring since its replacement costs fall within the $50 to $400 range.
Dodge Dakota Clock Spring Parts and Q&A
- Q: How to Install a Clock Spring Assembly on Dodge Dakota?A:To begin, take out the battery negative cable to disable the supplemental restraint system, wait two minutes after you do this to give the system capacitor time to discharge and only then proceed to install the Clock Spring assembly. The Clock Spring should arrive properly centered on the shaft, locked by the dispatch pin that should only be taken out after attachment to the Steering Column. Check that the front wheels are pointing right ahead of you before you do anything else. Keeping both the rotor and case still, carefully push the Clock Spring down onto the steering column upper shaft. Place the opening in the locating tab on the Clock Spring case over the locating pin found on the multi-function switch mounting housing and fasten the two screws that secure the Clock Spring to the housing to 2 Nm or 20 in. lbs. Arrange the two instrument panel cable connectors into the receptacles at the back of the Clock Spring and place the lower shroud on the steering column. Using a torque wrench, firm the central screw to 2 Nm (20 in. lbs.) as you snake it from below. Lift the upper shroud over the lower shroud, with the gearshift lever gap hider lined up against its partner which should pop in place when you line up the top snap features and apply pressure to the shrouds. Attach the shroud to the bike by tightening the two outboard screws to 2 Nm (20 in. lbs.), then fit the tilt knob onto the adjuster and fasten it with a screw at 2 Nm (20 in. lbs.). To keep the clock proper in position on a new style, remove the plastic locking pin. As you install the Steering Wheel, line up the yellow rubber booted engagement dowel of the Clock Spring rotor between the two fins of the steering wheel armature hub. Reglue the steering wheel to its place, attach the steering wheel wire connectors correctly, add the driver air bag to the steering wheel and make sure the negative Battery Cable is back in place.
- Q: How to Replace a Faulty Clock Spring on Dodge Dakota?A:When the Clock Spring fails, is damaged or an air bag has deployed, it must be replaced and cannot be repaired. When beginning to service the air bag system or connected components, make sure to disconnect the negative battery cable and wait two minutes before carrying out the service, as precaution against the air bag deploying by mistake. Initially, check that the Steering Wheel is pointing straight ahead; afterward, take out the air bag module from the driver side steering wheel. If the upper Clock Spring wire harness in your vehicle is equipped, disconnect the connectors leading from the vehicle speed control and remote radio switches inside the steering wheel hub. Lift out the nut holding the steering wheel armature to the upper shaft and now use a steering wheel puller (Special Tool C-3428-B) to get the steering wheel off the shaft. Take the covering off the Steering Column opening on the instrument panel and, if there is one, unscrew the lever on the tilt steering column adjuster. Both the upper and lower shrouds from the steering column should be removed, but keep the lower fixed column shroud in place. Unfasten the two multi-function switch screws that are buried in the steering lock. Gently pull the multi-function switch away to reveal the bumper covering over the Clock Spring assembly side latch, then disconnect both wire harnesses that connect to the lower Clock Spring connector. To not harm the Clock Spring latches, take the plastic latches out of the receptacles in the steering lock housing using a small screwdriver, then remove the Clock Spring. After mounting a new Clock Spring, make sure it sits precisely between the steering wheel, steering shaft and gear, to minimize risks of damage. Always wait to remove the covering tape from the auto-locking tabs on service replacement Clock Springs after you have installed them. While your front tires are pointed straight, lower the center Clock Spring over the upper shaft until both black latches snap into place inside the receptacles. Join the lower Clock Spring wire harness connector to the instrument panel wire harness, so the locator clips are located, the connectors are fitted and then connect the instrument panel wire harness connector to the lower Clock Spring. Secure the multi-function switch in the steering column lock housing with two screws tightened to 2 Nm (17 in. lbs.). After placing the steering column shrouds, lay the lower Clock Spring wire harness inside and mount the steering column opening cover. Bring the steering wheel onto the upper shaft, line up the flattened areas on the hub with the interior of the Clock Spring hub and pass the upper wiring through the areas between the steering wheel back cover and the armature. Screw in the mounting nut of the steering wheel only until you feel 61 Nm (45 ft. lbs.), checking all the time that you are not catching the harnesses. If you find the parts, plug the upper Clock Spring wire harness back into the vehicle speed control or remote radio switches, insert the wires in the correct places, install the tilt steering column if there is one and set the driver side air bag unit into place.


Related Dodge Dakota Parts
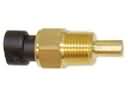 Dodge Dakota Coolant Temperature Sensor
 Dodge Dakota Ignition Switch
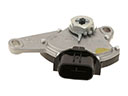 Dodge Dakota Neutral Safety Switch
 Dodge Dakota Air Bag Control Module
 Dodge Dakota Air Bag Sensor
 Dodge Dakota Airbag
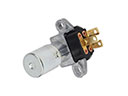 Dodge Dakota Dimmer Switch
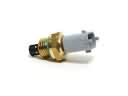 Dodge Dakota Intake Manifold Temperature Sensor
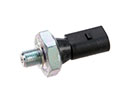 Dodge Dakota Oil Pressure Switch
 Dodge Dakota Seat Heater Switch
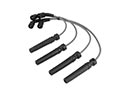 Dodge Dakota Spark Plug Wire
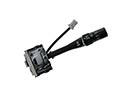 Dodge Dakota Windshield Wiper Switch