JeepParts
My Garage
My Account
Cart
OEM Dodge Ram 2500 Clock Spring
Spiral Cable Clock Spring- Select Vehicle by Model
- Select Vehicle by VIN
Select Vehicle by Model
orMake
Model
Year
Select Vehicle by VIN
For the most accurate results, select vehicle by your VIN (Vehicle Identification Number).
10 Clock Springs found


Dodge Ram 2500 Clockspring Part Number: 56045455AH
$256.06 MSRP: $377.00You Save: $120.94 (33%)Ships in 1-3 Business Days


Dodge Ram 2500 Clockspring Part Number: 56046116AE
$336.50 MSRP: $496.00You Save: $159.50 (33%)


Dodge Ram 2500 Clockspring Part Number: 56007627AA
$321.03 MSRP: $363.00You Save: $41.97 (12%)Ships in 1-2 Business Days
Dodge Ram 2500 Clockspring Part Number: 56045652AD
$397.32 MSRP: $580.00You Save: $182.68 (32%)Ships in 1-3 Business Days


Dodge Ram 2500 Clockspring Part Number: 56046115AE
$164.29 MSRP: $242.00You Save: $77.71 (33%)


Dodge Ram 2500 Clockspring Part Number: 56049795AE
$226.60 MSRP: $334.00You Save: $107.40 (33%)Dodge Ram 2500 Clockspring Part Number: 56007624
Dodge Ram 2500 Clockspring Part Number: 56045456AG
Dodge Ram 2500 Clockspring Part Number: 56045454AA
Dodge Ram 2500 Clockspring Part Number: 56045454AG
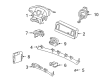
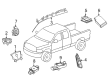
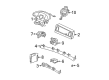
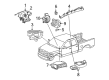
Dodge Ram 2500 Clock Spring
Choose OEM Clock Spring that meet Dodge factory standards. Dodge designs and tests every component for precision and durability. Each Clock Spring follows strict manufacturing steps to lock in quality and fit. If your Dodge Ram 2500 matters to you, OEM parts make the smart choice. You'll get the exact look, feel, and performance you expect. Shop genuine Ram 2500 parts at the highly competitive prices online. Enjoy a manufacturer's warranty, a hassle-free return policy, and rapid delivery. No more guesswork with off brands. Get genuine parts with exact fit and true factory performance. Shop with confidence today at JeepPartsDeal.com.
Dodge Ram 2500 Clock Spring Parts and Q&A
- Q: How to Replace a Faulty Clock Spring on Dodge Ram 2500?A:If the Clock Spring is bad, damaged or the driver's air bag has gone off, it must be replaced because it cannot be repaired. To start, turn off the air bag system by taking off and isolating the negative battery terminal and letting it discharge for two minutes. Turn the Steering Wheel continuously until both front wheels are lined up to go straight. Take out the driver's air bag, disconnect the wires for the speed control and radio switches and take off the screw holding the steering wheel armature to the steering column top shaft. Insert a steering wheel puller (Special Tool C-3428-B) into the space between the steering column and the center of the steering wheel and then remove the opening cover on the panel above the instrument cluster. To remove the handlebar, take out the lever from the tilt steering column, then unscrew the outer shrouds on top and bottom and the inner shrouds as well. Use a set of pliers to release both connector ends on the Clock Spring. Ease the plastic catches off the steering column lock and pull the Clock Spring away from the car. If you want to save the Clock Spring, ensure the rotor is properly and securely centered to keep it in the right place until the Clock Spring is attached back. When fitting the installation, the Clock Spring should be set in the middle, since Clock Springs sent for service already have tape covering the auto-locking tabs which you should not take off until you fit the Clock Spring. Pull the centered Clock Spring down over the steering column upper shaft to lock it and reinsert the lower Clock Spring pigtail wire connector with the instrument panel wire harness connector. Then, fit and fasten the lower inner and outer shrouds. As you attach the steering wheel, match the flats on the hub with the design on the Clock Spring, tighten the steering mount nut to 61 Nm (45 ft. lbs.) and take care not to press or twist the wires. If your car has upper Clock Spring pigtail wires, reconnect them and attach the driver air bag back to the steering wheel.
- Q: How to Install a Clock Spring Assembly on Dodge Ram 2500?A:First, switch off the supplemental restraint system by removing and isolating the negative cable of the battery for two minutes, before installing the Clock Spring assembly. Insert the Clock Spring pin before centering the unit; the pin should be left on through the installation until the Steering Column. Make certain the front wheels are facing forward before you continue. Keep the rotor and case still or leave the plastic locking pin set as you move the Clock Spring over the steering column upper shaft. Bring the hole in the locating tab on the Clock Spring case in line with the locating pin on the switch mounting housing and tighten the two screws to 2 Nm (20 in. lbs.). Attach the two instrument panel wire harness connections to their corresponding receptacles in the back of the Clock Spring housing and for ESP vehicles, attach the wire harness connector for the Steering Angle Sensor to the unit underneath the steering column. Slide the lower shroud onto the steering column and fasten it with one center screw fully tightened to 2 Nm (20 in. lbs.). After placing the upper shroud on the lower one, if your car is automatic and has a gap hider, attach it to that lever and snap the shrouds shut before finally installing and tightening the two outer screws. Use a screwdriver to connect the knob to the actuator of the tilting steering column; after that, tighten the screw to 2 Nm (20 in. lbs.). Replace the cover over the steering column opening and, if a new Clock Spring has been installed, take out the plastic locking pin for proper centering. Before putting the Steering Wheel back, make sure the blue engagement dowel is engaged in the little gap of the Clock Spring rotor, between the steering wheel armature hub's fins and then re-connect the wiring harness, checking its placed correctly. After that, install the driver air bag onto the steering wheel and securely attach the negative Battery Cable.


Related Dodge Ram 2500 Parts
 Dodge Ram 2500 Air Bag Control Module
 Dodge Ram 2500 Air Bag Sensor
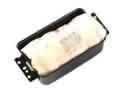 Dodge Ram 2500 Airbag
 Dodge Ram 2500 Camshaft Position Sensor
 Dodge Ram 2500 Dimmer Switch
 Dodge Ram 2500 Engine Control Module
 Dodge Ram 2500 Headlight Switch
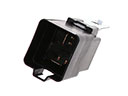 Dodge Ram 2500 Radiator Fan Relay
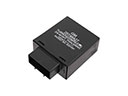 Dodge Ram 2500 Turn Signal Flasher
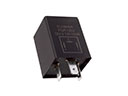 Dodge Ram 2500 Turn Signal Relay
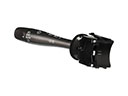 Dodge Ram 2500 Turn Signal Switch
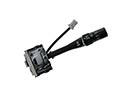 Dodge Ram 2500 Windshield Wiper Switch