JeepParts
My Garage
My Account
Cart
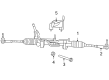
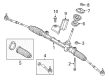
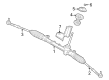
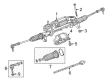
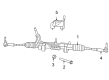
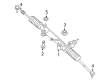
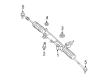
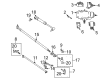
OEM Jeep Rack And Pinion
Steering Gear- Select Vehicle by Model
- Select Vehicle by VIN
Select Vehicle by Model
orMake
Model
Year
Select Vehicle by VIN
For the most accurate results, select vehicle by your VIN (Vehicle Identification Number).
70 Rack And Pinions found


Jeep Steering Gear Part Number: 5154519AC
$792.76 MSRP: $1220.00You Save: $427.24 (36%)Ships in 1-2 Business DaysProduct Specifications- Other Name: Gear - Rack And Pinion; Rack and Pinion Assembly; Steering Gearbox; Gear Assembly; Gear Rack And Pinion
- Replaces: 5105085AE, 5105085AF, 5105085AD, 5154519AB, 5105085AG, 68060088AB, 68060088AC, 5154519AA, 5105085AC


Jeep Steering Gear Part Number: 68263205AA
$919.36 MSRP: $1405.00You Save: $485.64 (35%)Ships in 1-2 Business DaysProduct Specifications- Other Name: Gear - Rack And Pinion; Steering Gearbox; Gear Assembly; Gear Rack And Pinion Outer Tie Rod Ends Not Included; Gear Rack And Pinion


Jeep Steering Gear Part Number: 52126348AE
$1042.49 MSRP: $1595.00You Save: $552.51 (35%)Ships in 1-2 Business DaysProduct Specifications- Other Name: Gear - Power Steering; Steering Gear Box; Steering Gearbox; Gear Assembly; Gear Power Steering
- Replaces: 52060172AD, 52126348AC, 52126348AA, 68170089AA, 52060172AE, 52126348AB, 52060172AC, 52126348AD


Jeep Steering Gear Part Number: 52089292AE
$554.08 MSRP: $834.00You Save: $279.92 (34%)Ships in 1-2 Business DaysProduct Specifications- Other Name: Gear - Rack And Pinion; Rack and Pinion Assembly; Steering Gearbox; Gear Assembly; Gear Rack And Pinion
- Replaces: 52089292AD, 52089292AC, R2089292AE


Jeep Steering Gear Part Number: 52124727AF
$1117.24 MSRP: $1625.00You Save: $507.76 (32%)Product Specifications- Other Name: Gear - Rack And Pinion; Rack and Pinion Assembly; Steering Gearbox; Gear Assembly; Gear Rack And Pinion
- Replaces: 52124727AE, 52124727AD, 52124727AB, 52124727AC


Jeep Steering Gear Part Number: 68078525AC
$868.55 MSRP: $1185.00You Save: $316.45 (27%)Ships in 1-2 Business DaysProduct Specifications- Other Name: Gear - Rack And Pinion; Rack and Pinion Assembly; Steering Gearbox; Gear Assembly; Gear Rack And Pinion
- Replaces: 68078525AB

Jeep Steering Gear Part Number: 68273356AF
$502.50 MSRP: $754.00You Save: $251.50 (34%)Ships in 1-2 Business DaysProduct Specifications- Other Name: Gear - Rack And Pinion; Rack and Pinion Assembly; Steering Gearbox; Gear Assembly; Gear Rack And Pinion
- Replaces: 68273356AC, 68273356AD, 68273356AE

Jeep Gear - Rack And Pinion Part Number: 68628263AB
$599.27 MSRP: $877.00You Save: $277.73 (32%)Product Specifications- Other Name: RACK AND PINION
- Replaces: 68581380AA, 68581380AC, 68581380AE, 68581380AB, 68581380AF, 68375407AD, 68375407AF, 68375407AI, 68628263AA, 68581380AD, 68375407AG, 68375407AE

Jeep Steering Gear Part Number: 68284077AJ
$809.04 MSRP: $1170.00You Save: $360.96 (31%)Ships in 1-2 Business DaysProduct Specifications- Other Name: Gear - Rack And Pinion; Rack and Pinion Assembly; Steering Gearbox; Gear Assembly
- Replaces: 68284077AH, 68284077AB, 68284077AC, 68284077AE, 68284077AI, 68284077AF, 68284077AG, 68284077AD
Jeep Steering Gear Part Number: 4854700AB
$1372.75 MSRP: $2175.00You Save: $802.25 (37%)Ships in 1-2 Business DaysProduct Specifications- Other Name: Gear - Rack And Pinion; Rack and Pinion Assembly; Steering Gearbox; Gear Assembly
- Replaces: 4854700AA, RL854700AA
Jeep Steering Gear Part Number: 5154516AC
$733.09 MSRP: $1115.00You Save: $381.91 (35%)Ships in 1-2 Business DaysProduct Specifications- Other Name: Gear - Rack And Pinion; Rack and Pinion Assembly; Steering Gearbox; Gear Assembly; Gear Rack And Pinion
- Replaces: 5154516AA, 5154516AB
Jeep Steering Gear Part Number: 5154517AC
$806.02 MSRP: $1230.00You Save: $423.98 (35%)Ships in 1-2 Business DaysProduct Specifications- Other Name: Gear - Rack And Pinion; Rack and Pinion Assembly; Steering Gearbox; Gear Assembly; Gear Rack And Pinion
- Replaces: 5154517AA, 5154517AB

Jeep Steering Gear Part Number: 5154513AC
$866.79 MSRP: $1320.00You Save: $453.21 (35%)Ships in 1-2 Business DaysProduct Specifications- Other Name: Gear - Rack And Pinion; Rack and Pinion Assembly; Steering Gearbox; Gear Assembly; Gear Rack And Pinion
- Replaces: 5154513AA, 5154513AB, RL154513AA
Jeep Steering Gear Part Number: 68078529AE
$893.31 MSRP: $1365.00You Save: $471.69 (35%)Ships in 1-2 Business DaysProduct Specifications- Other Name: Gear - Rack And Pinion; Rack and Pinion Assembly; Steering Gearbox; Rack & Pinion; Gear Assembly; Gear Rack And Pinion
- Replaces: 68078529AD, 68078529AC

Jeep Steering Gear Part Number: 52124724AH
$975.08 MSRP: $1480.00You Save: $504.92 (35%)Ships in 1-2 Business DaysProduct Specifications- Other Name: Gear - Rack And Pinion; Rack and Pinion Assembly; Steering Gearbox; Gear Assembly; Gear Rack And Pinion
- Replaces: 52124724AF, 52124724AE, 52124724AG
Jeep Steering Gear Part Number: 52124800AB
$980.61 MSRP: $1500.00You Save: $519.39 (35%)Ships in 1-2 Business DaysProduct Specifications- Other Name: Gear - Rack And Pinion; Rack and Pinion Assembly; Steering Gearbox; Gear Assembly
- Replaces: R2124800AB, 52124800AA, 68140919AA, RL124800AA
Jeep Steering Gear Part Number: 68052897AE
$1042.49 MSRP: $1595.00You Save: $552.51 (35%)Product Specifications- Other Name: Gear - Power Steering; Steering Gear Box; Steering Gearbox; Gear Assembly; Gear Power Steering
- Replaces: 68052897AB, 68052897AA, RL052897AC, 68052897AC, 52059897AD, 52059897AC, 68052897AD

Jeep Steering Gear Part Number: 68624746AB
$1073.43 MSRP: $1630.00You Save: $556.57 (35%)Ships in 1-2 Business DaysProduct Specifications- Other Name: Gear - Power Steering


Jeep Steering Gear Part Number: 68000400AB
$1134.20 MSRP: $1740.00You Save: $605.80 (35%)Ships in 1-2 Business DaysProduct Specifications- Other Name: Gear - Rack And Pinion; Rack and Pinion Assembly; Steering Gearbox; Gear Assembly
- Replaces: 52090488AE, 68140908AA, 52090488AC, RL090488AE, 52090488AD, RX000400AA, 68000400AA, 52124278AB, RL124278AB, RL124278AC, 52124278AC, 52090488AB, RL000400AA


Jeep Steering Gear Part Number: R2089046AC
Product Specifications- Other Name: Gear - Power Steering; Steering Gear Box; Steering Gearbox; Gear Assembly
- Replaces: 52089046AD, 52089046AC
| Page 1 of 4 |Next >
1-20 of 70 Results
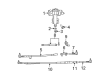
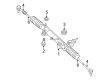
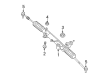
Jeep Rack And Pinion
OEM parts sourced directly from Jeep deliver superior quality, long lasting strength, and a precise fit you can trust. Each item goes through strict quality checks to ensure safety, toughness, and performance that matches your factory equipment. At JeepPartsDeal online shop, you'll get top-quality, budget-friendly OEM Jeep Rack And Pinion for your vehicle. We focus on giving you a high standard without pushing up the price. Our full selection of genuine factory products comes backed by the original manufacturer's warranty. You'll love our fast delivery, seamless shopping experience, and convenient return policy, saving you all the hassle.
Jeep Rack And Pinion converts wheel input to fast and accurate tire angles to be able to control. Jeep has established its brand on boxy brawn, outdoor adventure and go-anywhere capability that takes a beating. When the snowy roads, the dusty deserts and even the wet trails turn to be easy with the Jeep Selec-Terrain knob clicking between snow, sand or mud, it becomes easy. Every Jeep has now digital cabins that have touch screens, voice commands and wireless updates to allow drivers to adjust settings without picking up a wrench. High ride height is combined with low overhangs that allow the body to climb on ledges other people would be scared of, and yet fits into city parking spots. Meetings in Moab to local dirt pits exchange trail fixes, tale-telling and demonstrate that ruffling SUVs may also create close-knit communities. Updates are then delivered as patches and drive modes via over-the-air at night without the use of cables or even downtime. Rack And Pinion mesh gears inside the steering bay convert each quarter-turn of the wheel to precise lateral bar movement, ensuring that the front tires bite in and the steering follows a straight course even when the rocks smash the suspension. Rack And Pinion will make tasks easier with hydraulic assistance, meaning that by the end of the afternoon, arms will not be tired of crawling switchbacks. The drivers like the Rack And Pinion makes the feedback sharp on the pavement, gravel and even mud, which enhances the faithful Jeep grin. Length at the Rack And Pinion relies upon the clean liquid as well as sound sense on the wheel, protecting accuracy with an innumerable plethora of trail years.
Jeep Rack And Pinion Parts and Q&A
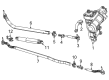
- Q: How to Service and Repair a Rack and Pinion Steering System on Jeep Grand Cherokee?A:When servicing or repairing the rack and pinion, put the front wheels straight and lock the steering wheel first. Drain or siphon the power steering system, next remove the bolt from the column coupler shaft and pop the shaft out of the rack and pinion. Remove the oil drip tray, then pull the pressure line and return line from the rack and pinion. Piece of advice: support the vehicle and then you can take off the front tires. Drop the jam nuts first, get rid of the outer nut next and then use tool #8677 to release the tie rod from the knuckle. Take off the front splash shield and, if your car is a 4X4, also remove the front axle. Afterwards, disable the two rack and pinion bolts, make sure the rack and pinion is on the full right side for clearance over the control arm, move it into place, lower it, guide it to the full left position and then remove the rack and pinion from the vehicle. If you must, take out the outer tie rod ends from the rack and pinion. At installation, first reinstall the outer tie rod ends if you took them out and then replace the rack and pinion as it was before removal. Currently, mount the rack and pinion with the bolts and secure them using a tightening torque of 217 Nm. Fit the front splash shield again, fasten the tie rod end nuts so they're just snug to the tie rods, link the tie rod ends to the knuckle and then neat the knuckle. Install the pressure back into the hoses and plug them into the rack and pinion, then tighten them to 28 Nm. Slot the drip tray under the oil filter back in place, slide the column coupler shaft into the lower coupling and fix it with a new bolt replaced and tightened to 49 Nm. Remove the front axle housing unit, reinstall it and finally connect the wheel and tire assembly. Remove the support, lower the vehicle down, remove the lock on the steering wheel, fill the power steering pump and set the toe.
- Q: How to Service and Repair a Rack and Pinion Steering System on Jeep Wrangler?A:The first step for servicing or repairing the rack and pinion is to set the front wheels directly ahead and lock the steering wheel. Raise the power steering level by siphoning all the fluid and then move the coolant bottle away. Take out the lower column pinch bolt at the rack and pinion and separate the lower column coupler shaft from the rack and pinion. After that, disconnect both the power steering hoses/tubes from the rack and pinion. Lift the vehicle up and raise it, then loosen the bolt that holds the track bar at the frame and remove the bar. Detach the pitman arm nut and, with special tool 9615 puller, remove the pitman arm from the rack and pinion. Afterward, take out the pitman arm from the rack and pinion and loosen the retaining bolts to remove the rack and pinion.


Related Jeep Parts
 Jeep Power Steering Pump
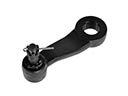 Jeep Pitman Arm
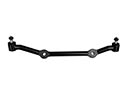 Jeep Center Link
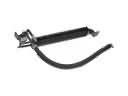 Jeep Power Steering Cooler
 Jeep Power Steering Hose
 Jeep Power Steering Reservoir
 Jeep Steering Gear Box
 Jeep Tie Rod End
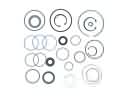 Jeep Power Steering Gear Seal
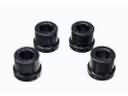 Jeep Rack & Pinion Bushing
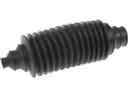 Jeep Rack and Pinion Boot
 Jeep Radius Heat Shield