JeepParts
My Garage
My Account
Cart
OEM 2006 Chrysler Pacifica Brake Caliper
Caliper- Select Vehicle by Model
- Select Vehicle by VIN
Select Vehicle by Model
orMake
Model
Year
Select Vehicle by VIN
For the most accurate results, select vehicle by your VIN (Vehicle Identification Number).
5 Brake Calipers found

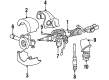
2006 Chrysler Pacifica Steering Column Part Number: 5066106AC
Product Specifications- Other Name: Column - Steering; Column Assembly; Caliper
- Replaces: 5066106AB, 5103440AA
- Item Weight: 14.40 Pounds
- Condition: New
- Fitment Type: Direct Replacement
- SKU: 5066106AC
- Warranty: This genuine part is guaranteed by Mopar's factory warranty.

 Product Specifications
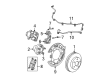
- Other Name: Caliper - Disc Brake; Disc Brake Caliper, Rear Right; Caliper Disc Brake; Brake Caliper
- Position: Rear Passenger Side
- Item Weight: 5.80 Pounds
- Item Dimensions: 5.1 x 5.2 x 7.2 inches
- Condition: New
- Fitment Type: Direct Replacement
- SKU: 5114440AA
- Warranty: This genuine part is guaranteed by Mopar's factory warranty.
- Product Specifications
- Other Name: Caliper - Disc Brake; Disc Brake Caliper, Rear Left; Caliper Disc Brake; Brake Caliper
- Position: Rear Driver Side
- Item Weight: 5.90 Pounds
- Item Dimensions: 7.4 x 5.4 x 3.3 inches
- Condition: New
- Fitment Type: Direct Replacement
- SKU: 5114441AA
- Warranty: This genuine part is guaranteed by Mopar's factory warranty.

 Product Specifications
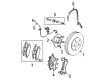
- Other Name: Caliper - Disc Brake; Disc Brake Caliper, Front Left; Caliper Disc Brake; Brake Caliper
- Position: Front Driver Side
- Item Weight: 12.50 Pounds
- Item Dimensions: 10.3 x 7.5 x 5.2 inches
- Condition: New
- Fitment Type: Direct Replacement
- SKU: 5103119AA
- Warranty: This genuine part is guaranteed by Mopar's factory warranty.
- Product Specifications
- Other Name: Caliper - Disc Brake; Disc Brake Caliper, Front Right; Caliper Disc Brake; Brake Caliper
- Position: Front Passenger Side
- Item Weight: 11.60 Pounds
- Item Dimensions: 10.2 x 7.7 x 5.2 inches
- Condition: New
- Fitment Type: Direct Replacement
- SKU: 5103118AA
- Warranty: This genuine part is guaranteed by Mopar's factory warranty.
2006 Chrysler Pacifica Brake Caliper Parts and Q&A
- Q: How to Maintain a Rear Brake Caliper on 2006 Chrysler Pacifica?A: Before servicing the rear disc brake caliper, loosen the negative cable from the battery and press the brake pedal past its first inch using a brake pedal holding tool to separate the master cylinder from the rest of the brakes. Lift and secure the vehicle and after that, remove the set of wheel and tire. Take out the banjo bolt that holds the brake hose to the caliper and get rid of its old sealing washers so you can use new ones. Invert the car to gain access to the bottom bolts of the caliper and rotation of the assembly will allow you to disconnect it from the brake adapter with a lift. Pull the outboard brake shoe out of the caliper fingers, then slide it off. After that, pull the inboard shoe away from the caliper piston to remove the clip that is holding it in place. For taking apart, remove dirt and examine the caliper and afterward, push the guide pin bushing sleeve towards the back of the caliper and pull it out. Collapse the rubber guide pin on one side, then pull it out of the caliper mounting boss. Install the caliper in a vise that has rubber jaws, insert a wooden block into the caliper and gently use low pressure compressed air to eject the piston from the bore. Take off the dust boot and throw it away, then break up the old seal in its groove and get rid of it. Scrub the ingot cavity and check for signs of scratching or dimpling by using crocus cloth. Put some fresh Mopar DOT 3 Motor Vehicle Brake Fluid on the pistons, seals and bores, put the new piston seal and boot in place and push the piston into the bore. Place the dust boot into the caliper counterbore using Installer, Special Tool 9089. Then install the bleeder screw. Pull back the caliper piston into the bore, put the inboard shoe retainer against the piston area and verify that the outboard shoes are all lined up correctly. Carefully mount the caliper to the disc brake mount using the adapter, make sure the boots on the caliper guide pins are not damaged and screw the caliper guide pin bolts to a force of 23 Nm (17 ft. lbs.). Put the new washers on the banjo bolt, tighten it to 47 Nm (35 ft. lbs.) and align the tire and wheel assembly. Tighten the wheel mounting nuts at 135 Nm (100 ft. lbs.). Slowly adjust the vehicle so it sits on the ground, take out the brake pedal holding tool, link the battery negative cable, flush the brake system and make sure it functions well on a road test.
Related 2006 Chrysler Pacifica Parts
 2006 Chrysler Pacifica Brake Booster
 2006 Chrysler Pacifica Speed Sensor
 2006 Chrysler Pacifica ABS Control Module
 2006 Chrysler Pacifica Brake Caliper Bracket
 2006 Chrysler Pacifica Brake Caliper Piston
 2006 Chrysler Pacifica Brake Disc
 2006 Chrysler Pacifica Brake Line
 2006 Chrysler Pacifica Brake Master Cylinder
 2006 Chrysler Pacifica Brake Pad
 2006 Chrysler Pacifica Parking Brake Cable
 2006 Chrysler Pacifica Parking Brake Shoe
 2006 Chrysler Pacifica Wheel Stud