JeepParts
My Garage
My Account
Cart
OEM 2006 Chrysler Pacifica ABS Control Module
Anti Lock Brake Control Module- Select Vehicle by Model
- Select Vehicle by VIN
Select Vehicle by Model
orMake
Model
Year
Select Vehicle by VIN
For the most accurate results, select vehicle by your VIN (Vehicle Identification Number).
4 ABS Control Modules found

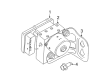
2006 Chrysler Pacifica Control Module Part Number: 5142279AA
$187.91 MSRP: $238.21You Save: $50.30 (22%)Ships in 1-2 Business DaysProduct Specifications- Other Name: Control - Anti-Lock Brakes; ABS Control Module; Module Anti-Lock Brakes
- Item Weight: 1.90 Pounds
- Item Dimensions: 7.1 x 7.2 x 6.8 inches
- Condition: New
- Fitment Type: Direct Replacement
- SKU: 5142279AA
- Warranty: This genuine part is guaranteed by Mopar's factory warranty.
2006 Chrysler Pacifica Control Module Part Number: 5142282AA
Product Specifications- Other Name: Control - Anti-Lock Brakes; ABS Control Module; Module Anti-Lock Brakes
- Condition: New
- Fitment Type: Direct Replacement
- SKU: 5142282AA
- Warranty: This genuine part is guaranteed by Mopar's factory warranty.

2006 Chrysler Pacifica Modulator Part Number: 5142280AA
Product Specifications- Other Name: Accumulator - Anti-Lock Brake System; ABS Modulator Valve; ABS Control Module; Hydraulic Control Unit Anti-Lock Brake System
- Condition: New
- Fitment Type: Direct Replacement
- SKU: 5142280AA
- Warranty: This genuine part is guaranteed by Mopar's factory warranty.
2006 Chrysler Pacifica Modulator Part Number: 5142277AA
Product Specifications- Other Name: Accumulator - Anti-Lock Brake System; ABS Modulator Valve; ABS Control Module; Hydraulic Control Unit Anti-Lock Brake System
- Condition: New
- Fitment Type: Direct Replacement
- SKU: 5142277AA
- Warranty: This genuine part is guaranteed by Mopar's factory warranty.
2006 Chrysler Pacifica ABS Control Module Parts and Q&A
- Q: How to Service and Repair the ABS Control Module for Antilock Brakes on 2006 Chrysler Pacifica?A: The first step to servicing and repairing a hydraulic antilock brake assembly is to remove the negative battery cable and separate it for safety. Make sure the master cylinder doesn't allow anything to enter by closing off the vacuum to the power brake booster by pressing hard on the brake pedal. Grip the nuts on the coolant recovery bottle and remove them after which you can open the hood and put it to the side. Use Mopar Brake Parts Cleaner or another suitable cleaner to wipe all of the brake fluid reservoir and master cylinder, focusing on the point where the master cylinder meets the power brake booster. Come away from the main brake tubes where they meet the ABS ICU, cap them and secure sealing plugs into the open network ports. Release the nuts holding the master cylinder on the power brake booster and pull out the master cylinder. Cut out the four chassis brake tubes at the ABS ICU and seal each one with a cap. Push in on the tabs of the 47-way connector to release it from the antilock brake module and then pull the cover away. Untighten the two bolts connecting the ABS ICU bracket to the frame rail, pick the ICU up from the bolts and remove it from the car. Should you need to, take out the mounting bolt, move the mounting pins away on the frame and position them in the rear portion of the attack bearing mechanism. If your board comes without traction control, you only need to screw off three; for boards with it, remove the four screws instead. Remove all debris from the areas where the HCU and ABM fit together and change any non-new seals except for new O-rings and solenoid valve seals which should not be lubricated. Install the ABM onto the HCU, use the correct number of screws and tighten each one to 2 Nm or 17 inch lbs. When putting in the mounting bracket, fit the mounting pins into the grommets and tighten the single mounting bolt to 11 Nm (97 inch lbs.). Place the ICU in the vehicle and turn the mounting bolts until you reach a torque of 24 Nm (18 ft. lbs.). Add the 47-way wiring connector to the ABM socket and shut the cover. Push in the four chassis brake tubes to their ICU outlet ports and tighten the bolts to 14 Nm (120 inch lbs.) torque with a tool. Apply the vacuum seal back onto the master cylinder and install it on the studs so the push rod is aligned with the piston in the cylinder. After installing the master cylinder, tighten its two mounting nuts to 25 Nm (225 inch lbs), place the primary and secondary brake lines onto the ICU ports and tighten both of the tube nuts to 14 Nm (120 inch lbs.). Remove the wiring harness from the brake fluid level switch, replace the coolant recovery bottle and then reconnect the negative battery cable. Use a scanner to reset the ABM, top up the master cylinder with Mopar Brake Fluid or an equal product, bleed both the base brakes and ABS and check the brakes by driving on the road.
Related 2006 Chrysler Pacifica Parts
 2006 Chrysler Pacifica Brake Booster
 2006 Chrysler Pacifica Speed Sensor
 2006 Chrysler Pacifica Brake Caliper
 2006 Chrysler Pacifica Brake Caliper Bracket
 2006 Chrysler Pacifica Brake Disc
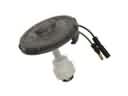 2006 Chrysler Pacifica Brake Fluid Level Sensor
 2006 Chrysler Pacifica Brake Line
 2006 Chrysler Pacifica Brake Master Cylinder
 2006 Chrysler Pacifica Brake Pad
 2006 Chrysler Pacifica Parking Brake Cable
 2006 Chrysler Pacifica Parking Brake Shoe
 2006 Chrysler Pacifica Wheel Stud