JeepParts
My Garage
My Account
Cart
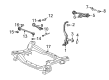
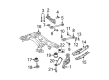
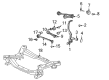
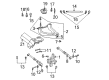
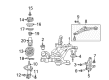
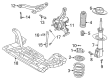
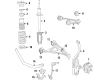
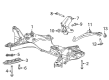
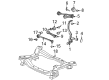
OEM Chrysler Control Arm
Suspension Arm- Select Vehicle by Model
- Select Vehicle by VIN
Select Vehicle by Model
orMake
Model
Year
Select Vehicle by VIN
For the most accurate results, select vehicle by your VIN (Vehicle Identification Number).
103 Control Arms found


Chrysler Lower Control Arm, Front Part Number: 68079723AB
$213.00 MSRP: $317.00You Save: $104.00 (33%)Ships in 1-2 Business DaysProduct Specifications- Other Name: Arm - Lower Control; Suspension Control Arm, Front Lower Rearward; Arm Lower Control Front; Suspension Control Arm; Control Arm
- Position: Front Lower
- Replaces: 68079723AA


Chrysler Lower Control Arm, Front Part Number: 5168389AB
$214.08 MSRP: $324.00You Save: $109.92 (34%)Ships in 1-2 Business DaysProduct Specifications- Other Name: Arm - Lower Control; Suspension Control Arm, Front Lower Rearward; Arm Lower Control Front; Suspension Control Arm; Control Arm
- Position: Front Lower
- Replaces: 5168389AA


Chrysler Lower Control Arm, Rear Part Number: 5085418AD
$69.49 MSRP: $156.00You Save: $86.51 (56%)Ships in 1-2 Business DaysProduct Specifications- Other Name: Arm - Lower Control; Suspension Control Arm, Rear Lower Rearward; Arm Lower Control Rear; Suspension Control Arm; Control Arm
- Position: Rear Lower
- Replaces: 5085418AC


Chrysler Lower Control Arm, Front Part Number: 68002123AC
$149.18 MSRP: $329.00You Save: $179.82 (55%)Ships in 1-2 Business DaysProduct Specifications- Other Name: Arm - Lower Control; Suspension Control Arm, Front Lower Rearward; Suspension Control Arm Bushing; Upper Control Arm; Arm Lower Control Front Lower; Arm Lower Control Front; Suspension Control Arm; Control Arm
- Position: Front Lower
- Replaces: 68002123AA, 68002123AB


Chrysler Upper Control Arm, Rear Passenger Side Part Number: 4895276AC
$190.41 MSRP: $321.00You Save: $130.59 (41%)Ships in 1-2 Business DaysProduct Specifications- Other Name: Arm - Control; Rear Right Upper Suspension Control Arm and Ball Joint Assembly.; Arm Control; Control Arm
- Position: Rear Upper Passenger Side
- Replaces: 4895276AB


Chrysler Lower Control Arm, Front Driver Side Part Number: 4766911AL
$224.32 MSRP: $343.00You Save: $118.68 (35%)Ships in 1-2 Business DaysProduct Specifications- Other Name: Arm - Lower Control; Front Left Suspension Control Arm and Ball Joint Assembly.; Arm Lower Control Front; Suspension Control Arm; Control Arm
- Position: Front Lower Driver Side
- Replaces: 4766911AH, 4721483AD, 4766911AG, 4766911AE, 4766911AF, 4766911AJ, 4766911AI, 68157179AA, 4766911AK


Chrysler Lower Control Arm, Front Passenger Side Part Number: 4766910AL
$224.32 MSRP: $343.00You Save: $118.68 (35%)Ships in 1-2 Business DaysProduct Specifications- Other Name: Arm - Lower Control; Front Right Suspension Control Arm and Ball Joint Assembly.; Arm Lower Control Front; Control Arm
- Position: Front Lower Passenger Side
- Replaces: 4766910AK, 4766910AG, 4766910AH, 68157178AA, 4766910AE, 4766910AJ, 4721484AD, 4766910AF, 4766910AI


Chrysler Control Arm, Front Lower Driver Side Part Number: 4656731AN
$246.42 MSRP: $376.00You Save: $129.58 (35%)Ships in 1-2 Business DaysProduct Specifications- Other Name: Arm - Lower Control; Front Left Suspension Control Arm and Ball Joint Assembly.; Lower Control Arm; Arm Lower Control Front; Arm Control; Suspension Control Arm
- Position: Front Lower Driver Side
- Replaces: 4656731AL, 4656731AH, 4656731AJ, 4656731AF, 4656731AK, 4656731AM, 4656731AG


Chrysler Lower Control Arm, Front Upper Driver Side Part Number: 4895669AB
$403.33 MSRP: $615.00You Save: $211.67 (35%)Ships in 1-2 Business DaysProduct Specifications- Other Name: Arm - Upper Control; Front Left Suspension Control Arm and Ball Joint Assembly.; Upper Control Arm; Arm Upper Control Front; Suspension Control Arm; Control Arm
- Position: Front Upper Driver Side
- Replaces: 5180597AA, 5180597AB, 5180597AC, 4895669AA


Chrysler Lower Control Arm, Front Upper Passenger Side Part Number: 4895668AB
$403.33 MSRP: $615.00You Save: $211.67 (35%)Ships in 1-2 Business DaysProduct Specifications- Other Name: Arm - Upper Control; Front Right Suspension Control Arm and Ball Joint Assembly.; Upper Control Arm; Arm Upper Control Front; Suspension Control Arm; Control Arm
- Position: Front Upper Passenger Side
- Replaces: 5180596AB, 4895668AA, 5180596AC


Chrysler Lower Control Arm, Front Driver Side Part Number: 68228521AG
$446.42 MSRP: $679.00You Save: $232.58 (35%)Ships in 1-2 Business DaysProduct Specifications- Other Name: Arm - Lower Control; Suspension Control Arm, Front Left; Control Arm
- Position: Front Lower Driver Side
- Replaces: 68228521AF, 68228521AB, 68228521AC, 68228521AA, 68228521AE, 68228521AD


Chrysler Lower Control Arm, Front Driver Side Part Number: 5168283AB
$548.08 MSRP: $833.00You Save: $284.92 (35%)Ships in 1-2 Business DaysProduct Specifications- Other Name: Arm - Lower Control; Front Left Suspension Control Arm and Ball Joint Assembly.; Arm Lower Control Front; Suspension Control Arm; Control Arm
- Position: Front Lower Driver Side
- Replaces: 5168283AA

Chrysler Lower Control Arm, Front Passenger Side Part Number: 5168282AB
$548.08 MSRP: $833.00You Save: $284.92 (35%)Ships in 1-2 Business DaysProduct Specifications- Other Name: Arm - Lower Control; Front Right Suspension Control Arm and Ball Joint Assembly.; Arm Lower Control Front; Suspension Control Arm; Control Arm
- Position: Front Lower Passenger Side


Chrysler Control Arm, Front Lower Passenger Side Part Number: 4656730AN
$131.39 MSRP: $195.00You Save: $63.61 (33%)Ships in 1-3 Business DaysProduct Specifications- Other Name: Arm - Lower Control; Front Right Suspension Control Arm and Ball Joint Assembly.; Lower Control Arm; Arm Lower Control Front; Arm Control; Suspension Control Arm
- Position: Front Lower Passenger Side
- Replaces: 4656730AK, 4656730AL, 4656730AH, 4656730AM, 4656730AJ, 4656730AG, 4656730AF


Chrysler Upper Control Arm, Front Driver Side, Steel Part Number: 4782665AB
$149.56 MSRP: $221.00You Save: $71.44 (33%)Product Specifications- Other Name: Arm - Control; Front Left Upper Suspension Control Arm and Ball Joint Assembly.; Arm Control; Suspension Control Arm; Control Arm
- Position: Front Upper Driver Side


Chrysler Upper Control Arm, Rear Passenger Side Part Number: 4782978AA
$216.58 MSRP: $307.00You Save: $90.42 (30%)Ships in 1-2 Business DaysProduct Specifications- Other Name: Arm - Control; Rear Right Upper Suspension Control Arm and Ball Joint Assembly.; Arm Control; Control Arm
- Position: Rear Upper Passenger Side


Chrysler Upper Control Arm, Rear Part Number: 52113278AA
$132.96 MSRP: $165.00You Save: $32.04 (20%)Ships in 1-2 Business DaysProduct Specifications- Other Name: Arm - Upper Control; Suspension Control Arm, Rear Upper; Arm Upper Control Rear; Suspension Control Arm; Control Arm
- Position: Rear Upper


Chrysler Lower Control Arm Part Number: MB864727
$68.24 MSRP: $86.50You Save: $18.26 (22%)Ships in 1-2 Business DaysProduct Specifications- Other Name: Arm - Control; Front Lower Control Arm; Arm Assembly, Rear Suspension Lower; Arm Control


Chrysler Control Arm, Front Passenger Side Part Number: 4616402
$121.95 MSRP: $154.60You Save: $32.65 (22%)Ships in 1-2 Business DaysProduct Specifications- Other Name: Arm - Control; Front Right Suspension Control Arm and Ball Joint Assembly.; Lower Control Arm; Arm And Bushing, Lower Control Arm, Right; Arm Control; Suspension Control Arm
- Position: Front Passenger Side


Chrysler Upper Control Arm, Rear Lower Driver Side Part Number: 4782979AA
$281.08 MSRP: $286.00You Save: $4.92 (2%)Ships in 1-2 Business DaysProduct Specifications- Other Name: Arm - Control; Rear Left Lower/Upper Suspension Control Arm and Ball Joint Assembly.; Arm Control; Control Arm
- Position: Rear Lower Driver Side
| Page 1 of 6 |Next >
1-20 of 103 Results
Chrysler Control Arm
OEM parts sourced directly from Chrysler deliver superior quality, long lasting strength, and a precise fit you can trust. Each item goes through strict quality checks to ensure safety, toughness, and performance that matches your factory equipment. At JeepPartsDeal online shop, you'll get top-quality, budget-friendly OEM Chrysler Control Arm for your vehicle. We focus on giving you a high standard without pushing up the price. Our full selection of genuine factory products comes backed by the original manufacturer's warranty. You'll love our fast delivery, seamless shopping experience, and convenient return policy, saving you all the hassle.
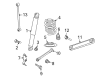
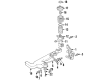
Chrysler Control Arm maintains direction of wheels during load which provides drivers with constant handling during uneven pavement. In 1925, Chrysler went ahead to launch vehicles that were solid to touch, appeared new, and priced reasonably, making new customers become true drivers who treasured simple dealings more than theatrics at showrooms. Floating Power allowed Chrysler to cut engine vibration harshly to the point that dashboards ceased to vibrate and the teenage road-trippers could actually hear their music even on washboard gravel. It was demonstrated by bold airflow styling that cutting-edge lines cut the wind drag, increased the MPG by a few spur gears, and provided the entire occupant with more breathing room well before the advent of computerized wind tunnels. Afterwards, Chrysler launched the first viable minivan that was cost-effective as it demonstrated spacious cabins, flat cabin floors, and rapid sliding doors outshining bloated sedans. A Control Arm is what connects the wheel hub to the frame which contains bushings and a ball joint to direct the up and down movement to ensure that the alignment remains true even when sudden hits of potholes occur. The Control Arm has rubber bushings to eliminate vibration and the joint allows the knuckle to pivot without sticking during tight parking turns. Each Control Arm shakes the flex, sheds pounds, and hones steering on any Chrysler system with stout cast aluminum or iron. Track-day fans select performance Control Arms to adjust the camber and to keep corners stuck at quite ridiculous velocities.
Chrysler Control Arm Parts and Q&A
- Q: How to Remove and Install a lower Control Arm on Chrysler 300?A:A special tool is needed to separate the balljoint from the lower control arm. Start by loosening the wheel lug nuts and raising the front of the vehicle on jackstands. Remove the wheel and the engine splash shield. Remove the stabilizer bar brackets to access the lower control arm-to-subframe mounting bolt. Check the bolt for grooves. Hold the bolt while loosening the nut and remove the bolt slowly, noting its placement in the bushing. Remove the shock absorber lower mounting fasteners and the ABS wheel speed sensor harness. Loosen the nut on the balljoint stud and use a balljoint removal tool to disconnect the balljoint from the lower control arm. Remove the balljoint stud nut and pry the knuckle down to separate it from the control arm. Slide out the lower control arm from the subframe bracket. To install, use a new balljoint stud nut and tighten all fasteners. Raise the lower control arm with a floor jack to simulate normal ride height before tightening the lower control arm mounting nut and the lower shock absorber mounting fasteners. Install the wheel, lower the vehicle, and tighten the lug nuts. Finally, have the front end alignment checked and adjusted if necessary.
- Q: How to Remove and Install a front Control Arm on Chrysler Cirrus?A:To remove the shock absorber, remove the coil spring and remove the nuts and bolts attaching the upper control arm. Also, inspect the bushings in the mounting bracket for cracks or tears and replace the control arm mounting bracket if necessary. Install the coil spring on the shock absorber and the upper shock mount/upper control arm assembly and install the shock absorber.


Related Chrysler Parts
 Chrysler Ball Joint
 Chrysler Lug Nuts
 Chrysler Wheel Bearing
 Chrysler Axle Support Bushings
 Chrysler Coil Springs
 Chrysler Lateral Link
 Chrysler Leaf Spring Bushing
 Chrysler Leaf Spring Plate
 Chrysler Shock Absorber
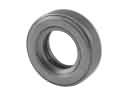 Chrysler Strut Bearing
 Chrysler Sway Bar Bracket
 Chrysler Trailing Arm Bushing