JeepParts
My Garage
My Account
Cart
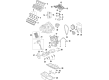
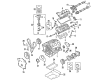
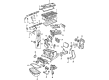
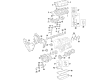
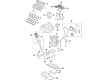
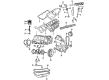
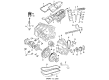
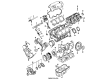
OEM Chrysler Oil Pan
Oil Drain Pan- Select Vehicle by Model
- Select Vehicle by VIN
Select Vehicle by Model
orMake
Model
Year
Select Vehicle by VIN
For the most accurate results, select vehicle by your VIN (Vehicle Identification Number).
58 Oil Pans found


Chrysler Oil Pan Part Number: 4892061AC
$317.14 MSRP: $484.00You Save: $166.86 (35%)Ships in 1-2 Business DaysProduct Specifications- Other Name: Pan - Oil; Engine Oil Pan; Pan Oil
- Replaces: 4892061AB


Chrysler Oil Pan Part Number: 5037634AC
$411.06 MSRP: $623.00You Save: $211.94 (35%)Ships in 1-2 Business DaysProduct Specifications- Other Name: Pan - Engine Oil; Engine Oil Pan; Pan Engine Oil
- Replaces: 5037634AA, 5037634AB, 4792870AA, 4792870AB


Chrysler Oil Pan Part Number: 5184513AC
$206.63 MSRP: $311.00You Save: $104.37 (34%)Product Specifications- Other Name: Pan - Engine Oil; Engine Oil Pan; Upper Oil Pan; Lower Oil Pan; Pan Engine Oil


Chrysler Oil Pan Part Number: 68086157AC
$216.74 MSRP: $326.00You Save: $109.26 (34%)Ships in 1-2 Business DaysProduct Specifications- Other Name: Pan - Engine Oil; Engine Oil Pan; Pan Engine Oil


Chrysler Oil Pan Part Number: 4792861AC
$167.33 MSRP: $249.00You Save: $81.67 (33%)Ships in 1-3 Business DaysProduct Specifications- Other Name: Pan - Oil; Engine Oil Pan; Pan Oil
- Replaces: 4792861AB


Chrysler Oil Pan Part Number: 4792247
$207.10 MSRP: $262.53You Save: $55.43 (22%)Ships in 1-2 Business DaysProduct Specifications- Other Name: Pan - Oil; Pan Oil


Chrysler Oil Pan Part Number: 5047566AE
$166.20 MSRP: $252.00You Save: $85.80 (35%)Ships in 1-2 Business DaysProduct Specifications- Other Name: Pan - Engine Oil; Engine Oil Pan
- Replaces: 5047566AB, 5047566AC, 5047566AD, 5047566AA


Chrysler Oil Pan, Upper Part Number: 68249488AE
$157.22 MSRP: $238.00You Save: $80.78 (34%)Ships in 1-2 Business DaysProduct Specifications- Other Name: Pan - Engine Oil; Engine Oil Pan, Upper
- Position: Upper
- Replaces: 68249488AC, 68249488AD


Chrysler Oil Pan Part Number: 4884665AF
$204.39 MSRP: $308.00You Save: $103.61 (34%)Ships in 1-2 Business DaysProduct Specifications- Other Name: Pan - Engine Oil; Engine Oil Pan; Pan Engine Oil
- Replaces: 4884665AC, 4884665AE, 4884665AD


Chrysler Oil Pan, Upper Part Number: 68051597AD
$217.02 MSRP: $450.00You Save: $232.98 (52%)Ships in 1-2 Business DaysProduct Specifications- Other Name: Pan - Engine Oil; Engine Oil Pan, Upper; Upper Oil Pan; Pan Engine Oil
- Position: Upper
- Replaces: 68051597AB, 68051597AC

Chrysler Oil Pan Part Number: 68431654AA
$462.84 MSRP: $832.00You Save: $369.16 (45%)Ships in 1-2 Business DaysProduct Specifications- Other Name: Pan - Oil; Engine Oil Pan
- Replaces: 4792662AC

Chrysler Oil Pan Part Number: 53021687AD
$255.26 MSRP: $389.00You Save: $133.74 (35%)Ships in 1-2 Business DaysProduct Specifications- Other Name: Pan - Engine Oil; Engine Oil Pan
- Replaces: 53021687AC

Chrysler Oil Pan Part Number: 4892386AA
$430.95 MSRP: $657.00You Save: $226.05 (35%)Ships in 1-2 Business DaysProduct Specifications- Other Name: Pan - Oil; Engine Oil Pan; Pan Oil

Chrysler Oil Pan Part Number: 4648930AA
$134.76 MSRP: $202.00You Save: $67.24 (34%)Ships in 1-2 Business DaysProduct Specifications- Other Name: Pan - Engine Oil; Engine Oil Pan; Pan Engine Oil
Chrysler Oil Pan, Lower Part Number: 5184404AG
$141.50 MSRP: $214.00You Save: $72.50 (34%)Ships in 1-2 Business DaysProduct Specifications- Other Name: Pan - Engine Oil; Engine Oil Pan, Lower; Lower Oil Pan; Pan Engine Oil; Engine Oil Pan
- Position: Lower
- Replaces: 5184404AE, 5184404AD, 5184404AF


Chrysler Oil Pan, Upper Part Number: 68051599AE
$199.89 MSRP: $301.00You Save: $101.11 (34%)Ships in 1-2 Business DaysProduct Specifications- Other Name: Pan - Engine Oil; Engine Oil Pan, Upper; Upper Oil Pan; Pan Engine Oil
- Position: Upper
- Replaces: 68051599AA, 68051599AD, 68051599AB


Chrysler Oil Pan Part Number: 4777991AB
$106.39 MSRP: $157.00You Save: $50.61 (33%)Ships in 1-3 Business DaysProduct Specifications- Other Name: Pan - Engine Oil; Engine Oil Pan; Pan Engine Oil

Chrysler Oil Pan Part Number: MD110686
Product Specifications- Other Name: Pan; Engine Oil Pan; Pan Assembly, Oil

Chrysler Oil Pan Part Number: 4892061AA
Product Specifications- Other Name: Pan - Oil; Engine Oil Pan; Pan Oil


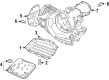
Chrysler Differential Cover, Front Part Number: 4659520
Product Specifications- Other Name: Pan - Transaxle Differential Oil; Automatic Transmission Cover, Front; Pan, Transmission Differential Oil; Pan Transaxle Differential Oil
- Position: Front
| Page 1 of 3 |Next >
1-20 of 58 Results
Chrysler Oil Pan
OEM parts sourced directly from Chrysler deliver superior quality, long lasting strength, and a precise fit you can trust. Each item goes through strict quality checks to ensure safety, toughness, and performance that matches your factory equipment. At JeepPartsDeal online shop, you'll get top-quality, budget-friendly OEM Chrysler Oil Pan for your vehicle. We focus on giving you a high standard without pushing up the price. Our full selection of genuine factory products comes backed by the original manufacturer's warranty. You'll love our fast delivery, seamless shopping experience, and convenient return policy, saving you all the hassle.
Chrysler Oil Pan maintains engine lifeblood within control, protecting the power and avoiding dry metal misery. Since 1925, Chrysler has rolled out rides to date, with Floating Power mounts to eliminate vibrations, wind-slicing shapes to enhance cabin quietness, and people-moving designs to make minivan road trips uncomplicated without too much finance jargon in the dealer. Continuing the tradition, Chrysler continues to perfect roomy interiors, smooth ride, and utility, allowing ordinary commuters and a whole family to ride long distances without any hassle or banging, and offers flexibility and cargo transportation alike. The recent Chrysler improvement is right in the open under the block where an Oil Pan made of cast aluminum can absorb the road kickback, withstand warp due to heat spikes, and yet remain low enough not to lose any valuable ground clearance. The Oil Pan is also applied inside as a reservoir to store the lubricant pool such that the pump will not gulp any air even when the sedan travels in deep water, uphill, or even when cornering. The unit contains baffles to stabilize flow, and Chrysler combines them with a wet-sump pickup which recycles cooled oil at a high rate, thus keeping bearings steady at every rpm, with the Oil Pan remaining firmly closed against accidents. Strong gaskets and strong threads allow the Oil Pan to endure thousands of drains and give the engine many more miles.
Chrysler Oil Pan Parts and Q&A
- Q: How to remove and install an oil pan in V8 engine on Chrysler 300?A:The first step is to remove the battery's negative cable. This can be done by draining the coolant and supporting the vehicle using jack stands. To drain the engine oil, replace an oil filter and unscrew the dipstick for engine oil. Following this, take away the engine splash shield and separate exhaust pipes from manifold outlets. Thereafter, do away with cooling fans, shroud of same as well as cross member power steering gear taking care not to disconnect intermediate shaft coupler, tie rod ends or power steering fluid lines. The use of your automotive crane will facilitate easy lifting of the engine in question whereby removal of left-hand side and right hand side engine-to-subframe nuts plus bolts becomes possible. At first it is necessary to consider all bolts on an oil pan before you lower it from an engine; otherwise force will have to be applied. That tray must be replaced while one removes that pan since it is part of blocks' new parts when their pans are taken off. You should begin by installing a new gasket plus windage tray followed by washing out pan using solvent when preparing for reassembly or installation. In cleaning both block surfaces where pan mounts and pan's surface itself from old sealer along with gasket material resort may be had towards cleaner/ thinner lacquer materials in case there is some distortion in that device caused by straightening flange; overall gasket faces ought to be wiped clean with thinner/ acetone solvents so they are ready for assembly operations. After that, RTV sealant must be applied at specified locations through attachment of single-piece oil pan gasket via contact cement type adhesive designed for use on gaskets meant for mounting on upper surfaces of the block directly above crankcases; aside from this alignment studs should now face each other properly within a specific place called block hole having been used prior thereto only because there still remained enough room throughout entire space between cylinder heads under intake manifolds of carburetors which weren't much higher than blocks themselves but still had sufficient clearance concerning each other. You will have to lift pan into its final location making sure not to disturb gasket and put several bolts in place only finger tight while looking out for any portion extending beyond perimeter around block. Finally, install oil pan nuts onto studs by tightening fasteners as per correct torque sequence after all bolts have been placed; meanwhile the remaining reverse procedures of disassembly should be followed until you are through with installation.
- Q: How to remove and install the oil pan in four cylinder engine on Chrysler Cirrus?A:To perform this type of work the first step is to unbolt the negative battery cable from the ground stud on the left shock tower of the truck and then lift the truck and set it on jackstands. Pull the accessory drivebelt splash shield and empty the engine oil. Subsequently, two bolts securing the front of the transmission support bracket can be ejected, and then the front engine mount as well as the strut can be detached; on the 2.4L engines, the engineers left the engine support module in place if it was installed. If possible, take off the structural collar, connecting the transaxle to the oil pan; for engines of 2.0 liter, take off the inspection cover of the transaxle, oil filter and adapter if the automobile is equipped with air conditioning system. Unwind and unbolt the mounting in a cross-wise direction and then slowly pull down the oil pan off the car in a manner that does not affect the sealing surface of the gasket. Take out the oil pump pick-up tube and screen assembly and discard the O-ring seal then clean the assembly well. It is necessary to clean all sealing surfaces on the oil pan and block, and remove all gasket materials and check for ovality. As for installation, a new O-ring shall be fitted on the oil pick-up tube and then the latter has to be bolted onto the oil pump housing with the tension of the bolt up to the prescribed value. Be sure, then, to use a 1/8-inch bead of RTV sealant on the cylinder block-oil pump assembly joint, and put on a new oil pan gasket. Place the oil pan and then engage the bolts such that they are tightened slightly, then progress from the center outward in a rotational manner. In the front engine mount ready to attach, for 1998 2.4L engines the front engine mount strut &collar should be secured by tightening the bolts in a sequence manner. For 1997 2.4L and 1998 and later 2.0L engines instal the oil pan-to-transaxle structural collar and fasten the bolts in three steps to the drain bolt torque, as follows. Again return through the disassembly steps, add the correct oil into the crankcase, engage the engine to ensure there are no leaks and subject the car through road test to confirm the absence of leaks.


Related Chrysler Parts
 Chrysler Crankshaft Pulley
 Chrysler Camshaft Bearing
 Chrysler Crankshaft Timing Gear
 Chrysler Intake Valve
 Chrysler Oil Pump Gasket
 Chrysler Pushrod
 Chrysler Rod Bearing
 Chrysler Timing Chain
 Chrysler Timing Chain Tensioner
 Chrysler Timing Cover
 Chrysler Valve Stem Seal
 Chrysler Variable Timing Sprocket