JeepParts
My Garage
My Account
Cart
OEM Dodge Challenger Camshaft Seal
Cam Seal- Select Vehicle by Model
- Select Vehicle by VIN
Select Vehicle by Model
orMake
Model
Year
Select Vehicle by VIN
For the most accurate results, select vehicle by your VIN (Vehicle Identification Number).
3 Camshaft Seals found


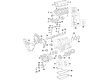
Dodge Challenger Thrust Plate Seal Part Number: 4536492AB
$7.95 MSRP: $11.90You Save: $3.95 (34%)Ships in 1-3 Business Days


Dodge Challenger Oil Filter Housing Seal, Outer Part Number: 53021661AA
$11.66 MSRP: $16.75You Save: $5.09 (31%)
Dodge Challenger Oil Seal Part Number: 4792318AB
$21.96 MSRP: $32.55You Save: $10.59 (33%)Ships in 1-2 Business Days
Dodge Challenger Camshaft Seal
Choose OEM Camshaft Seal that meet Dodge factory standards. Dodge designs and tests every component for precision and durability. Each Camshaft Seal follows strict manufacturing steps to lock in quality and fit. If your Dodge Challenger matters to you, OEM parts make the smart choice. You'll get the exact look, feel, and performance you expect. Shop genuine Challenger parts at the highly competitive prices online. Enjoy a manufacturer's warranty, a hassle-free return policy, and rapid delivery. No more guesswork with off brands. Get genuine parts with exact fit and true factory performance. Shop with confidence today at JeepPartsDeal.com.
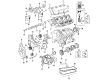
The Camshaft Seal is an essential part that constantly reminds the performance and durability of the Dodge challenger series. Used to exclude such elements as dirt, oil or other contaminants from the camshaft area which is located in the cylinder head, the Camshaft Seal is vital to the lubrication of the engine and its overall performance. This assures that the Dodge Challenger runs effectively and creating the prime time of performance and safety. It is used in most models of Dodge Challenger across the three generations with the Camshaft Seal designed for each generation to help in the enhancement of the performance of the car's engine. The role of the Dodge Challenger Camshaft Seal is not only to shield but to also keep the vehicles and its components durable and efficiently running. Interestingly, the Camshaft Seal is made of components that can hardly wear out; this makes Camshaft Seal highly rated by consumers in the automotive industry. Its design not only improves the Dodge Challenger car's performance but also favors fuel efficiency making the drives powerful without necessarily having to undergo the agony of visiting the fuel station very often. Certainly, the Dodge Challenger Camshaft Seal is a great example of the brand-specific successful deliverance of quality and entertainment thus contributing to the achievement of the Dodge Challenger as the dream car for performance enthusiasts. Thus, the Dodge Challenger Camshaft Seal is a must-have for any owner of this car model who is concerned with the long-term dependability of their vehicle and who wants to keep the engine in great conditions to perform at their prime.
Dodge Challenger Camshaft Seal Parts and Q&A
- Q: How to Remove a Camshaft Seal on Dodge Challenger?A:You should first cut off the negative Battery Cable and pour out a portion of your coolant to replace the camshaft oil seal. Remove the upper Intake Manifold, then shield the openings on the lower intake manifold. Remove the Timing Belt after fixing the screw of the right camshaft with a 36 mm (1 7/16 in.) box wrench to keep the timing mark in place, then remove the bolt and washer that retains the right camshaft gear. The camshaft gears and the camshaft are connected by keys that cannot slip apart. Disconnect the two plugs from the EGR valve and the Ignition Coils after removing the right camshaft sprocket. Then, remove the retaining tabs for the wire harness track from the cylinder head cover. After that, remove the right ignition coils, the EGR valve held on with two bolts and a gasket, eight bolts and the right cylinder head cover, ten bolts and the right Rocker Arm assembly and three bolts and the right rear camshaft thrust plate. Advance the camshaft far enough to be out of the cylinder head and about 3.5 inches past the rear end. Choose the best driver and carefully take out the camshaft oil seal. Disconnect the negative battery cable, drain the cooling system, remove the upper intake manifold and plug or tape the lower intake manifold openings for the left cylinder head as well. First, get rid of the timing belt and camshaft sprockets and then the rear timing belt cover. Take the wire harness connectors out from the ignition coils and free up the wire harness track retainers on the cylinder head cover. Disconnect the left ignition coils, take out 8 bolts from the cylinder cover, 10 bolts from the left cylinder head and 3 bolts securing the left rear camshaft thrust plate. Slide the camshaft backwards and out of the cylinder head until it is positioned about 3.5 inches from the head. Then, be careful as you remove the oil seal with the proper tool, not damaging the cylinder head or the camshaft journal surfaces.
- Q: How to Install a Camshaft Seal in the Right Cylinder Head on Dodge Challenger?A:To place the Camshaft oil seal in the correct cylinder head, put the seal in the groove and use Camshaft Installer MD-998306 to install it. Coat the seal lip and Cam Seal Protector 6788 with clean oil and then place it over the camshaft. Put the seal protector through the seal as you push the camshaft all the way forward, then pull out the protector. Take the camshaft thrust plate and the gasket and tighten their three bolts to 28 Nm. Put a new gasket around the EGR solenoid/valve and the back of the cylinder head, secure the assembly and use two mounting bolts to tighten up to 30 Nm. The camshaft sprocket should match the original camshaft and the new sprocket should be identical to the one you removed. Make sure the sprocket is counterheld with a 36 mm box end wrench and tighten the bolt to 102 Nm plus a 90° turn. Adjust the right camshaft gear so that its timing mark becomes visible and make sure the marks on the left camshaft gear and crankshaft gear are all in a line. Begin installation by fitting the timing belt around the crankshaft sprocket going against the clock. Keep it tight while working around the tensioner pulley. Place the tensioner into the housing and use a torque wrench to tighten the two bolts to 28 Nm so that the sprocket marks are in line. Loosen the retaining pin, so the tensioner hippens, then crank the sprocket two whole revolutions and see the timing marks lining up. Should they not be the same, keep going through the procedure again. Put the rocker arm and shaft in place such that marks point in the correct direction and tighten all ten bolts to 31 Nm. Wipe the cylinder head and cover mating surfaces, look at and change the gasket and seals when needed, install the cylinder head cover and tighten the eight bolts to 12 Nm. Screw in the spark plugs till they reach 28 Nm torque and tighten the bolts on the Ignition Coils to 6.7 Nm torque. Move the engine wire harness to its proper location, attach the electrical connectors to the ignition coils and place the upper and lower timing belt front covers in place. Secure the Timing Cover bolts to the indicated torque values. Place Forcing Screw C-4685-C1 through the crankshaft damper to install it, then use Damper Holding Fixture 9365 to tighten the damper bolt at the specified torque. Place the radiator Cooling Fan Assembly in front of the radiator, install the bolts, connect the wiring and set the upper radiator hose in place. Attach the tensioner for the accessory Drive Belt, tightening its mounting bolt to 34 Nm and then the accessory drive belt. Fit the upper Intake Manifold and the air cleaner body, after which connect the negative Battery Cable and tighten its nut to 5 Nm. Run the engine while topping up the cooling system until the temperature is normal and check the fluid level inside. For the left cylinder head, follow the same directions for the initial camshaft seal installation and use the same torque specs as before for aligning the timing gear, setting up the rocker arms, installing the cylinder head cover, mounting the spark plugs, ignition coils and timing belt covers, mounting the crankshaft damper, building the radiator cooling fan assembly, brake system and checking the cooling system again.


Related Dodge Challenger Parts
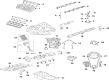
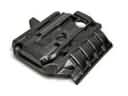 Dodge Challenger Engine Cover
 Dodge Challenger Exhaust Valve
 Dodge Challenger Oil Pan
 Dodge Challenger Valve Cover Gasket
 Dodge Challenger Cylinder Head
 Dodge Challenger Cylinder Head Gasket
 Dodge Challenger Engine Mount
 Dodge Challenger Intake Valve
 Dodge Challenger Piston
 Dodge Challenger Timing Belt Tensioner
 Dodge Challenger Timing Chain Tensioner
 Dodge Challenger Transmission Mount