JeepParts
My Garage
My Account
Cart
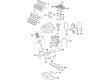
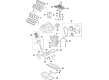
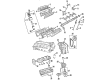
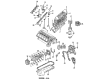
OEM Dodge Ram 3500 Camshaft
Cam- Select Vehicle by Model
- Select Vehicle by VIN
Select Vehicle by Model
orMake
Model
Year
Select Vehicle by VIN
For the most accurate results, select vehicle by your VIN (Vehicle Identification Number).
9 Camshafts found


Dodge Ram 3500 Camshaft Part Number: 53022314AD
$403.04 MSRP: $592.00You Save: $188.96 (32%)


Dodge Ram 3500 Camshaft Part Number: 53022064AA
$396.17 MSRP: $582.00You Save: $185.83 (32%)

Dodge Ram 3500 Camshaft Part Number: 68335532AA
$2759.45 MSRP: $4035.00You Save: $1275.55 (32%)
Dodge Ram 3500 Camshaft Part Number: 53021101

Dodge Ram 3500 Camshaft Part Number: 53020842

Dodge Ram 3500 Camshaft Part Number: 5093139AA

Dodge Ram 3500 Camshaft Gear Part Number: 5018412AB

Dodge Ram 3500 Timing Gear Set Part Number: 5018413AB

Dodge Ram 3500 Camshaft Part Number: 5093139AB
Dodge Ram 3500 Camshaft
Choose OEM Camshaft that meet Dodge factory standards. Dodge designs and tests every component for precision and durability. Each Camshaft follows strict manufacturing steps to lock in quality and fit. If your Dodge Ram 3500 matters to you, OEM parts make the smart choice. You'll get the exact look, feel, and performance you expect. Shop genuine Ram 3500 parts at the highly competitive prices online. Enjoy a manufacturer's warranty, a hassle-free return policy, and rapid delivery. No more guesswork with off brands. Get genuine parts with exact fit and true factory performance. Shop with confidence today at JeepPartsDeal.com.
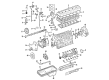
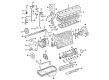
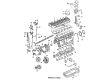
Camshaft in the Dodge Ram 3500 is instrumental in the control of the intake and exhaust valves with regards to admission of the air/fuel mixture as well as the elimination of the exhaust gases. Principally made from iron or steel, the camshaft works with lifters, pushrods and rocker arms in Over Head Vale (OHV) engines whereas followers in Single Over Head Cam (SOHC) and Double Over Head Cam (DOHC) engines. Dodge Ram 3500 models may incorporate different camshafts whereby performance camshafts depict new higher lift and long duration for better airflow. Parameters including LSA, govern the amount of torque and horsepower to be delivered and can be used to maximize performance depending on certain changes that have been made to the vehicle.
Dodge Ram 3500 Camshaft Parts and Q&A
- Q: How to Effectively Service and Repair a Camshaft on Dodge Ram 3500?A:When servicing or repairing the camshaft, first remove the engine from the car and then take it completely apart. Gently remove the rear cam bearing core plug and then drive out the bearing shells with proper adapters and washers using the Camshaft Bearing Remover/Installer Tool C-3132-A. Since the camshaft is installed with an integral oil pump and distributor drive gear, the Radiator, A/C Condenser (if it has one), engine cover, Intake Manifold, cylinder head covers, timing case cover, Timing Chain, Rocker Arms, push rods and tappets must be removed, with care to note where each belongs for reinstallation. After that, take out the distributor and lift the oil pump and distributor drive shaft out, making sure to note the oil tab's position on the camshaft thrust plate. Before pulling out the camshaft, put a long bolt into the front of it and remove it gently so as not to damage the cam bearings. Slide the new camshaft bearings into position over the correct adapter, set the rear bearing in the tool, secure the horseshoe lock and drive the bearing shell into place while it is correctly aligned with the oil passages. Put in a new core hole plug at the back of the camshaft to keep leaks from happening. Coat the camshaft lobes and bearing journals in oil and put the camshaft in the cylinder block until it rests 51 mm (2 inches) from the last position. Apply the Camshaft Holder Tool C-3509 to prevent the camshaft from getting forced into the cylinder head too deeply when you tighten the distributor lock plate bolt. Set the camshaft thrust plate on top of the camshaft, place the chain oil tab and align the tang in the right hole. Then, secure with bolts to a torque of 24Nm (210 in. lbs.) Add the timing chain and gears, measure the end play of the camshaft and if this is required, swap out the thrust plate. Replace every tappet onto its original pin and install all new tappets whenever the camshaft is swapped. After that, add the distributor and its drive shaft, followed by push rods, tappets, rocker arms, timing cover, cylinder covers, intake manifold, engine cover, A/C condenser (if available) and finally the radiator. Fire up the engine and look for any leaks.
- Q: How to Remove and Replace a Camshaft on Dodge Ram 3500?A:Prior to removing the camshaft, remove both of the battery negative cables and, if the vehicle is equipped with A/C,20, drain the refrigerant. Place the car on a hoist and let the engine coolant out into the proper container. Lower the car, remove the upper Radiator hose, together with the fan drive assembly and fan shroud. Remove the lower radiator hose and the hose from the radiator neck of the cooling recovery bottle from their connections to the radiator. If you have an automatic transmission model, unplug the transmission oil cooler lines from the radiator with Special Tool 6931 unless the disconnect can be done by hand. Unscrew the radiator mounts and lift the radiator from its place, then take off the top radiator panel and front Bumper assembly. Should there be an A/C unit, separate the A/C condenser refrigerant lines and plug charge air cooler plumbing into the cooler inlet and outlet. Afterward, drain the cooling fluid from the two charge air cooler mounting bolts and remove the entire charge air cooler along with the A/C condenser if fitted. Remove the accessory Drive Belt, the fan, Crankshaft damper and the cover for the crankcase breather vapor canister from the gear housing cover. After using the Special Tool 7471-B to turn the crankshaft to TDC #1, remove all the bolts securing the gear cover, then carefully lift the cover from the housing. Slip off the cylinder head cover, remove the Rocker Arms, cross heads and push rods, mark every part so you can put it back in the correct place. Tighten the tappets by screwing in the wooden dowel rods of the Miller Tool Kit 8502 or Cummins tappet tool kit #3822513 and secure them with rubber bands so they don't fall off during assembly. align the timing marks from the camshaft and injection pump with those on the crankshaft, then carefully undo the bolts that hold the thrust plate and make sure it doesn't fall into the engine while removing the camshaft. Pull out the camshaft and thrust plate, checking the valve lobes and bearing journals for damages and for their degree of wear. Check the camshaft bushing and bores for too much wear, using a telescoping bore gauge and micrometer and see if the camshaft bushing oil hole lines up with the cylinder block. Inspect the camshaft gear for any noticeable cracks or damage and see if the thrust plate is worn down by comparing its thickness to what's called for by the manufacturer. Before installation, grease the camshaft bushing and its housing bore with fresh motor oil, spray the lobes, journals and thrust washer and line up the timing markers while placing in the camshaft and thrust plate. Screw each of the thrust plate bolts to 24 Nm (18 ft. lbs.) of torque, measure the camshaft back lash and end clearance and pull the wooden dowel rods and rubber bands out of the tappets. Grease the push rods, crossheads, rocker arms and screw them into their original places, securing all with bolts tightened to 36 Nm (27 ft. lbs.), while checking the valve lash. Put in the cylinder head cover with the same gasket, gear housing cover, crankshaft damper and fan support/hub assembly and tighten all bolts to 24 Nm (18 ft. lbs. torque). Mount the crankcase breather housing, charge air cooler and make sure bolts are tightened to 2 Nm / 17 inch lbs. torque. After that, connect charge air cooler inlet and outlet piping and tighten the clamps to 10 Nm / 100 inch lbs. torque. Set the radiator upper support panel, shut the radiator petcock, carefully lower the radiator into place and tighten the bolts to 11 Nm (95 inch lbs.). Lift the vehicle, fasten the radiator lower hose and secure the clamp before you connect the lines of transmission auxiliary oil cooler if available. Lower your vehicle, attach the fan shroud, secure it with screws at 6 Nm (50 inch lbs.), fit the viscous fan/drive assembly, install the coolant recovery and windshield washer fluid reservoirs and finally link the hose from the recovery tank to the radiator filler neck. Install the drive belt at the front, install the main bumper, add engine coolant, charge the A/C if needed, reconnect the main negative Battery Cable and turn on the engine to check for leaks.


Related Dodge Ram 3500 Parts
 Dodge Ram 3500 Cam Gear
 Dodge Ram 3500 Camshaft Seal
 Dodge Ram 3500 Crankshaft
 Dodge Ram 3500 Crankshaft Pulley
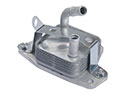 Dodge Ram 3500 Engine Oil Cooler
 Dodge Ram 3500 Exhaust Valve
 Dodge Ram 3500 Harmonic Balancer
 Dodge Ram 3500 Oil Pan Gasket
 Dodge Ram 3500 Oil Pump
 Dodge Ram 3500 Rocker Arm
 Dodge Ram 3500 Rocker Shaft Spring Kit
 Dodge Ram 3500 Timing Chain