JeepParts
My Garage
My Account
Cart
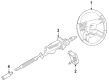
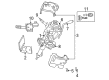
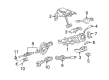
OEM Dodge Steering Column
Steering Column Tilt- Select Vehicle by Model
- Select Vehicle by VIN
Select Vehicle by Model
orMake
Model
Year
Select Vehicle by VIN
For the most accurate results, select vehicle by your VIN (Vehicle Identification Number).
146 Steering Columns found


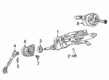
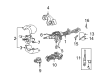
Dodge Steering Column Part Number: 68271371AB
$1078.16 MSRP: $2455.00You Save: $1376.84 (57%)Ships in 1-3 Business DaysProduct Specifications- Other Name: Column - Steering; Column Steering
- Replaces: 68271371AA


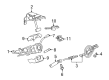
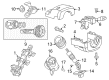
Dodge Steering Column Part Number: 5057638AC
$1552.53 MSRP: $2365.00You Save: $812.47 (35%)Ships in 1-2 Business DaysProduct Specifications- Other Name: Column - Steering; Column Steering
- Replaces: 5057638AB, 5057638AA


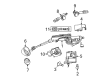
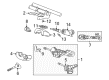
Dodge Steering Column Part Number: 4664341AP
$739.67 MSRP: $1080.00You Save: $340.33 (32%)Ships in 1-3 Business DaysProduct Specifications- Other Name: Column - Steering; Column Assembly; Column Steering
- Replaces: 4664341AK, 4664333AL, 4664341AO, 4664341AE, 4664333AF, 4664333AH, 4664333AI, 4664333AM, 4664333AJ, 4664341AG, 4664341AJ, 4664341AN, 4664333AG, 4664341AH, 4664333AE, 4664341AF, 4664341AI, 4664333AK, 4664333AN, 4664341AM, 4664341AL


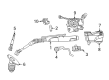
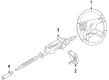
Dodge Steering Column Part Number: 5057642AH
$1464.46Ships in 1-2 Business DaysProduct Specifications- Other Name: Column - Steering; Column Assembly; Column Steering
- Replaces: 5057642AG, 5057642AA, 5057642AF, 5057642AB, 5057642AC, 5057642AD, 5057642AE

Dodge Column Assembly Part Number: 4680435AD
$89.01 MSRP: $565.00You Save: $475.99 (85%)Ships in 1-2 Business DaysProduct Specifications- Other Name: Column - Steering; Steering Column; Column Steering Tilt
- Replaces: 4680435AC

Dodge Steering Column Part Number: 4664224AG
$85.25 MSRP: $489.00You Save: $403.75 (83%)Ships in 1-2 Business DaysProduct Specifications- Other Name: Column - Steering; Column Assembly; Column Steering Tilt
- Replaces: 4664224AF, 4664224AE

Dodge Steering Column Part Number: 5073538AA
$193.03 MSRP: $1110.00You Save: $916.97 (83%)Ships in 1-2 Business DaysProduct Specifications- Other Name: Column - Steering; Column Assembly; Column Housing; Column Steering Tilt

Dodge Steering Column Part Number: 68091898AB
$1463.48 MSRP: $3650.00You Save: $2186.52 (60%)Ships in 1-2 Business DaysProduct Specifications- Other Name: Column - Steering; Column Steering
- Replaces: 68091898AA


Dodge Steering Column Part Number: 5057980AF
$2908.78 MSRP: $5270.00You Save: $2361.22 (45%)Ships in 1-2 Business DaysProduct Specifications- Other Name: Column - Steering; Column Steering
- Replaces: 5057980AE, 5057980AD

Dodge Steering Column Part Number: 5057191AH
$1552.08 MSRP: $2560.00You Save: $1007.92 (40%)Ships in 1-2 Business DaysProduct Specifications- Other Name: Column - Steering
- Replaces: 5057191AB, 5057191AG, 5057191AE, 5057191AF, 5057191AC, 5057191AD

Dodge Steering Column Part Number: 5057033AD
$1360.92 MSRP: $2055.00You Save: $694.08 (34%)Ships in 1-2 Business DaysProduct Specifications- Other Name: Column - Steering; Column Steering Tilt
- Replaces: 5057311AA
Dodge Steering Column Part Number: 5057552AD
$3192.40 MSRP: $5215.00You Save: $2022.60 (39%)Ships in 1-2 Business DaysProduct Specifications- Other Name: Column - Steering; Column Steering
- Replaces: 5057552AC
Dodge Steering Column Part Number: 68248471AD
$749.19 MSRP: $1145.00You Save: $395.81 (35%)Ships in 1-2 Business DaysProduct Specifications- Other Name: Column - Steering; Column Steering Includes Lower Column Shaft Seal; Column Steering
- Replaces: 68248471AC, 68248471AA, 68248471AB
Dodge Steering Column Part Number: 68248472AD
$865.22 MSRP: $1320.00You Save: $454.78 (35%)Ships in 1-2 Business DaysProduct Specifications- Other Name: Column - Steering; Column Steering Includes Lower Column Shaft Seal; Column Steering
- Replaces: 68248472AC, 68248472AB
Dodge Steering Column Part Number: 68140568AG
$1067.43 MSRP: $1635.00You Save: $567.57 (35%)Ships in 1-2 Business DaysProduct Specifications- Other Name: Column - Steering; Column Steering Includes Upper Intermediate Shaft And Boot; Column Steering Includes Intermediate Shaft; Column Steering
- Replaces: 68140568AD, 68140568AA, 68140568AF, 68140568AH, 68140568AB, 68140568AC


Dodge Steering Column Part Number: 5057549AD
$1091.74 MSRP: $1665.00You Save: $573.26 (35%)Ships in 1-2 Business DaysProduct Specifications- Other Name: Column - Steering; Steering Column Tube; Column Assembly; Column Steering
- Replaces: 5057549AA, 5057549AB, 5057549AC

Dodge Steering Column Part Number: 68259475AD
$1558.05 MSRP: $2375.00You Save: $816.95 (35%)Ships in 1-2 Business DaysProduct Specifications- Other Name: Column - Steering; Column Steering Includes Upper Intermediate Shaft, Lower Column Shaft Seal, and Intermediate Shaft.
- Replaces: 68259475AB, 68259475AC, 68259475AA
Dodge Steering Column Part Number: 68140571AF
$1759.88 MSRP: $2400.00You Save: $640.12 (27%)Ships in 1-2 Business DaysProduct Specifications- Other Name: Column - Steering
- Replaces: 68140571AC, 68140571AB


Dodge Steering Column Part Number: 68140569AG
$678.99 MSRP: $989.00You Save: $310.01 (32%)Product Specifications- Other Name: Column - Steering; Column Steering Includes Upper Intermediate Shaft, Lower Column Shaft Seal, and Intermediate Shaft.
- Replaces: 68140569AB, 68140569AC, 68140569AA, 68140569AF, 68140569AD


Dodge Steering Column Part Number: 5057434AC
Product Specifications- Other Name: Column - Steering; Column Steering Tilt; Column Steering
- Replaces: 5057434AA, 5057434AB
| Page 1 of 8 |Next >
1-20 of 146 Results
Dodge Steering Column
OEM parts sourced directly from Dodge deliver superior quality, long lasting strength, and a precise fit you can trust. Each item goes through strict quality checks to ensure safety, toughness, and performance that matches your factory equipment. At JeepPartsDeal online shop, you'll get top-quality, budget-friendly OEM Dodge Steering Column for your vehicle. We focus on giving you a high standard without pushing up the price. Our full selection of genuine factory products comes backed by the original manufacturer's warranty. You'll love our fast delivery, seamless shopping experience, and convenient return policy, saving you all the hassle.
Dodge Steering Column converts your turnings of the wheel into a very specific control of the road as it protects you in an accident. In 1914, Dodge came storming down roads with the very first all-steel body and declared crude strength and power. Throughout the decades, the brand piled up muscle creds with HEMI mills, the track bite of the Viper, and inexorable straight line speed. The new Fratzonic Chambered Exhaust turns a 600-watt howl, which can switch between Donut and Stealth at a tap. Drivers desire that unmitigated sound and rush, and the badge continues to deliver without drowning in marketing porridge. Dodge continues to combine domineering power with intelligent electronics to make each release a declaration rather than a drive. The Steering Column is the collapsible but solid structure between your hands and the rack and measures angle and torque with milliseconds of urgency. Designed break points absorb the crash energy before it arrives at the cabin. The Steering Column integration also incorporates a difficult steering lock that kills the hopes of thieves and introduces zero slack to the daily inputs. Dodge designed the Steering Column so that it could fit the whole line, making the installation process of the column easy and the steering functionality the same whether the vehicle is a hatchback or a big SUV. Its hard shafts incorporate quality alloys that shake off flex, enabling the wheel to remain tight and responsive by being hard to corner.
Dodge Steering Column Parts and Q&A
- Q: How to Ensure Safety and Proper Operation Before Servicing a Steering Column on Dodge Durango?A:Disarm the air bag system before servicing the steering column to avoid any accidental beeping or injury. Before operation, all fasteners need to be tightened to the proper levels. Place the steering column on the support in the dash panel and simply install the nuts temporarily. Slide the steering column upward until it meets the studs on the dash panel and use your hands to tighten the nuts. Slide the steering shaft coupler over the steering shaft and put in a loosely fitting bolt. Start by loosening the upper left nut, then tighten the lower right, after that tighten the lower left nut and finally tighten the upper right nut. Insert the steering column, centered in the opening and fasten it securely with the new bolt at 28 Nm (250 in. lbs.) Fix the coupler bolt so it's tightened at 38 Nm (28 ft. lbs.). Set up the shifter cable, the new brake light switch and connect the column wiring harness. Fit the Skim module and the Clock Spring. Attach the shrouds, the support reinforcement for the steering column opening and the cover for this opening. Match the spline on the steering wheel hub with that on the shaft, then set the steering wheel and tighten the bolt to 61 Nm (45 ft. lbs.). Fit the air bag, insert the tilt lever handle and attach the negative battery terminal. Don't forget to check the horn, Electronic Prndl, headlights and other instruments connected to the steering column while operating.
- Q: How to Ensure Safety and Proper Operation Before Servicing a Steering Column on Dodge Dakota?A:Ensure disarming the air bag system prior to touching the steering column to keep accidents and injuries from happening. Fasteners should be tightened up to the required amount for keeps them from failing. Set the steering column in place on the dash panel support and put in the mounting nuts loosely. Slide the steering column upwards against the studs in the dash panel and tighten the nuts by hand. Put the steering column in the middle of its opening in the dash and tighten each nut in the same order shown: upper left, lower right, lower left, then upper right, to 28 Nm (250 in. lbs.). Get the coupler for the steering shaft and move it onto the steering shaft, then loosely fix a bolt that you'll have to change when you reassemble it. The coupler bolt should be tightened to a value of 57 Nm (42 ft. lbs.). Place a new brake light switch into the dash, fit the shifter cable and link the wiring connector to the column unit. Place the Skim module and the Clock Spring in your vehicle's dashboard. Start with installing the shrouds and the steering column opening cover reinforcement, then place the steering column opening cover. Lay the spline of the steering shaft on the wheel hub and secure the wheel by fastening it with a fresh bolt turned to 61 Nm (45 ft. lbs.). Attach the electrical connectors of the air bag and then insert the air bag into the inflator. After that, screw on the tilt lever handle, reconnect the negative battery terminal and check that the horn, Electronic Prndl Indicator, lights and any other steering-controlled functions are working properly.


Related Dodge Parts
 Dodge Steering Wheel
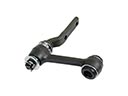 Dodge Idler Arm
 Dodge Rack And Pinion
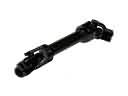 Dodge Steering Shaft
 Dodge Tie Rod
 Dodge Power Steering Gear Seal
 Dodge Rack & Pinion Bushing
 Dodge Radius Heat Shield
 Dodge Steering Column Cover
 Dodge Steering Column Seal
 Dodge Tie Rod Adjusting Sleeve
 Dodge Upper Steering Column Bearing