JeepParts
My Garage
My Account
Cart
OEM Jeep Wrangler Crankshaft
Crank Shaft- Select Vehicle by Model
- Select Vehicle by VIN
Select Vehicle by Model
orMake
Model
Year
Select Vehicle by VIN
For the most accurate results, select vehicle by your VIN (Vehicle Identification Number).
9 Crankshafts found


Jeep Wrangler Crankshaft Part Number: 4781643AA
$539.13 MSRP: $818.00You Save: $278.87 (35%)Ships in 1-2 Business Days

Jeep Wrangler Crankshaft Part Number: 5038339AG
$1069.51 MSRP: $1455.00You Save: $385.49 (27%)

Jeep Wrangler Crankshaft Part Number: 4893950AC
$646.43 MSRP: $975.00You Save: $328.57 (34%)Ships in 1-2 Business Days
Jeep Wrangler Crankshaft Part Number: 5184251AI
$849.75 MSRP: $1285.00You Save: $435.25 (34%)Ships in 1-2 Business Days
Jeep Wrangler Crankshaft - Engine Part Number: 68683080AA
$504.99 MSRP: $765.00You Save: $260.01 (34%)Ships in 1-2 Business Days
Jeep Wrangler Crankshaft Part Number: 4781507AD


Jeep Wrangler Crankshaft Part Number: 4713051AB


Jeep Wrangler Crankshaft Part Number: 4621917

Jeep Wrangler Crankshaft Part Number: 4864726AD
Jeep Wrangler Crankshaft
Choose OEM Crankshaft that meet Jeep factory standards. Jeep designs and tests every component for precision and durability. Each Crankshaft follows strict manufacturing steps to lock in quality and fit. If your Jeep Wrangler matters to you, OEM parts make the smart choice. You'll get the exact look, feel, and performance you expect. Shop genuine Wrangler parts at the highly competitive prices online. Enjoy a manufacturer's warranty, a hassle-free return policy, and rapid delivery. No more guesswork with off brands. Get genuine parts with exact fit and true factory performance. Shop with confidence today at JeepPartsDeal.com.
Jeep Wrangler Crankshaft Parts and Q&A
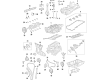
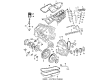
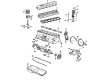
- Q: How is a Crankshaft Installed in an Engine on Jeep Wrangler?A:First, put a little engine oil on the crankshaft and then fit the main crankshaft in the block, each half at a time. Attach the crankshaft (11) into the engine block and perform the next steps for main bearing fitting. Look at the main cap bolts for signs of stretching (2) and change any stretched bolts; check the bolt stretch by placing the scale or edge (2) against the threads (3) to be sure all are touching. Fasten the main bearing caps (1,2,3,5) and tighten their bolts to 41 Nm (30 ft. lbs.) along with a 1/4 turn. Once the engine is back up, put in the new cross bolt and washer assembly. Fix the NEW cross bolts and washer assemblies (8) with a tightening torque of 61 Nm (45 ft. lbs.). Put the connecting rod and bearing caps into place on the crankshaft and then attach the rear oil seal on the crankshaft. Then, fit the crankshaft sprocket, install the Timing Chain and add the camshaft sprocket. Install the cover for the timing chain and then the oil pick-up tube and Oil Pan. Lastly, put in the engine assembly.
- Q: How to Remove and Replace a Crankshaft in an Engine Assembly on Jeep Wrangler?A:First, the engine must be lifted out of the vehicle and then the flex plate and crankshaft rear oil seal should be removed. Once the engine is mounted on a stand, pull out the oil and filter to drained them. Once done, remove the Oil Pan, Timing Belt covers, timing belt, oil pump and balance shafts with the housing assembly. Each connecting rod cap requires you to use a permanent marker or paint to stamp the cylinder number to keep the connecting rods from being damaged by an automatic number stamp or punch. Take great care to remove all joining rod bolts and their caps and unbolt those in the engine block that are part of the bedplate. Tap each side of the bedplate away from the dowel pins to loosen it without putting any pressure on it. Then, remove the crankshaft after ensuring you don't harm the main bearings or journals when raising it. The two target ring mounting screws are best removed and the target ring taken off the crankshaft. The crankshaft journals should be examined for too much wear or scoring and the grinding must not exceed 0.305 mm (0.012 Inch) under the regular diameter. After the grinding step, it's important to remove the edges from the oil holes and the polish should follow the direction of normal crankshaft rotation. The lubrication groove should face down in the cylinder during installation, so the oil holes in the housing and in the bearings are correctly aligned. Oil should be kept away from the area where the bedplate joins the roller bed. Balancing must be done as one unit, with the crankshaft machined and the target ring on it. Mopar brake parts cleaner should be used to clean the crankshaft and target ring and then you should dry them with compressed air. The flashes should be held up by new mounting screws that are finger tight at first, then all screws should be tightened sequentially to 13 Nm (110 Inch lbs.) using a T30 torx bit. Crankshaft bearings and journals must be oiled prior to installing the crankshaft and only approved anaerobic sealer should be used on the bedplate. Applying a bead of Mopar Bed Plate Sealant that is 1.5 to 2.0 mm (0.059 To 0.078 inch) thick to the cylinder block is recommended. Set the main bearing into the main bearing cap/bedplate, with the tabs inserted into the proper place. The bolts should be greased before you put them in place and you should secure the main bearing bedplate to the engine block beginning with bolts 11, 17 and 20 in as tight as a finger needs to turn. Correct placement of the thrust bearings is accomplished by rotating the crankshaft so the number 4 Piston reaches Tdc, moving the crankshaft backward and forward to the limits and using a wedge to secure the crankshaft counterweight to the cylinder block rear. Torque the bolts (1-10) to 41 Nm (30 Ft. lbs.) and then tighten them again following this with a 1/4 turn. Bolts 11 to 20 which hold the main bearing bedplate to the engine block, should be tightened to 28 Nm (20 Ft. lbs.) one after another. Once installation is complete, measure the crankshaft turning torque to make sure it's no more than 5.6 Nm (50 Inch lbs.). New connecting rod bolts should be torqued to 27 Nm (20 Ft. lbs.) after 1/4 turn. Then, fit the balance shafts and housing assembly, oil pump and pickup tube, timing belt rear cover, timing belt, timing belt front covers, engine support bracket, oil pan, Oil Filter, crankshaft rear oil seal and flex plate. After that, coat the bolt threads on the flex plate with Mopar Lock & Seal Adhesive and tighten them to 95 Nm (70 Ft. lbs.) The engine assembly should now be returned to its original position.


Related Jeep Wrangler Parts
 Jeep Wrangler Oil Pump
 Jeep Wrangler Transmission Mount
 Jeep Wrangler Rocker Arm
 Jeep Wrangler Cam Gear
 Jeep Wrangler Crankshaft Gear
 Jeep Wrangler Cylinder Head Gasket
 Jeep Wrangler Dipstick Tube
 Jeep Wrangler Intake Valve
 Jeep Wrangler Piston
 Jeep Wrangler Timing Belt Tensioner
 Jeep Wrangler Valve Stem Seal
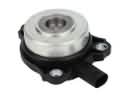 Jeep Wrangler Variable Timing Solenoid