JeepParts
My Garage
My Account
Cart
OEM 2005 Dodge Durango A/C Switch
Air Conditioning Switch- Select Vehicle by Model
- Select Vehicle by VIN
Select Vehicle by Model
orMake
Model
Year
Select Vehicle by VIN
For the most accurate results, select vehicle by your VIN (Vehicle Identification Number).
6 A/C Switches found


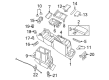
2005 Dodge Durango Heater Control, Rear Part Number: 5127844AA
$116.39Ships in 1-2 Business DaysProduct Specifications- Other Name: Control - A/C And Heater - Auxiliary; HVAC Temperature Control Panel; Climate Control Module; Blower Switch; Heater & A/C Control; Dash Control Unit; Controller; Control A/C And Heater - Auxiliary
- Position: Rear
- Item Weight: 1.00 Pounds
- Item Dimensions: 10.2 x 6.3 x 5.2 inches
- Condition: New
- Fitment Type: Direct Replacement
- SKU: 5127844AA
- Warranty: This genuine part is guaranteed by Mopar's factory warranty.


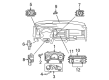
2005 Dodge Durango Heater Control Part Number: 55057281AE
Product Specifications- Other Name: Control - A/C And Heater; HVAC Temperature Control Panel; Climate Control Module; Blower Control Switch; Dash Control Unit; Control A/C And Heater
- Replaces: 55057281AB, 55056170AB, 55057281AD, 55056170AC, 55057281AC, 55057281AA
- Item Weight: 1.90 Pounds
- Item Dimensions: 10.5 x 6.3 x 6.6 inches
- Condition: New
- Fitment Type: Direct Replacement
- SKU: 55057281AE
- Warranty: This genuine part is guaranteed by Mopar's factory warranty.
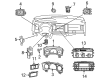
2005 Dodge Durango Heater Control Part Number: R5057279AC
Product Specifications- Other Name: Module - A/C And Heater; HVAC Temperature Control Panel; Climate Control Module; Blower Control Switch; Dash Control Unit
- Replaces: 55056168AB, 55057279AB, 55057279AC, 55057279AA, RL057279AC, 55056168AC
- Item Weight: 1.50 Pounds
- Item Dimensions: 12.4 x 5.6 x 4.5 inches
- Condition: New
- Fitment Type: Direct Replacement
- SKU: R5057279AC
- Warranty: This genuine part is guaranteed by Mopar's factory warranty.

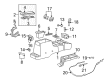
2005 Dodge Durango Heater Control, Front Part Number: 55057280AF
Product Specifications- Other Name: Control - A/C And Heater; HVAC Temperature Control Panel, Front; Climate Control Module; Blower Control Switch; Dash Control Unit; Control A/C And Heater
- Position: Front
- Replaces: 55056169AC, 55057280AC, 55056169AB, 55057280AD, 55057280AB, 55057280AA, 55057280AE
- Item Weight: 1.70 Pounds
- Item Dimensions: 10.6 x 6.3 x 6.4 inches
- Condition: New
- Fitment Type: Direct Replacement
- SKU: 55057280AF
- Warranty: This genuine part is guaranteed by Mopar's factory warranty.

2005 Dodge Durango Heater Control Knob, Lower Part Number: 5133149AA
Product Specifications- Other Name: Knob - A/C And Heater Control - Ro; HVAC Heater Control Knob, Lower; Controller Knob; Knob A/C And Heater Control - Rotary
- Position: Lower
- Item Weight: 0.40 Pounds
- Item Dimensions: 2.1 x 2.1 x 1.2 inches
- Condition: New
- Fitment Type: Direct Replacement
- SKU: 5133149AA
- Warranty: This genuine part is guaranteed by Mopar's factory warranty.

2005 Dodge Durango Heater Control Knob, Lower Part Number: 5135535AA
Product Specifications- Other Name: Knob - A/C And Heater Control - Ro; HVAC Heater Control Knob, Lower; Knob A/C And Heater Control - Rotary
- Position: Lower
- Item Weight: 0.50 Pounds
- Condition: New
- Fitment Type: Direct Replacement
- SKU: 5135535AA
- Warranty: This genuine part is guaranteed by Mopar's factory warranty.
2005 Dodge Durango A/C Switch Parts and Q&A
- Q: How to Operate the Rear A/C Switch for Optimal Performance on 2005 Dodge Durango?A: Start by disconnecting and isolating the negative battery cable before touching the rear A/C-heater control. Beneath the rear A/C-heater control, find the small clip retainers located at each top corner, use the screwdriver to press down gently, then turn the top of the control to loosen and lift the bottom tabs from their slots in the center console. Disconnect the rear A/C-heater control wire and pull the control out of the vehicle. Adjust the rear A/C-heater control beside the center console and join the wire harness connector to the control's back. Attach the two locator tabs from the bottom of the control to the two slots on the bottom edge of the opening, then rotate the control forward so its top snaps into place with the matching receptacles on the top. Move the up button on the control forward until the snaps fit securely into their holes, then attach the negative battery cable again. Scan the vehicle and calibrate all replaced potentiometer values; then ensure that the front A/C-heater control has been correctly calibrated before driving. Clockwise turn the Rear Temperature Selector to the Cold Position and leave it there for 5 seconds, then turn it again to the Hot Position and stay there for another 5 seconds. Calibration has been finished.
Related 2005 Dodge Durango Parts
 2005 Dodge Durango Blower Motor
 2005 Dodge Durango Blend Door Actuator
 2005 Dodge Durango Heater Core
 2005 Dodge Durango Blower Motor Resistor
 2005 Dodge Durango Evaporator
 2005 Dodge Durango A/C Accumulator
 2005 Dodge Durango A/C Clutch
 2005 Dodge Durango A/C Compressor
 2005 Dodge Durango A/C Condenser
 2005 Dodge Durango A/C Expansion Valve
 2005 Dodge Durango A/C Hose
 2005 Dodge Durango HVAC Pressure Switch