JeepParts
My Garage
My Account
Cart
OEM Jeep Dimmer Switch
Light Dimmer Switch- Select Vehicle by Model
- Select Vehicle by VIN
Select Vehicle by Model
orMake
Model
Year
Select Vehicle by VIN
For the most accurate results, select vehicle by your VIN (Vehicle Identification Number).
40 Dimmer Switches found


Jeep Turn Signal Switch Part Number: 68041485AD
$122.34 MSRP: $172.00You Save: $49.66 (29%)Product Specifications- Other Name: Switch - Multifunction; Turn Signal & Combination Lever; Steering Column Housing; Multi Purpose Switch; Multifunction Switch; Headlamp Switch; Signal Switch; Switch Multifunction
- Replaces: 5183947AC, 68041485AA, 68041485AB, 5183947AA, 68041485AC, 5183947AB


Jeep Turn Signal Switch Part Number: 68015101AG
$95.89 MSRP: $144.00You Save: $48.11 (34%)Product Specifications- Other Name: Switch - Multifunction; Turn Signal & Combination Lever; Steering Column Housing; Multi Purpose Switch; Multifunction Switch; Headlamp Switch; Switch Multifunction
- Replaces: 68015101AE, 68015101AD, 68015101AC, 68015101AF, 68015101AB


Jeep Multifunction Switch Part Number: 68015102AF
$110.93 MSRP: $247.00You Save: $136.07 (56%)Product Specifications- Other Name: Switch - Multifunction; Turn Signal & Combination Lever; Steering Column Switch Housing.; Switch Multifunction
- Replaces: 68015102AC, 68015102AA, 68015102AB, 68015102AD, 68015102AE


Jeep Turn Signal Switch Part Number: 68041491AD
$121.54 MSRP: $184.00You Save: $62.46 (34%)Ships in 1-2 Business DaysProduct Specifications- Other Name: Switch - Multifunction; Turn Signal & Combination Lever; Combination Switch; Multi Purpose Switch; Multifunction Switch; Switch Multifunction
- Replaces: 68024197AB, 68041491AB, 68041491AC, 68041491AA


Jeep Headlamp Switch Part Number: 56042300AG
$156.22 MSRP: $159.00You Save: $2.78 (2%)Ships in 1-2 Business DaysProduct Specifications- Other Name: Switch - Multifunction; Windshield Washer Switch; Hazard Flasher Switch; Multi Purpose Switch; Wiper Switch; Turn Signal & Hazard Switch; Switch Multifunction Left Side; Switch Multifunction
- Replaces: 56042300AF

Jeep Headlamp Switch Part Number: 68542448AA
$41.91 MSRP: $62.25You Save: $20.34 (33%)Ships in 1-2 Business DaysProduct Specifications- Other Name: Switch - Headlamp

Jeep Headlamp Switch Part Number: 68542460AA
$81.73 MSRP: $125.00You Save: $43.27 (35%)Ships in 1-2 Business DaysProduct Specifications- Other Name: Switch - Headlamp
Jeep Headlamp Switch Part Number: 68542459AA
$88.42 MSRP: $134.00You Save: $45.58 (35%)Ships in 1-2 Business DaysProduct Specifications- Other Name: Switch - Headlamp
Jeep Turn Signal Switch Part Number: 5183952AF
$55.75 MSRP: $83.35You Save: $27.60 (34%)Ships in 1-2 Business DaysProduct Specifications- Other Name: Switch - Multifunction; Turn Signal & Combination Lever; Steering Column Housing; Multi Purpose Switch; Multifunction Switch; Headlamp Switch; Switch Multifunction
- Replaces: 5183952AA, 5183952AC, 5183952AB, 5183952AD, 5183952AE

Jeep Turn Signal Switch Part Number: 5143311AF
$160.59 MSRP: $243.00You Save: $82.41 (34%)Ships in 1-3 Business DaysProduct Specifications- Other Name: Switch - Multifunction; Turn Signal & Combination Lever; Steering Column Switch Housing.; Headlamp Switch
- Replaces: 5143311AE, 5143311AC, 5143311AB, 5143311AD


Jeep Turn Signal Switch Part Number: 5143313AF
$88.37 MSRP: $130.00You Save: $41.63 (33%)Product Specifications- Other Name: Switch - Multifunction; Turn Signal & Combination Lever; Steering Column Housing; Multi Purpose Switch; Headlamp Switch; Switch Multifunction
- Replaces: 5143313AC, 5143313AE, 5143313AB, 5143313AD


Jeep Turn Signal Switch Part Number: 56010315AA
Product Specifications- Other Name: Switch - Multifunction; Multi Purpose Switch; Signal Switch; Multifunction Left Stalk for Interior/Exterior Lights & Turn Signal Controls.


Jeep Headlamp Switch Part Number: 56042302AG
Product Specifications- Other Name: Switch - Multifunction; Switch Multifunction Left Side; Switch Multifunction
- Replaces: 56042302AF


Jeep Ignition Switch Part Number: 4728424
Product Specifications- Other Name: Switch - Multifunction; Turn Signal & Combination Lever; Steering Column Housing; Windshield Washer Switch.; Turn Signal Switch; Multifunction, Wiper, Headlamp Dimmer, Hazard, Signal & Tilt options.


Jeep Turn Signal Switch Part Number: 5183950AF
Product Specifications- Other Name: Switch - Multifunction; Steering Column Switch Housing; Combination Switch; Multi Purpose Switch; Multifunction Switch; Signal Switch; Switch Multifunction
- Replaces: 5183950AE, 5183950AD, 5183950AC, 5183950AB, 5183950AA


Jeep Turn Signal Switch Part Number: 5183946AF
Product Specifications- Other Name: Switch - Multifunction; Combination Switch; Multi Purpose Switch; Multifunction Switch; Signal Switch; Switch Multifunction
- Replaces: 5183946AA, 5183946AD, 5183946AE, 5183946AB, 5183946AC


Jeep Headlamp Switch Part Number: 56042299AG
Product Specifications- Other Name: Switch - Multifunction; Hazard Flasher Switch; Multi Purpose Switch; Turn Signal & Hazard Switch; Switch Multifunction Left Side; Switch Multifunction
- Replaces: 56042299AF


Jeep Turn Signal Switch Part Number: 5016708AD
Product Specifications- Other Name: Switch - Multifunction; Multi Purpose Switch; Signal Switch; Multifunction Left Stalk for Interior/Exterior Lights & Turn Signal Controls
- Replaces: 5016708AC


Jeep Multifunction Switch Part Number: 56010126AI
Product Specifications- Other Name: Switch - Multifunction; Combination Switch; Multi Purpose Switch
- Replaces: 56010126AD, 56010126AH, 56010126AG, 56010126AE, 56010126AF


Jeep Turn Signal Switch Part Number: 5016709AD
Product Specifications- Other Name: Switch - Multifunction; Multi Purpose Switch; Signal Switch; Multifunction Left Stalk for Interior/Exterior Lights & Turn Signal Controls.
- Replaces: 5016709AB, 5016709AC
| Page 1 of 2 |Next >
1-20 of 40 Results
Jeep Dimmer Switch
OEM parts sourced directly from Jeep deliver superior quality, long lasting strength, and a precise fit you can trust. Each item goes through strict quality checks to ensure safety, toughness, and performance that matches your factory equipment. At JeepPartsDeal online shop, you'll get top-quality, budget-friendly OEM Jeep Dimmer Switch for your vehicle. We focus on giving you a high standard without pushing up the price. Our full selection of genuine factory products comes backed by the original manufacturer's warranty. You'll love our fast delivery, seamless shopping experience, and convenient return policy, saving you all the hassle.
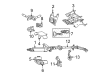
Jeep Dimmer Switch allows drivers to dial the brightness of the cabin and headlights very fast to have a clear and comfortable sight. Jeep is an epitome of dirt on rugged paths and stable stance on smooth roads. Jeep left the 1945 non-army version behind to the present technologically loaded SUVs without making adventure a complicated thing. Jeep is a rolling campsite with selectable traction modes, rapid voice recognition, and robust community camaraderie. Crossing sand ridges or making it through snowy lanes, Jeep offers bold souls simple control. The Dimmer Switch is within the reach of the arm and it responds to the tilt of a light fingertip immediately. It also connects the dashboard light and headlamp, so that you can use minute adjustments to fine-tune the brightness levels, rather than being blinded by the storm lights in the rainy dark nights. The Dimmer Switch helps to reduce eye strain at dusk or on a midnight trail, glowing gauges just bright enough. Since power paths are made to factory specifications, all modern Jeeps can install without code chasing. The Dimmer Switch has durable contacts that withstand dust and vibration that would otherwise make light control less sharp after several years of bouncing over rocks. The Dimmer Switch operates on a quick periodic clicking, which is applied to check its clean operation and to warn you early on in case you require a closer inspection of wiring. The process of opening a smooth thumb is natural and it makes one remain focused on the road.
Jeep Dimmer Switch Parts and Q&A
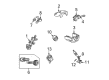
- Q: How to Effectively Service and Repair a Dimmer Switch on Jeep Wrangler?A:You have to disconnect and remove the battery cable to stop SRS from deploying the air bag during dimmer switch work. The first step is to take out the upper and lower shrouds of the steering column. After that, unhook the instrument panel wire harness connector from the back of the left multi-function switch. Take out the screw holding the left multi-function switch to the bracket along the left side of the Clock Spring. Pull the switch to the opposite side from the Clock Spring to separate the slide tabs from the original channel cutouts on the mounting bracket. After that, take out the jumper wire harness connector from the left multi-function switch at the inboard end and take the switch out of the Clock Spring.
- Q: How to Service and Repair a Dimmer Switch in a Multi-function System on Jeep Grand Cherokee?A:Start by removing the battery's negative cable, then wait for two minutes for the air bag system capacitor to discharge before handling the left multi-function switch. Pull off the two pieces of the steering column shroud and unsnap them next to the washing bottle compartment. Unplug the instrument panel wire harness from the switch connector, then remove the screws securing the left multi-function switch to its housing and pull out the switch. Before attaching the multi-function switch mounting housing, steer the wheel to make it straight. Disconnect the battery negative cable a second time and then take out the Clock Spring from the multi-function switch mounting housing. Next, take out the left and right multi-function switches from the mounting housing and screw to remove the housing itself. Secure the left multi-function switch to the housing, then tighten it using screws at 2.5 Nm (22 in. lbs.). Plug in the instrument panel wire harness connector and place the lower section of the steering column shroud. Then, tighten the screw to 1.9 Nm (17 in. lbs.). Fit the steering column shroud where it tilts up and then tie on the negative battery wire. For a multi-function switch mounting housing, make sure the front wheels are level, rotate the turn signal cancel cam until it lines up with the hole, press the housing onto the steering column so the locating tab fits in the groove. Tighten the housing screw to 1.9 Nm (17 in. lbs.), then attach the right and left multi-function switches and the Clock Spring. In the last step, connect the negative battery cable again.


Related Jeep Parts
 Jeep Key Fob
 Jeep Ignition Switch
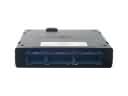 Jeep Body Control Module
 Jeep Headlight Switch
 Jeep Ignition Lock Cylinder
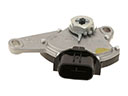 Jeep Neutral Safety Switch
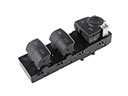 Jeep Power Window Switch
 Jeep Air Bag Control Module
 Jeep Back Up Light Switch
 Jeep Daytime Running Light Relay
 Jeep Ignition Lock Assembly
 Jeep Intake Manifold Temperature Sensor