JeepParts
My Garage
My Account
Cart
OEM Dodge Automatic Transmission Filter
AT Filter- Select Vehicle by Model
- Select Vehicle by VIN
Select Vehicle by Model
orMake
Model
Year
Select Vehicle by VIN
For the most accurate results, select vehicle by your VIN (Vehicle Identification Number).
17 Automatic Transmission Filters found


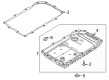
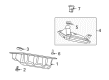
Dodge Oil Pan Part Number: 68266725AB
$114.85 MSRP: $174.00You Save: $59.15 (34%)Ships in 1-2 Business DaysProduct Specifications- Other Name: Filter - Transmission Oil; Transmission Filter; Filter; Filter Transmission Oil Includes Item #2, #3 And #5; Filter Transmission Oil
- Replaces: 68266725AA


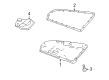
Dodge Oil Pan Part Number: 52108325AA
$40.50 MSRP: $60.00You Save: $19.50 (33%)Product Specifications- Other Name: Filter - Transmission Oil; Hydraulic Filter, Automatic Transmission; Fluid Kit; Oil Filter; Filter; Filter Transmission Oil


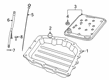
Dodge Auto Transmission Filter Part Number: 4864505AB
$43.88 MSRP: $65.00You Save: $21.12 (33%)Ships in 1-2 Business DaysProduct Specifications- Other Name: Filter Package - Transmission Oil; Transmission Filter; Hydraulic Filter; Filter Package Transmission Oil Includes Item # 12; Filter Kit Transmission Oil


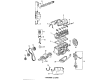
Dodge Filter Part Number: 5191890AA
$48.38 MSRP: $71.70You Save: $23.32 (33%)Ships in 1-2 Business DaysProduct Specifications- Other Name: Filter - Transmission Oil; Automatic Transmission Filter Kit; Hydraulic Filter; Filter Transmission Oil
- Replaces: 68070620AA


Dodge Oil Filter Part Number: 5015267AD
$51.86 MSRP: $76.85You Save: $24.99 (33%)Ships in 1-2 Business DaysProduct Specifications- Other Name: 4X2 Filter - Transmission Oil; Transmission Filter; Hydraulic Filter; Filter
- Replaces: 5015267AC


Dodge Oil Filter Part Number: 5179267AD
$37.41 MSRP: $54.00You Save: $16.59 (31%)Product Specifications- Other Name: Filter Package - Transmission Oil; Transmission Filter; Transmission Filter Kit; Hydraulic Filter; Filter; Filter Package Transmission Oil
- Replaces: 5179267AC, 4799662AB, 5179267AA, 5179267AB, 4799662AC, 4799662


Dodge Filter Part Number: 52118789
$39.90 MSRP: $57.70You Save: $17.80 (31%)Ships in 1-2 Business DaysProduct Specifications- Other Name: Filter - Valve Body; Transmission Filter; Hydraulic Filter; Filter Valve Body


Dodge Filter Part Number: 68059549AA
$43.62 MSRP: $62.65You Save: $19.03 (31%)Ships in 1-2 Business DaysProduct Specifications- Other Name: Filter - Transmission Oil; Transmission Filter; Filter Kit Transmission Oil
- Replaces: 5101917AB, 52852913AB


Dodge Filter Assembly Part Number: 68018555AA
$54.75 MSRP: $78.65You Save: $23.90 (31%)Ships in 1-2 Business DaysProduct Specifications- Other Name: Filter Package - Transmission Oil; Filter Kit; Hydraulic Filter; Filter; Filter Package Transmission Oil

Dodge Oil Pan Part Number: 68259490AD
$190.91 MSRP: $287.00You Save: $96.09 (34%)Ships in 1-2 Business DaysProduct Specifications- Other Name: Pan - Transmission Oil; Transmission Filter; Transmission Pan; Filter
- Replaces: 68259490AC

Dodge Filter Part Number: 68192984AA
$42.64 MSRP: $63.15You Save: $20.51 (33%)Ships in 1-2 Business DaysProduct Specifications- Other Name: Filter - Transmission Oil; Transmission Filter; Hydraulic Filter; Filter Transmission Oil

Dodge Filter Part Number: 68060326AB
$29.87 MSRP: $42.95You Save: $13.08 (31%)Ships in 1-3 Business DaysProduct Specifications- Other Name: Filter - Transmission Oil; Transmission Filter; Hydraulic Filter; Filter Kit Transmission Oil
- Replaces: 68060326AA, 68046084AA

Dodge Auto Transmission Filter Part Number: 4269649
$8.36 MSRP: $9.45You Save: $1.09 (12%)Ships in 1-2 Business DaysProduct Specifications- Other Name: Filter - Valve Body; Transmission Filter; Hydraulic Filter; Filter; Filter, Transaxle Oil; Filter Valve Body


Dodge Filter Part Number: 3515996
Product Specifications- Other Name: Filter - Valve Body; Transmission Filter; Hydraulic Filter; Filter Or Strainer, Transmission Oil; Filter, Valve Body; Filter Package
- Replaces: J8126768

Dodge Filter Part Number: 4800029AA
Product Specifications- Other Name: Filter - Transmission Oil; Transmission Filter; Hydraulic Filter

Dodge Filter Part Number: MD758684
Product Specifications- Other Name: Filter - Automatic Transmission Valve Body; Transmission Filter; Hydraulic Filter
- Replaces: MD758691


Dodge Filter Part Number: 68049926AA
Product Specifications- Other Name: Filter - Transmission Oil; Transmission Filter; Hydraulic Filter; Filter Kit Transmission Oil
Dodge Automatic Transmission Filter
OEM parts sourced directly from Dodge deliver superior quality, long lasting strength, and a precise fit you can trust. Each item goes through strict quality checks to ensure safety, toughness, and performance that matches your factory equipment. At JeepPartsDeal online shop, you'll get top-quality, budget-friendly OEM Dodge Automatic Transmission Filter for your vehicle. We focus on giving you a high standard without pushing up the price. Our full selection of genuine factory products comes backed by the original manufacturer's warranty. You'll love our fast delivery, seamless shopping experience, and convenient return policy, saving you all the hassle.
Dodge Automatic Transmission Filter keeps the gear shifts clean and sharp, preserving the delivery of power over the miles. Dodge started as a machine shop, a dirty machine shop, and soon gained a reputation for unbreakable steel bodies and raw muscle. Throughout decades, the brand pushed HEMI power below hoods, Viper craziness, and attitude. Its recent Fratzonic Chambered Exhaust, has a top noise of 126 decibels and can even shut off to be silent with a switch. Dodge is an approach to the roads as a quarter-mile lane with drive modes called Drag, Donut, and Sport to make the driver feel in control. Be it electric or gas, it grabs the attitude louder than logic. The outcome is trust, racket, and smirk-inducing thrust that teens yearn for and adults crave but keep quiet. Automatic Transmission Filter is placed in the transmission pan and guards against metal shavings, clutch dust, and road grime. The trapped debris maintains fluid flow, heat, and non-slip work of the torque converter by supplying a smooth circulation of the fluid. Consistent replacements of the Automatic Transmission Filter keep the quality of the shift constant and the lifespan of the transmission much longer than those that lack maintenance. It is also this basic cartridge that is pushing the fuel economy in the right direction since the pump no longer struggles to move thick and contaminated oil. With simple tools and an hour on a weekend, as an owner of a Dodge, one is able to drop the pan, unbolt the filter, and bolt on a new Automatic Transmission Filter.
Dodge Automatic Transmission Filter Parts and Q&A
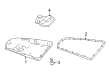
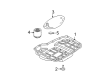
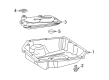
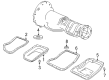
- Q: How to Perform an Automatic Transmission Filter and Fluid Service on Dodge Challenger?A:First, make the engine reach its operating temperature before you change the oil and filter. When that's done, support and raise the vehicle above the roadway. Unscrew five bolts and four retainer rings from the oil pan to the transmission, then take out the oil pan along with the gasket. After that, remove the transmission oil filter and o-ring from the electrohydraulic control unit. Clean up and inspect the inside of the oil pan; if the gasket looks worn, replace it. Put in a new oil filter and oil ring and then secure the transmission cover to the bottom of the transmission. Install the replaceable bolts and retainers to secure the oil pan and get tight them at 8 Nm. Once you have lowered the vehicle, pour in 5.0 L (10.6 pts.) of transmission fluid and check how the oil level stands.
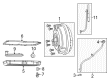
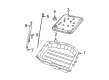
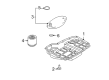
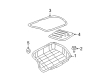
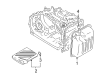
- Q: How to service an Automatic Transmission Filter on Dodge Ram 1500?A:Before handling the fluid or filter, raise and steady the car on safety stands and put a large shallow pan under the transmission fluid pan. Take out the bolts at the front and sides of the pan to the transmission, loosen those at the rear and remove the front part of the pan to collect the fluid. With the pan still level, get rid of any remaining bolts and lower the car far enough away so you can pour any extra fluid into the drain pan. After that, remove the screw that holds the main oil filter (1) to the valve body, take out the filter and pour the fluid into the drain pan. Examine the seal in the oil filter; if it is not installed properly or deteriorated, throw it away, but if it's intact and in good shape, you can reset it. When you need to replace filter 2, use the mentioned wrench to unroll the filter. Throw away the old transmission fluid and filters the right way. At the end of inspection, check the magnetic target for heavy buildup and the bottom of the pan for a light covering of clutch particles, seeing it's normal unless the vehicle slips or shifts late. Rinse the pan and the magnet with a cleaner and chop off the old gasket material around the transmission case and pan using a gasket scraper. Following installation, use the proper tool to make sure the primary oil filters seal is all the way into the oil pump inlet bore. Place the new filter in the valve body and into the oil pump, then use a screw to secure it with 4.5 Nm (40 inch lbs.) of torque. Should you need to, snap the new cooler return filter (2) into place and tighten it to 14.12 Nm (125 inch lbs.). Add a line of Mopar(R) RTV sealant along the sealing surface in the case, set the pan in place and screw on the bolts to 11.8 Nm (105 inch lbs.). After that, lower the vehicle and add Mopar(R) ATF +4 to the transmission.


Related Dodge Parts
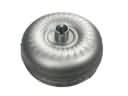 Dodge Torque Converter
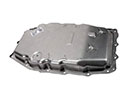 Dodge Transmission Pan
 Dodge Automatic Transmission Dipstick
 Dodge Automatic Transmission Output Shaft Seal
 Dodge Automatic Transmission Seal
 Dodge Automatic Transmission Shift Levers
 Dodge Automatic Transmission Shifter
 Dodge Flywheel Ring Gear
 Dodge Shift Cable
 Dodge Transmission Assembly
 Dodge Transmission Drain Plug
 Dodge Transmission Sensor
Browse Dodge Automatic Transmission Filter by Models
Charger Challenger Ram 1500 Dakota Durango Dart Grand Caravan Ram 2500 Journey Caravan Avenger D100 D150 Magnum Neon Nitro Caliber Ramcharger Omni Dynasty Intrepid Ram 3500 Shadow Spirit Stratus Ram 50 W250 600 Aries B250 B350 D250 D350 Daytona Diplomat Power Ram 50 Ram 1500 Van Rampage Sprinter 2500 Sprinter 3500 W100 W150 W350 B2500 Lancer B150 B1500 B3500 Mini Ram Ram 2500 Van Ram 3500 Van