JeepParts
My Garage
My Account
Cart
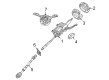
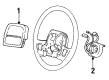
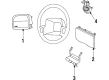
OEM Jeep Clock Spring
Spiral Cable Clock Spring- Select Vehicle by Model
- Select Vehicle by VIN
Select Vehicle by Model
orMake
Model
Year
Select Vehicle by VIN
For the most accurate results, select vehicle by your VIN (Vehicle Identification Number).
53 Clock Springs found


Jeep Clockspring Part Number: 5156106AG
$527.85 MSRP: $769.00You Save: $241.15 (32%)Product Specifications- Other Name: Clockspring - Steering Column Control Mod; Air Bag Clockspring; Clockspring Steering Column Control Module
- Replaces: 5156106AF, 68000477AA, 5156106AE


Jeep Clockspring Part Number: 56010688AA
$372.13 MSRP: $543.00You Save: $170.87 (32%)Ships in 1-3 Business DaysProduct Specifications- Other Name: Air Bag Clockspring
- Replaces: 56010146AF, 56010187AE, 56010187AF, 56010146AD, 56010146AE, 56010187AG


Jeep Multifunction Switch Part Number: 68455814AA
$417.93 MSRP: $611.00You Save: $193.07 (32%)Product Specifications- Other Name: Module - Steering Column; Turn Signal & Combination Lever; Combination Switch; Air Bag Clockspring; Clockspring; Module Steering Column Includes Clockspring; Module Steering Column
- Replaces: 68141121AH, 68141121AL, 68141121AC, 68141121AM, 68141121AD, 68141121AE, 68141121AG, 68375484AA, 68141121AB, 68141121AF, 68141121AJ, 68141121AI, 68141121AK, 68375484AB


Jeep Multifunction Switch, Beige/Black Part Number: 1HE78DX9AO
$468.31 MSRP: $683.00You Save: $214.69 (32%)Product Specifications- Other Name: Module - Steering Column; Air Bag Clockspring; Combination Switch; Driver Inflator Module; Clockspring
- Replaces: 1HE78DX9AJ, 1HE78DX9AG, 1HE78DX9AI, 1HE78DX9AL, 1HE78DX9AE, 1HE78DX9AH, 1HE78DX9AD, 1HE78DX9AB, 1HE78DX9AM, 1HE78DX9AN, 1HE78DX9AF


Jeep Clockspring Part Number: 4504370
$154.50 MSRP: $195.86You Save: $41.36 (22%)Ships in 1-2 Business DaysProduct Specifications- Other Name: Clockspring-6 Circuit; Air Bag Clockspring; Clockspring Package, W/O Tilt; W/Air Bag options available.

Jeep Multifunction Switch Part Number: 68351725AD
$279.57 MSRP: $426.00You Save: $146.43 (35%)Ships in 1-2 Business DaysProduct Specifications- Other Name: Module - Steering Control; Multi Purpose Switch; Combination Switch; Clockspring
- Replaces: 68351725AC
Jeep Multifunction Switch Part Number: 68351727AD
$61.35 MSRP: $90.25You Save: $28.90 (33%)Product Specifications- Other Name: Module - Steering Control; Multi Purpose Switch; Combination Switch; Clockspring
- Replaces: 68351727AC
Jeep Multifunction Switch Part Number: 68351728AD
$66.73 MSRP: $98.20You Save: $31.47 (33%)Product Specifications- Other Name: Module - Steering Control; Multi Purpose Switch; Combination Switch; Clockspring
- Replaces: 68351728AC

Jeep Module - Steering Column Part Number: 5VN54LC5AE
$267.39 MSRP: $394.00You Save: $126.61 (33%)Ships in 1-2 Business DaysProduct Specifications- Other Name: MODULE-STEERING COLUMN
- Replaces: 5VN54LC5AD

Jeep Clockspring Part Number: 56009070AE
$290.05 MSRP: $427.00You Save: $136.95 (33%)Ships in 1-3 Business DaysProduct Specifications- Other Name: Air Bag Clockspring
- Replaced by: 56047103AC

Jeep Clockspring - Steering Column Control Mod Part Number: 6UW42LXHAD
$319.51 MSRP: $471.00You Save: $151.49 (33%)Ships in 1-2 Business DaysProduct Specifications- Other Name: CLKSPRNG-STEERING COLUMN CONTROL MOD
Jeep Multifunction Switch Part Number: 68351726AD
$54.64 MSRP: $79.30You Save: $24.66 (32%)Ships in 1-2 Business DaysProduct Specifications- Other Name: Module - Steering Control; Multi Purpose Switch; Combination Switch; Clockspring
- Replaces: 68351726AC

Jeep Clockspring Part Number: 5156133AB
$345.79 MSRP: $504.00You Save: $158.21 (32%)Ships in 1-3 Business DaysProduct Specifications- Other Name: Clockspring - Steering Column Control Mod; Air Bag Clockspring
- Replaces: 68024159AD, 68024159AA, 68024159AB, 68024159AC, 5156133AA, 68024159AE

Jeep Multifunction Switch, Black Part Number: 5VN54DX9AC
$364.11 MSRP: $531.00You Save: $166.89 (32%)Ships in 1-3 Business DaysProduct Specifications- Other Name: Module - Steering Column; Steering Column Switch Housing; Air Bag Clockspring; Multi Purpose Switch; Combination Switch; Clockspring; Module Steering Column

Jeep Multifunction Switch Part Number: 68599296AA
$295.71 MSRP: $435.00You Save: $139.29 (33%)Product Specifications- Other Name: Module - Steering Column; Combination Switch; Clockspring
- Replaced by: 68599296AB
- Replaces: 68526259AA, 68491577AA, 68491577AB, 68399808AB, 68253862AA, 68253862AB, 68399808AA


Jeep Clockspring Part Number: 56047144AA
Product Specifications- Other Name: Air Bag Clockspring


Jeep Clockspring Part Number: 56047105AB
Product Specifications- Other Name: Air Bag Clockspring


Jeep Clockspring Part Number: 56042107
Product Specifications- Other Name: Air Bag Clockspring; Clockspring Package


Jeep Clockspring Part Number: 56009071
Product Specifications- Other Name: Air Bag Clockspring

Jeep Clockspring Part Number: 56047144AE
Product Specifications- Other Name: Air Bag Clockspring
- Replaces: 56047144AD, 56047144AC, 56047144AB
| Page 1 of 3 |Next >
1-20 of 53 Results
Jeep Clock Spring
OEM parts sourced directly from Jeep deliver superior quality, long lasting strength, and a precise fit you can trust. Each item goes through strict quality checks to ensure safety, toughness, and performance that matches your factory equipment. At JeepPartsDeal online shop, you'll get top-quality, budget-friendly OEM Jeep Clock Spring for your vehicle. We focus on giving you a high standard without pushing up the price. Our full selection of genuine factory products comes backed by the original manufacturer's warranty. You'll love our fast delivery, seamless shopping experience, and convenient return policy, saving you all the hassle.
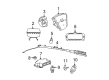
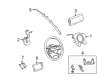
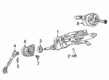
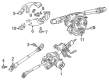
Jeep Clock Spring is a steering-linked electronic component that maintains the functionality of airbags under the effect of turning wheels. Jeep has proved its freedom in 1945 and continues to scream it out with boxy fenders, removable doors, straight axles, and bare-sky cabins that scorn pavement. Jeep drivers can change between school runs and rock gardens in a few seconds since the Selec-Terrain dial shows the snow, sand, and mud settings even to novices. Jeep cabins currently include voice recognition, sharp touch screens, automatic updates in the air, and lane nudging assistance, but the rigs remain blunt, steel-framed, and squarely square. Open trails, mutual wave greetings, oversize tires, and low-range gears make ownership fun, social, and headed well beyond the end of the map. The Clock Spring coils and uncoils in every rotation within the steering column, connecting wires to the horn, radio buttons, airbags, and cruise switches, maintaining the circuit in any Jeep on any trail. Clock Spring energy storage prevents fatigue of the conductor; therefore, when an abrupt impact occurs, the airbag igniter will get instant current. Hard ribbon cable and a tight shell allow Clock Spring to shake off dust, water, heat, and interminable vibration on washboard tracks. Even basic bolts and a keyed plug imply that a Clock Spring change does not demand significant money and merely a few minutes with standard hand tools.
Jeep Clock Spring Parts and Q&A
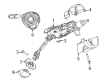
- Q: How to Replace a Faulty Clock Spring on Jeep Grand Cherokee?A:If there is an issue with the Clock Spring, has it become damaged or the air bag has deployed, it needs to be changed, as repair isn't allowed. Until the steering wheel is turned straight, do not start your vehicle. In cars with air bags, first unhook the negative battery cable, give it two minutes to prevent any accidental inflation, then connect it again. Before removing the Clock Spring, line the front wheels straight ahead, disconnect the driver air bag from the steering wheel, release the steering wheel wires from the Clock Spring power receptacles and take out the steering wheel. After that, undo the screw holding the lower shroud to the switch housing and gently press down both sides of the upper shroud to remove its snap features and both shrouds. First, disconnect the wires under the steering wheel from the Clock Spring connectors, unscrew the two screws holding the Clock Spring case to the housing and remove it. Should the Clock Spring be reused, make certain it is centered on the shaft inside the case until you can put it back into the case, otherwise place it back in the center before installing in the case. Install your security camera with the Clock Spring completely centered on the mount to avoid damage. Center locking is applied to all service replacement Clock Springs and the locking pin should not be removed until they are installed in the steering column. Firmly grip the centered rotor and case of the Clock Spring, place the Clock Spring along the upper shaft of the steering column and push both three and one pins from the rotor and case into their proper holes in the turn signal cancel cam and the multi-function switch housing. With the mounting screws as tight as 2.5 Nm (22 in. lbs.), hook up the instrument panel wire harnesses, move the lower shroud of the steering column onto the steering column and use a 2 Nm (17 in. lbs.) screw to secure it. Fix the upper tilting column cover in place, fold the snap features and squeeze both sections together. If you put in a new Clock Spring, push out the locking pin, reinstall the steering wheel, reconnect its electrical connections and put the driver air bag back onto the wheel.
- Q: How to Replace a Faulty Clock Spring on Jeep Wrangler?A:When the Clock Spring is defective, damaged or the driver side air bag has been used, it has to be replaced, as it cannot be repaired. You must disconnect the regulator and wait two minutes before beginning the air bag service, to prevent the air bag from going off accidentally. First, set the front wheels directly ahead, then remove the air bag module located on the driver's side of the steering wheel. Unplug the upper Clock Spring wire harness for the vehicle speed control switches from the vehicle, if the harness is fitted. Remove the nut on the steering wheel armature, then apply the steering wheel puller (Special Tool C-3428-B) to pull off the steering wheel from the upper shaft spline. Slide the steering column opening cover off the instrument panel and, where needed, move the tilt steering column up as far as possible. Unscrew the three hold-down screws connecting the lower steering column shroud to the upper shroud. If the steering column is of the standard non-tilt type, loosen both nuts at the top, but if your car has a tilt column, put it down in the lowest tilted position. Split the column apart and take off both upper and lower shrouds. Separate the two instrument panel wire harness connectors from the bottom of the Clock Spring connector receptacles. Accessing the upper Clock Spring latch which is behind the multi-function switch water shield bracket, allows you to pry open both plastic latches and remove the Clock Spring assembly. If your Clock Spring latches are damaged, go ahead and remove the broken pieces from the housing. Replace the Clock Spring if it is either broken, damaged or was deployed during an air bag activation. Should you choose to use the Clock Spring, keep the rotor locked to the case by passing a rigid wire with one end in the index hole at the 11 o'clock position until it is time to reassemble. Ensure the front wheels are straight ahead during installation and only take the wire from the index hole if you will reuse the Clock Spring. Before sliding it down, make sure the turn signal control stalk is in neutral. Then slide the centrally-located Clock Spring over the upper shaft of the steering column until the latches engage. When putting in a new Clock Spring, take out the pin that locks the rotor to its housing. Make sure to attach both instrument panel wire harness connectors, so the latches are completely locked into place. Put the steering column shrouds in place and attach the lower shroud with three screws tightened to 2 Nm (18 in. lbs.). Place the cover over the opening in the steering column, then fit the steering wheel onto the upper shaft so its flats fit onto the Clock Spring rotor's markings. Through the lower hole in the steering wheel armature, push the Clock Spring wires harnesses upward and tighten the nut to 61 Nm (45 ft. lbs.) without compressing the wires. If the tools are provided, add back the wire connector for the vehicle speed control switches located above the gear shifter and set the air bag module securely above the steering wheel.


Related Jeep Parts
 Jeep Ignition Switch
 Jeep Starter Solenoid
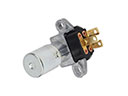 Jeep Dimmer Switch
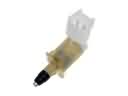 Jeep Door Jamb Switch
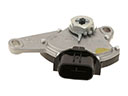 Jeep Neutral Safety Switch
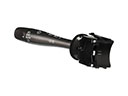 Jeep Turn Signal Switch
 Jeep Air Bag Sensor
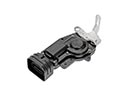 Jeep Door Lock Actuator Motor
 Jeep Hazard Warning Switch
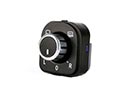 Jeep Mirror Switch
 Jeep Seat Heater Switch
 Jeep Temperature Sender