JeepParts
My Garage
My Account
Cart
OEM Dodge Axle Shaft
Car Axle Shaft- Select Vehicle by Model
- Select Vehicle by VIN
Select Vehicle by Model
orMake
Model
Year
Select Vehicle by VIN
For the most accurate results, select vehicle by your VIN (Vehicle Identification Number).
287 Axle Shafts found


Dodge Axle Assembly, Front Passenger Side Part Number: 4578884AC
$315.54 MSRP: $708.00You Save: $392.46 (56%)Product Specifications- Other Name: Shaft - Axle Half; CV Axle Assembly, Front Right; Constant Velocity Axle; Axle Shaft; Shaft Axle Half; CV Axle Assembly
- Position: Front Passenger Side
- Replaces: 4578884AB


Dodge Axle Assembly, Rear Part Number: 68277002AB
$397.71 MSRP: $965.00You Save: $567.29 (59%)Product Specifications- Other Name: Shaft - Axle Half; CV Axle Assembly, Rear; Constant Velocity Axle; Axle Shaft; Shaft Axle Half; CV Axle Assembly
- Position: Rear
- Replaces: 68277002AA


Dodge Axle Shaft, Rear Part Number: 5166553AA
$466.00 MSRP: $776.00You Save: $310.00 (40%)Ships in 1-2 Business DaysProduct Specifications- Other Name: Shaft - Axle; Drive Axle Shaft, Rear; Axle Shafts; Shaft Axle
- Position: Rear


Dodge Intermediate Shaft Part Number: 4746814
$246.42 MSRP: $376.00You Save: $129.58 (35%)Ships in 1-2 Business DaysProduct Specifications- Other Name: Shaft - Axle Intermediate; Intermed Shaft; Shaft Axle Intermediate; Shaft, Intermediate


Dodge Axle Assembly, Front Driver Side Part Number: 68079565AB
$325.98 MSRP: $497.00You Save: $171.02 (35%)Ships in 1-2 Business DaysProduct Specifications- Other Name: Shaft - Front Drive; CV Axle Assembly, Front Left; Constant Velocity Axle; Axle Shaft; Shaft Front Drive; CV Axle Assembly
- Position: Front Driver Side
- Replaces: 68079565AA


Dodge Axle Assembly, Front Driver Side Part Number: 68193661AB
$327.03 MSRP: $497.00You Save: $169.97 (35%)Product Specifications- Other Name: Shaft - Axle Half; CV Axle Assembly, Front Left; Axle Shaft; Shaft Axle Half
- Position: Front Driver Side
- Replaces: 68193661AA


Dodge Axle Assembly, Front Driver Side Part Number: 68067361AB
$327.03 MSRP: $497.00You Save: $169.97 (35%)Ships in 1-2 Business DaysProduct Specifications- Other Name: Shaft - Front Drive; CV Axle Assembly, Front Left; Constant Velocity Axle; Axle Shaft; Shaft Front Drive; CV Axle Assembly
- Position: Front Driver Side
- Replaces: 5273545AB, 5273545AC, 5273545AE, 68067361AA, 5273545AD

Dodge Axle Assembly, Front Passenger Side Part Number: 68193660AB
$345.81 MSRP: $526.00You Save: $180.19 (35%)Ships in 1-2 Business DaysProduct Specifications- Other Name: Shaft - Axle Half; CV Axle Assembly, Front Right; Axle Shaft; Shaft Axle Half
- Position: Front Passenger Side
- Replaces: 68193660AA


Dodge Axle Assembly, Front Driver Side Part Number: 4578885AC
$376.75 MSRP: $571.00You Save: $194.25 (35%)Product Specifications- Other Name: Shaft - Axle Half; CV Axle Assembly, Front Left; Constant Velocity Axle; Axle Shaft; Shaft Axle Half; CV Axle Assembly
- Position: Front Driver Side
- Replaces: 4578885AB


Dodge Axle Assembly, Front Driver Side Part Number: 52124713AD
$405.48 MSRP: $617.00You Save: $211.52 (35%)Ships in 1-2 Business DaysProduct Specifications- Other Name: Shaft - Axle Half; CV Axle Assembly, Front Left; Constant Velocity Axle; Axle Shaft; Shaft Axle Half; CV Axle Assembly
- Position: Front Driver Side
- Replaces: 52124713AB, 52124713AC


Dodge Axle Assembly, Rear Driver Side Part Number: 68080383AA
$448.58 MSRP: $675.00You Save: $226.42 (34%)Ships in 1-2 Business DaysProduct Specifications- Other Name: Shaft - Axle Half; CV Axle Assembly, Rear Left; Axle Shaft; Shaft Axle Half
- Position: Rear Driver Side


Dodge Axle Assembly, Rear Part Number: 52123966AD
$563.50 MSRP: $849.00You Save: $285.50 (34%)Ships in 1-2 Business DaysProduct Specifications- Other Name: Shaft - Axle Half; CV Axle Assembly, Rear; Axle Shaft; Shaft Axle Half
- Position: Rear
- Replaces: 52123966AC, 52123966AB


Dodge Drive Axle, Front Driver Side Part Number: 4578601AA
$450.79 MSRP: $685.00You Save: $234.21 (35%)Ships in 1-2 Business DaysProduct Specifications- Other Name: Shaft - Axle Half; CV Axle Assembly, Front Left; Constant Velocity Axle; Axle Shaft; Axle Assembly; Shaft Axle Half; CV Axle Assembly
- Position: Front Driver Side


Dodge Axle Assembly, Rear Part Number: 52123958AE
$518.19 MSRP: $780.00You Save: $261.81 (34%)Product Specifications- Other Name: Shaft - Axle Half; CV Axle Assembly, Rear; Constant Velocity Axle; Axle Shaft; Shaft Axle Half; CV Axle Assembly
- Position: Rear
- Replaces: 52123958AC, 52123958AA, 52123958AB, 52123958AD


Dodge Axle Shaft, Rear Part Number: 5086984AB
$523.77 MSRP: $794.00You Save: $270.23 (35%)Product Specifications- Other Name: Shaft - Axle Rear; Drive Axle Shaft, Rear; Axle Shafts; Shaft Axle Rear; Shaft Axle
- Position: Rear


Dodge Axle Assembly, Front Passenger Side Part Number: 52123544AC
$489.46 MSRP: $742.00You Save: $252.54 (35%)Product Specifications- Other Name: Shaft - Axle Half; CV Axle Assembly, Front Right; Constant Velocity Axle; Axle Shaft; Shaft Axle Half; CV Axle Assembly
- Position: Front Passenger Side
- Replaces: 52123544AB


Dodge Axle Assembly, Rear Part Number: 52123952AD
$285.04 MSRP: $429.00You Save: $143.96 (34%)Ships in 1-2 Business DaysProduct Specifications- Other Name: Shaft - Axle Half; CV Axle Assembly, Rear; Axle Shaft; Shaft Axle Half
- Position: Rear
- Replaces: 52123952AA, 52123952AB, 52123952AC


Dodge Axle Assembly, Rear Part Number: 52123962AD
$562.86 MSRP: $964.00You Save: $401.14 (42%)Product Specifications- Other Name: Shaft - Axle Half; CV Axle Assembly, Rear; Axle Shaft; Shaft Axle Half
- Position: Rear
- Replaces: 52123962AC, 52123962AB


Dodge Axle Assembly, Rear Driver Side Part Number: 5180495AC
$685.05 MSRP: $1035.00You Save: $349.95 (34%)Product Specifications- Other Name: Shaft - Axle Half; CV Axle Assembly, Rear Left; Constant Velocity Axle; Axle Shaft; Shaft Axle Half; CV Axle Assembly
- Position: Rear Driver Side
- Replaces: 5180495AB


Dodge Intermediate Shaft, Front Driver Side Part Number: 52069887AE
$173.94 MSRP: $259.00You Save: $85.06 (33%)Ships in 1-2 Business DaysProduct Specifications- Other Name: Shaft - Axle Intermediate; Drive Axle Shaft, Front Left; CV Intermediate Shaft; Axle Shafts; Axle Housing; Intermed Shaft; Shaft Axle Intermediate; Shaft Axle; Axle Shaft
- Position: Front Driver Side
- Replaces: 52069887AD
| Page 1 of 15 |Next >
1-20 of 287 Results
Dodge Axle Shaft
OEM parts sourced directly from Dodge deliver superior quality, long lasting strength, and a precise fit you can trust. Each item goes through strict quality checks to ensure safety, toughness, and performance that matches your factory equipment. At JeepPartsDeal online shop, you'll get top-quality, budget-friendly OEM Dodge Axle Shaft for your vehicle. We focus on giving you a high standard without pushing up the price. Our full selection of genuine factory products comes backed by the original manufacturer's warranty. You'll love our fast delivery, seamless shopping experience, and convenient return policy, saving you all the hassle.
Dodge Axle Shaft utilizes the raw torque directly to the wheels designed to make all stomps immediate. In 1914, Dodge cut its image in rolling out the first all steel body that sneered at poor rivals. The brand continued to shake with screeching HEMI engines which transformed shopping trips into drag racers. Dodge went to extremes once again as the Viper program demonstrated that showroom vehicles could inhale the adrenaline of the racetrack. The new Dodge Fratzonic Chambered Exhaust demonstrates that the company will not allow electric silence to murder muscle attitude, with a 600 watt growl that it is adjusting to all the drive modes. There is a Stealth Mode when you are in a quiet environment though punch Sport or Drag and the Dodge speakers scream defiance. The drivers are confident since the chassis, body panels, and power systems are all no nonsense of the same mental durability. Attitude of the muscle makes all badges, hauling lumber, drifting the corner, or flying past the quarter mile marker. Axle Shaft connections with wheel, weight, torque, and loads. The shaft also allows wheels on the left and right to turn at different speeds which imply that grip remains firm on slick corners. Axle Shaft is put under shear due to payloads, potholes, throttle bursts; when the tube becomes warped or scored, noise and shudder is a warning of greater damage. Leak, play, or knock checks keep the assembly in line and cushion the adjacent hubs. The Axle Shaft swaps are installed with splined ends and covered bearings, cutting down the time and putting the vehicle on the road quickly. A healthy Axle Shaft transforms pedal pressure into movement, nothing dramatic, it is simply thrust.
Dodge Axle Shaft Parts and Q&A
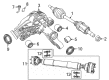
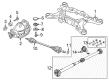
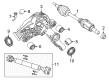
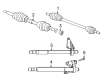
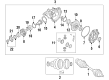
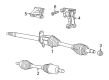
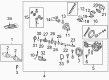
- Q: What Role Does the Axle Shaft Play in Front and Rear Axle Assemblies on Dodge Dakota?A:The rear axle assembly is a hybrid, semi-floating type with a casting differential carrier and pressed steel cover. The axle tubes are made of steel and pressed and welded into the carrier. An optional locking rear axle is available, which utilizes multi-disc clutch packs to lock both axleshafts together, providing equal rotational power to both wheels when one loses traction. On 4WD models, a fully independent front axle assembly is used, consisting of a differential, two axle shafts, and a pair of driveaxles with inner and outer Constant Velocity (CV) joints. To accommodate the offset differential, an extended axleshaft is employed on the right side. Before assuming an axle problem, a thorough check should be performed as noises commonly associated with axle diagnosis procedures can be caused by road surface, tire wear or pressure, or engine and transmission issues. Overhaul and general repair of the front or rear axle differential is beyond the scope of this description.
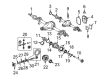
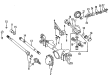
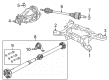
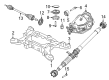
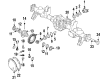
- Q: What role does the Axle Shaft play in supporting weight within the rear axle assembly on Dodge Ramcharger?A:The rear axle assembly is straight, hollow construction that includes a differential and axleshafts with the 'sprung' weight of a vehicle being supported from the axle housing and frame rails through the help of springs which can be leaf spring or coil spring types. They can be classified according to the extent of their floating as semi-floating and full-floating axleshafts, most of the truck models that have GVW below 7000 have semi-floating axleshafts or only the outer end floats while full-floating axleshafts do not even support any vehicle weight and can be removed without disturbing the wheel bearings. They both incorporate hypoid gears in which the centre line of the drive pinion is below that of the ring gear. Because of the absence of easy accessibility to most of these parts and tools, it is recommended that only limited work be done on these models; in cases where repairs or overhaul are needed, the axle assembly should be removed and delivered to a rebuilder or exchanged for a new or rebuilt unit since it is becoming more and more difficult to locate individual axle components for local repair work. Daily maintenance along with some simple repair works do not necessarily require the removal of the rear axle assembly and this includes; the axleshafts, hubs the wheel bearings, hub grease seals and the wheel lugs.


Related Dodge Parts
 Dodge Drive Shaft
 Dodge Differential
 Dodge Slip Yoke
 Dodge Universal Joint
 Dodge CV Joint
 Dodge Differential Cover Gasket
 Dodge Differential Pinion Bearing
 Dodge Differential Seal
 Dodge Output Shaft Seal
 Dodge Pinion Bearing
 Dodge Transfer Case Seal
 Dodge Transfer Case Shim
Browse Dodge Axle Shaft by Models
Charger Challenger Ram 1500 Dakota Durango Viper Dart Grand Caravan Ram 2500 Journey Caravan Avenger D100 D150 Magnum Neon Nitro Raider Caliber Ramcharger Dynasty Intrepid Ram 3500 Shadow Spirit Stratus Ram 50 W250 B250 B350 Charger Daytona D250 D350 Daytona Hornet Ram 1500 Van Sprinter 2500 Sprinter 3500 W100 W150 W350 B2500 B150 B1500 B3500 Ram 2500 Van Ram 3500 Van