JeepParts
My Garage
My Account
Cart
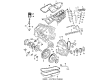
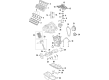
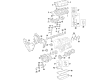
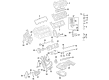
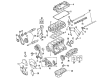
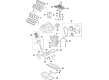
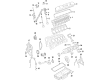
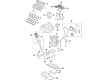
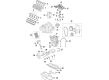
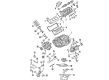
OEM Chrysler Piston
Engine Pistons- Select Vehicle by Model
- Select Vehicle by VIN
Select Vehicle by Model
orMake
Model
Year
Select Vehicle by VIN
For the most accurate results, select vehicle by your VIN (Vehicle Identification Number).
54 Pistons found


Chrysler Piston Part Number: 5191341AA
$162.84 MSRP: $247.00You Save: $84.16 (35%)Ships in 1-2 Business DaysProduct Specifications- Other Name: Piston - B - Size; Piston Pin And Rod B - Size See Note; Piston Pin And Rod B - Size
- Replaces: 5191340AA


Chrysler Piston Part Number: 4666129AA
$227.63 MSRP: $347.00You Save: $119.37 (35%)Ships in 1-2 Business DaysProduct Specifications- Other Name: Piston Pin And Rod; Piston Pin And Rod
- Replaces: 5019338AB


Chrysler Connecting Rod Part Number: 68090672AA
$291.72 MSRP: $439.00You Save: $147.28 (34%)Product Specifications- Other Name: Piston; Piston Pin And Rod


Chrysler Connecting Rod Part Number: 53022257AE
$221.23 MSRP: $328.00You Save: $106.77 (33%)Product Specifications- Other Name: Piston; Engine Piston Set; Cast Piston Set; Piston Pin And Rod
- Replaces: 53022257AD


Chrysler Vibration Damper Part Number: 5142303AB
$56.55 MSRP: $81.25You Save: $24.70 (31%)Ships in 1-3 Business DaysProduct Specifications- Other Name: Piston; Piston Pin And Rod
- Replaces: 5142303AA, 5066565AB


Chrysler Piston Part Number: 68067541AA
$253.77 MSRP: $292.00You Save: $38.23 (14%)Ships in 1-2 Business DaysProduct Specifications- Replaces: 5102235AA

Chrysler Connecting Rod Part Number: 68090673AA
$288.41 MSRP: $435.00You Save: $146.59 (34%)Product Specifications- Other Name: Piston; Piston Pin And Rod


Chrysler Piston Part Number: 5048639AA
$38.86 MSRP: $57.00You Save: $18.14 (32%)Product Specifications- Other Name: Piston - A - Size; Piston Pin And Rod A - Size
- Replaces: 68191813AA, 5048541AA

Chrysler Piston Part Number: 5175256AA
$109.15 MSRP: $482.00You Save: $372.85 (78%)Ships in 1-2 Business DaysProduct Specifications- Other Name: Piston - Engine
- Replaces: 5135006AA


Chrysler Piston Part Number: 5018627AD
$316.65 MSRP: $576.00You Save: $259.35 (46%)Ships in 1-2 Business DaysProduct Specifications- Other Name: Piston Pin And Rod; Piston Pin And Rod
- Replaces: 5018627AB, 5018627AA, 5018627AC

Chrysler Piston Part Number: 5191342AA
$128.02 MSRP: $193.00You Save: $64.98 (34%)Ships in 1-2 Business DaysProduct Specifications- Other Name: Piston - C - Size; Piston Pin And Rod C - Size See Note; Piston Pin And Rod C - Size

Chrysler Piston Part Number: MD357067
$89.79 MSRP: $133.00You Save: $43.21 (33%)Ships in 1-2 Business DaysProduct Specifications- Other Name: Piston - Standard; Piston & Pin Assembly Standard; Piston And Pin


Chrysler Piston Part Number: 5086011AB
Product Specifications- Other Name: Piston Pin And Rod; Piston Pin And Rod


Chrysler Piston Part Number: 5037491AB
Product Specifications- Other Name: Piston Pin And Rod Std; Piston Pin And Rod Std

Chrysler Piston Part Number: 5086010AB
Product Specifications- Other Name: Piston Pin And Rod; Piston Pin And Rod See Note; Piston Pin And Rod


Chrysler Piston Part Number: 53021539AD
Product Specifications- Other Name: Engine Piston Set; Cast Piston Set; Piston Pin And Rod Includes Items 1, 2, 3, 4; Piston Pin And Rod See Note; Piston Pin And Rod


Chrysler Piston Part Number: 53021538AD
Product Specifications- Other Name: Engine Piston Set; Cast Piston Set; Piston Pin And Rod Includes Items 1, 2, 3, 4; Piston Pin And Rod See Note; Piston Pin And Rod


Chrysler Piston Part Number: 68031890AD
Product Specifications- Other Name: Engine Piston Set; Cast Piston Set; Piston Pin And Rod
- Replaces: 68031890AC, 68031890AA, 5037490AB


Chrysler Piston Part Number: 68031891AD
Product Specifications- Other Name: Piston Pin And Rod
- Replaces: 68031891AC, 68031891AA


Chrysler Piston Part Number: 68233351AA
Product Specifications- Replaces: 5012362AF, 5012362AE, 5012362AC, 5012362AD
| Page 1 of 3 |Next >
1-20 of 54 Results
Chrysler Piston
OEM parts sourced directly from Chrysler deliver superior quality, long lasting strength, and a precise fit you can trust. Each item goes through strict quality checks to ensure safety, toughness, and performance that matches your factory equipment. At JeepPartsDeal online shop, you'll get top-quality, budget-friendly OEM Chrysler Piston for your vehicle. We focus on giving you a high standard without pushing up the price. Our full selection of genuine factory products comes backed by the original manufacturer's warranty. You'll love our fast delivery, seamless shopping experience, and convenient return policy, saving you all the hassle.
Chrysler Piston transforms blasts into the combustion engine to the smooth wheel-turning thrust with obstinate dependability. In 1925, Chrysler rocked the industry by demonstrating that good construction and reasonable prices could exist in the hands of ordinary consumers. Floating Power reduces engine vibration, and therefore cabins no longer rattled and conversation became understandable even on rough roads. Chrysler was next boasting of the flashy Airflow form, directing the breeze around steel and cooling interiors with fresh air. Large minivans came next, and the doors swung open allowing families to pack in strollers, groceries, and weekend equipment without any squashing. Chrysler continued to adjust ride comfort, extending wheelbases and making suspensions more relaxed to make long trips less like a chore. That emphasis on usable space, smooth movement, and uncomplicated purchasing continues to be the foundation of all badges that bear the winged logo today. Customers preferred that transparency and told more people than any signboard could ever tell. The Piston is made of lightweight aluminum alloy, which bounces off heat as it shuts off and on in a matter of milliseconds at the top dead center to the bottom. Funnel oil is cooled in the cooling cavities of the Piston to maintain tame temperatures and skirts free to slide. Each Piston has gas-tight rings on each trap, thus every explosion forces the crank rather than escaping the walls. The efficiency is a perfect match with the Chrysler ignition timing to convert fuel into propulsion without unnecessary shaking and wait. Since the Piston remains hard when subjected to inexorable pressure, engines thrust power day in, day out with no big deal.
Chrysler Piston Parts and Q&A
- Q: What steps must be taken before the inspection process of piston/connecting rod assemblies on Chrysler Cirrus?A:Before the inspection process can be carried out the piston/connecting rod assemblies must be cleaned and the original piston rings should be removed from the pistons and new piston rings should be fitted before assembling. Removing piston rings are best done using a piston ring removal tool to remove the rings from the pistons without damaging them. Remove any surplus carbon from the top of the piston with a hand-held wire brush or fine emery paper after most of the deposits have been removed because the use of a wire brush mounted in a drill motor will erode the surfaces of the soft pistons. Carbon must be scraped out of the piston ring groove and a piston ring groove cleaning tool should be used for this or a piece broken off the old ring would do the same job taking care not to take away the metal of the grooves of piston. Coat and lubricate the cylinders and piston/rod assemblies but before doing this ensure that there are no obstructions in the oil return holes-Remove the deposits-Wash the assemblies with solvent and use compressed air to dry the assemblies. If the pistons and cylinder walls are not damaged or excessively worn and the engine block is not rebored then new pistons may not be required, however new piston rings should always be fitted to the engine when reconditioning. It is essential to visually look for any crack, scores or scuffmark, hole or burn area on each piston, these withdraw attention in overheating or abnormal combustion areas which require checking of cooling and lub oil systems. Pitting is evidence of coolant leakage into the combustion chamber or crankcase and must not reoccur if large amounts of unaccounted metal loss are to be avoided. Check the piston ring side clearance by inserting a new piston ring into each groove and using a snap feeler gauge, take measurement at least three times and at different place and ways and the correct ring must be used for each grove; in case that the amount of side clearance exceeds the limit, new pistons must be installed. The dimension of the cylinder bore and piston diameter should be taken and should fit well; if the clearance is out of limits, then the block has to be rebored and pistons and rings will have to be replaced. Piston-to-rod clearance can be felt by rotating one at a time and moving the piston and the rod in an opposite manner; if the movement is very free, there is some wear that has to be adjusted, and this may require a resizing of the sleeve and having new pins fabricated for the automotive engines at an automotive machine shop. In case pistons are required to be separated from the connecting rods, it should be done in an automotive machine shop so as to check for bend and twist. Temporary removal of the rod cap to clean the bearing surfaces and check for nicks and scratches besides checking for cracks or damage; old bearings have to be replaced and the caps secured only by hand if rebuilding due to connecting rod knock then conclusively new rods have to be used.

Related Chrysler Parts
 Chrysler Camshaft Seal
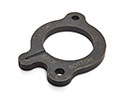 Chrysler Camshaft Thrust Plate
 Chrysler Cylinder Head Gasket
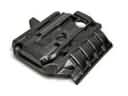 Chrysler Engine Cover
 Chrysler Engine Mount Torque Strut
 Chrysler Intake Valve
 Chrysler Oil Pump Gasket
 Chrysler Piston Ring Set
 Chrysler Rocker Arm
 Chrysler Rod Bearing
 Chrysler Timing Chain
 Chrysler Timing Chain Guide