JeepParts
My Garage
My Account
Cart
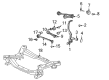
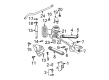
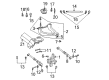
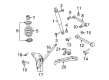
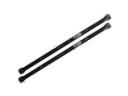
OEM Dodge Control Arm
Suspension Arm- Select Vehicle by Model
- Select Vehicle by VIN
Select Vehicle by Model
orMake
Model
Year
Select Vehicle by VIN
For the most accurate results, select vehicle by your VIN (Vehicle Identification Number).
267 Control Arms found


Dodge Lower Control Arm, Front Part Number: 68079723AB
$213.00 MSRP: $317.00You Save: $104.00 (33%)Ships in 1-2 Business DaysProduct Specifications- Other Name: Arm - Lower Control; Suspension Control Arm, Front Lower Rearward; Arm Lower Control Front; Suspension Control Arm; Control Arm
- Position: Front Lower
- Replaces: 68079723AA


Dodge Lower Control Arm, Front Part Number: 5168389AB
$214.08 MSRP: $324.00You Save: $109.92 (34%)Ships in 1-2 Business DaysProduct Specifications- Other Name: Arm - Lower Control; Suspension Control Arm, Front Lower Rearward; Arm Lower Control Front; Suspension Control Arm; Control Arm
- Position: Front Lower
- Replaces: 5168389AA


Dodge Upper Control Arm, Front Driver Side Part Number: 68217809AB
$177.29 MSRP: $270.00You Save: $92.71 (35%)Ships in 1-2 Business DaysProduct Specifications- Other Name: Arm - Upper Control; Front Left Suspension Control Arm and Ball Joint Assembly.
- Position: Front Upper Driver Side
- Replaces: 68046195AE, 68046195AG, 68046195AH, 68046195AD, 68046195AF, 68046195AI, 68217809AA


Dodge Lower Control Arm, Front Driver Side Part Number: 5168159AB
$475.15 MSRP: $723.00You Save: $247.85 (35%)Ships in 1-2 Business DaysProduct Specifications- Other Name: Arm - Lower Control; Suspension Control Arm, Front Left Lower; Arm Lower Control Front; Suspension Control Arm; Control Arm
- Position: Front Lower Driver Side
- Replaces: 5168159AA, 68022601AD


Dodge Lower Control Arm, Front Passenger Side Part Number: 5168158AB
$475.15 MSRP: $723.00You Save: $247.85 (35%)Ships in 1-2 Business DaysProduct Specifications- Other Name: Arm - Lower Control; Suspension Control Arm, Front Right Lower; Suspension Control Arm Bushing; Arm Lower Control Front; Suspension Control Arm; Control Arm
- Position: Front Lower Passenger Side
- Replaces: 68022600AD, 5168158AA


Dodge Upper Control Arm, Front Passenger Side Part Number: 68217808AB
$177.29 MSRP: $265.00You Save: $87.71 (34%)Ships in 1-2 Business DaysProduct Specifications- Other Name: Arm - Upper Control; Front Right Suspension Control Arm and Ball Joint Assembly.
- Position: Front Upper Passenger Side
- Replaces: 68046196AE, 68046196AI, 68217808AA, 68046196AF, 68046196AG, 68046196AH, 68046196AD


Dodge Lower Control Arm, Front Driver Side Part Number: 68012167AA
$95.34 MSRP: $547.00You Save: $451.66 (83%)Ships in 1-2 Business DaysProduct Specifications- Other Name: Arm - Lower Control; Suspension Control Arm, Front Left; Arm Lower Control Front; Control Arm
- Position: Front Lower Driver Side


Dodge Lower Control Arm, Rear Part Number: 5085418AD
$69.49 MSRP: $156.00You Save: $86.51 (56%)Ships in 1-2 Business DaysProduct Specifications- Other Name: Arm - Lower Control; Suspension Control Arm, Rear Lower Rearward; Arm Lower Control Rear; Suspension Control Arm; Control Arm
- Position: Rear Lower
- Replaces: 5085418AC


Dodge Lower Control Arm, Rear Part Number: 4766950AC
$87.29 MSRP: $194.00You Save: $106.71 (56%)Ships in 1-2 Business DaysProduct Specifications- Other Name: Arm - Lower Control; Suspension Control Arm, Rear Lower Rearward; Lateral Link; Lateral Arm; Arm Lower Control Rear; Control Arm
- Position: Rear Lower
- Replaces: 4766950AD, 4766950AA, 4766950AB


Dodge Lower Control Arm, Front Part Number: 68002123AC
$149.18 MSRP: $329.00You Save: $179.82 (55%)Ships in 1-2 Business DaysProduct Specifications- Other Name: Arm - Lower Control; Suspension Control Arm, Front Lower Rearward; Suspension Control Arm Bushing; Upper Control Arm; Arm Lower Control Front Lower; Arm Lower Control Front; Suspension Control Arm; Control Arm
- Position: Front Lower
- Replaces: 68002123AA, 68002123AB


Dodge Lower Control Arm, Front Part Number: 68078374AA
$183.60 MSRP: $403.00You Save: $219.40 (55%)Ships in 1-2 Business DaysProduct Specifications- Other Name: Arm - Lower Control; Suspension Control Arm, Front Lower; Suspension Control Arm; Control Arm
- Position: Front Lower
- Replaces: 52122411AA, 52122009AA, 52122009AB


Dodge Upper Control Arm, Rear Passenger Side Part Number: 4895276AC
$190.41 MSRP: $321.00You Save: $130.59 (41%)Ships in 1-2 Business DaysProduct Specifications- Other Name: Arm - Control; Rear Right Upper Suspension Control Arm and Ball Joint Assembly.; Arm Control; Control Arm
- Position: Rear Upper Passenger Side
- Replaces: 4895276AB


Dodge Upper Control Arm, Rear Part Number: 52125321AC
$81.95 MSRP: $125.00You Save: $43.05 (35%)Ships in 1-2 Business DaysProduct Specifications- Other Name: Arm - Upper Control; Suspension Control Arm, Rear Upper; Suspension Control Arm; Control Arm
- Position: Rear Upper
- Replaces: 52125321AB, 52125321AA


Dodge Upper Control Arm, Rear Part Number: 52855800AF
$93.81 MSRP: $138.00You Save: $44.19 (33%)Ships in 1-2 Business DaysProduct Specifications- Other Name: Arm - Upper Control; Suspension Control Arm, Rear Upper; Suspension Control Arm; Control Arm
- Position: Rear Upper
- Replaces: 52855800AB, 52855800AE, 52855800AC, 52855800AD


Dodge Lower Control Arm, Front Driver Side Part Number: 4766911AL
$224.32 MSRP: $343.00You Save: $118.68 (35%)Ships in 1-2 Business DaysProduct Specifications- Other Name: Arm - Lower Control; Front Left Suspension Control Arm and Ball Joint Assembly.; Arm Lower Control Front; Suspension Control Arm; Control Arm
- Position: Front Lower Driver Side
- Replaces: 4766911AH, 4721483AD, 4766911AG, 4766911AE, 4766911AF, 4766911AJ, 4766911AI, 68157179AA, 4766911AK


Dodge Lower Control Arm, Front Passenger Side Part Number: 4766910AL
$224.32 MSRP: $343.00You Save: $118.68 (35%)Ships in 1-2 Business DaysProduct Specifications- Other Name: Arm - Lower Control; Front Right Suspension Control Arm and Ball Joint Assembly.; Arm Lower Control Front; Control Arm
- Position: Front Lower Passenger Side
- Replaces: 4766910AK, 4766910AG, 4766910AH, 68157178AA, 4766910AE, 4766910AJ, 4721484AD, 4766910AF, 4766910AI


Dodge Upper Control Arm, Front Driver Side Part Number: 68291037AB
$227.63 MSRP: $347.00You Save: $119.37 (35%)Product Specifications- Other Name: Arm - Upper Control; Front Left Suspension Control Arm and Ball Joint Assembly.; Arm Upper Control Front; Control Arm
- Position: Front Upper Driver Side
- Replaces: 68291037AA


Dodge Upper Control Arm, Front Passenger Side Part Number: 68291036AB
$227.63 MSRP: $347.00You Save: $119.37 (35%)Ships in 1-2 Business DaysProduct Specifications- Other Name: Arm - Upper Control; Front Right Upper Suspension Control Arm and Ball Joint Assembly.; Arm Upper Control Front; Control Arm
- Position: Front Upper Passenger Side
- Replaces: 68291036AA


Dodge Upper Control Arm, Front Driver Side Part Number: 68227901AB
$232.05 MSRP: $353.00You Save: $120.95 (35%)Ships in 1-2 Business DaysProduct Specifications- Other Name: Arm - Upper Control; Front Left Suspension Control Arm and Ball Joint Assembly.; Arm Upper Control Front; Control Arm
- Position: Front Upper Driver Side
- Replaces: 68163961AD, 4877203AA, 68163961AC, 55398403AA, 68163961AA, 68163961AB, 68227901AA


Dodge Upper Control Arm, Front Passenger Side Part Number: 68227900AB
$232.05 MSRP: $353.00You Save: $120.95 (35%)Ships in 1-2 Business DaysProduct Specifications- Other Name: Arm - Upper Control; Front Right Suspension Control Arm and Ball Joint Assembly.; Arm Upper Control Front; Control Arm
- Position: Front Upper Passenger Side
- Replaces: 68227900AA, 68163960AD, 68163960AB, 4877202AA, 55398404AA, 68163960AC, 68163960AA
| Page 1 of 14 |Next >
1-20 of 267 Results
Dodge Control Arm
OEM parts sourced directly from Dodge deliver superior quality, long lasting strength, and a precise fit you can trust. Each item goes through strict quality checks to ensure safety, toughness, and performance that matches your factory equipment. At JeepPartsDeal online shop, you'll get top-quality, budget-friendly OEM Dodge Control Arm for your vehicle. We focus on giving you a high standard without pushing up the price. Our full selection of genuine factory products comes backed by the original manufacturer's warranty. You'll love our fast delivery, seamless shopping experience, and convenient return policy, saving you all the hassle.
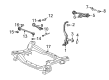
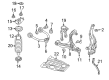
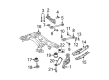
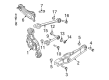
Dodge Control Arm ensures that wheels remain fixed in bumps that provide all the models with better handling and steering. Dodge began as a machine shop with no nonsense; it made news by introducing the first mass-produced all-steel body car in 1914 and debuting the original prototype as more durable than ornamental. Dodge continued to pound power ahead with raving HEMI blocks to the outrageous Viper that transformed lonely highways into rolling cauldrons to anyone who was bold enough to stick it to the floor on average plates. Dodge also electrifies swagger with the Fratzonic Chambered Exhaust, pumping a 600-watt blast in either the Drag, Donut, or Sport, but switching to hushed Stealth when neighbors are asleep. Dodge culture idolizes unrefined punch, not-so-subtle styling, the bang of exhaust note, and the notion that all commutes should have adrenaline over boredom. The Control Arm connects the chassis to the individual wheels using bushings, which allow the suspension components to slide over potholes without throwing the passengers around. Constructed of heavy cast iron or weight-reducing aluminum, the Control Arm opposes corner load, holds the toe and camber angles in place, and keeps rubber pressed on the road, making the braking force directly proportional to the stopping distance rather than vibration. A new Control Arm puts them back on track when the bushings crack or when ball joints relax and introduce the undisciplined wandering that grabs knuckles on long shots. The life of tires is also safeguarded by a correctly torqued Control Arm that does not cause camber drift when the car travels endless miles on the highway.
Dodge Control Arm Parts and Q&A
- Q: How to remove and install the lower control arm on Dodge Challenger?A:Before you attempt to take off the lower control arm you need to take off the front wheel, install a jack under the car and put on the frame rails, then unbolt the wheel lug nuts and raise the car. Second, remove the engine splash shield from under the car and then remove the stabilizer bar brackets for a view at the lower control arm-to-subframe mounting bolt. This bolt should have grooves and these are normally designed to make adjustments for the wheel alignment purposes. With the involved mounting bolt still in place, undo the nut and slow and cautiously pull out the bolt to its position in the notched position of the bushing. Go on and undo the shock absorber lower mounting bolts and nuts and unplug the ABS wheel speed sensor connector from the bracket. Hold the lower control arm steady by the lower control arm skit, then unscrew the balljoint nut up to the flat of the threaded stud only but do not remove it then use ball joint remover to detach the ball joint from the lower control arm. Upon the removal of the balljoint stud nut, force the knuckle down in order to detach it from the lower control arm to allow the lower control arm to be detached from the subframe bracket. For installation, lift the lower control arm with a floor jack to approximate normal ride height prior to tightening the mounting nut at the subframe, and the lower shock absorber fasteners. This should be done in reverse to the above steps, by replacing the balljoint stud nut with a new one, and ensuring that all nuts and bolts used are tighten to the recommended torque settings. Last of all, put back the wheel and the lug nuts; lower the car and tighten the lug nuts to the recommended torque; and get the front end alignment checked, and done if it is off.
- Q: How to remove and replace the lower control arm and its bushing on Dodge Ramcharger?A:Remove the coil spring. Next, take out the control arm mounting bolt from the crossmember and detach the lower control arm. If the bushing is worn, it can be pressed out and a replacement pressed in using a vise and sleeve. Installation is the reverse of removal, but avoid tightening the mounting bolt until the weight of the vehicle is on the suspension.


Related Dodge Parts
 Dodge Torsion Bar
 Dodge Wheel Hub
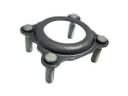 Dodge Axle Shaft Retainer
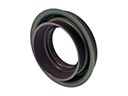 Dodge Axle Shaft Seal
 Dodge Axle Vent
 Dodge Ball Joint
 Dodge Coil Spring Insulator
 Dodge Lateral Link
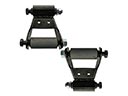 Dodge Leaf Spring Shackle
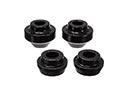 Dodge Radius Arm Bushing
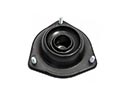 Dodge Strut Mounts
 Dodge Sway Bar Link
Browse Dodge Control Arm by Models
Charger Challenger Ram 1500 Dakota Durango Viper Dart Grand Caravan Ram 2500 Journey Caravan Avenger D100 D150 Magnum Neon Nitro Stealth Caliber Ramcharger Omni Dynasty Intrepid Ram 3500 Shadow Spirit Stratus W250 600 Aries B250 B350 Charger Daytona Colt D250 D350 Daytona Hornet Ram 1500 Van Rampage Sprinter 2500 Sprinter 3500 W100 W150 W350 B2500 Lancer B150 B1500 B3500 Ram 2500 Van Ram 3500 Van