JeepParts
My Garage
My Account
Cart
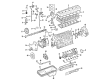
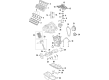
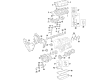
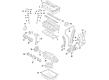
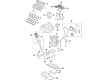
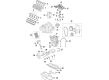
OEM Dodge Piston
Engine Pistons- Select Vehicle by Model
- Select Vehicle by VIN
Select Vehicle by Model
orMake
Model
Year
Select Vehicle by VIN
For the most accurate results, select vehicle by your VIN (Vehicle Identification Number).
138 Pistons found


Dodge Piston Part Number: 5191341AA
$162.84 MSRP: $247.00You Save: $84.16 (35%)Ships in 1-2 Business DaysProduct Specifications- Other Name: Piston - B - Size; Piston Pin And Rod B - Size See Note; Piston Pin And Rod B - Size
- Replaces: 5191340AA


Dodge Piston Part Number: 4666129AA
$227.63 MSRP: $347.00You Save: $119.37 (35%)Ships in 1-2 Business DaysProduct Specifications- Other Name: Piston Pin And Rod; Piston Pin And Rod
- Replaces: 5019338AB


Dodge Connecting Rod Part Number: 68090672AA
$291.72 MSRP: $439.00You Save: $147.28 (34%)Product Specifications- Other Name: Piston; Piston Pin And Rod


Dodge Piston Part Number: 68005277AB
$427.64 MSRP: $644.00You Save: $216.36 (34%)Product Specifications- Other Name: Engine Piston; Piston Pin And Rings Std
- Replaces: 68005277AA


Dodge Connecting Rod Part Number: 53022257AE
$221.23 MSRP: $328.00You Save: $106.77 (33%)Product Specifications- Other Name: Piston; Engine Piston Set; Cast Piston Set; Piston Pin And Rod
- Replaces: 53022257AD


Dodge Vibration Damper Part Number: 5142303AB
$56.55 MSRP: $81.25You Save: $24.70 (31%)Ships in 1-3 Business DaysProduct Specifications- Other Name: Piston; Piston Pin And Rod
- Replaces: 5142303AA, 5066565AB


Dodge Piston Part Number: 68067541AA
$253.77 MSRP: $292.00You Save: $38.23 (14%)Ships in 1-2 Business DaysProduct Specifications- Replaces: 5102235AA

Dodge Piston Part Number: 68165766AB
$97.48 MSRP: $148.00You Save: $50.52 (35%)Ships in 1-2 Business DaysProduct Specifications- Other Name: Piston - B - Size; Piston Pin And Rod B - Size
- Replaces: 68165766AA

Dodge Piston Part Number: 68262320AA
$605.54 MSRP: $912.00You Save: $306.46 (34%)Product Specifications- Other Name: Piston Pin And Rod

Dodge Connecting Rod Part Number: 68090673AA
$288.41 MSRP: $435.00You Save: $146.59 (34%)Product Specifications- Other Name: Piston; Piston Pin And Rod


Dodge Piston Part Number: 5048639AA
$38.86 MSRP: $57.00You Save: $18.14 (32%)Product Specifications- Other Name: Piston - A - Size; Piston Pin And Rod A - Size
- Replaces: 68191813AA, 5048541AA


Dodge Piston Part Number: 5189426AA
Product Specifications- Other Name: Piston - Engine; Piston Pin & Rod Package Engine


Dodge Piston Part Number: 5086011AB
Product Specifications- Other Name: Piston Pin And Rod; Piston Pin And Rod


Dodge Piston Part Number: 5037491AB
Product Specifications- Other Name: Piston Pin And Rod Std; Piston Pin And Rod Std

Dodge Piston Part Number: 5086010AB
Product Specifications- Other Name: Piston Pin And Rod; Piston Pin And Rod See Note; Piston Pin And Rod


Dodge Piston Part Number: 53021539AD
Product Specifications- Other Name: Engine Piston Set; Cast Piston Set; Piston Pin And Rod Includes Items 1, 2, 3, 4; Piston Pin And Rod See Note; Piston Pin And Rod


Dodge Piston Part Number: 53021538AD
Product Specifications- Other Name: Engine Piston Set; Cast Piston Set; Piston Pin And Rod Includes Items 1, 2, 3, 4; Piston Pin And Rod See Note; Piston Pin And Rod


Dodge Piston Part Number: 5189427AA
Product Specifications- Other Name: Piston - Engine; Piston Pin & Rod Package Engine
- Replaces: 5135750AB


Dodge Piston Part Number: 68031890AD
Product Specifications- Other Name: Engine Piston Set; Cast Piston Set; Piston Pin And Rod
- Replaces: 68031890AC, 68031890AA, 5037490AB


Dodge Piston Part Number: 68031891AD
Product Specifications- Other Name: Piston Pin And Rod
- Replaces: 68031891AC, 68031891AA
| Page 1 of 7 |Next >
1-20 of 138 Results
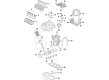
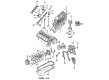
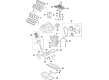
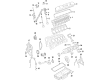
Dodge Piston
OEM parts sourced directly from Dodge deliver superior quality, long lasting strength, and a precise fit you can trust. Each item goes through strict quality checks to ensure safety, toughness, and performance that matches your factory equipment. At JeepPartsDeal online shop, you'll get top-quality, budget-friendly OEM Dodge Piston for your vehicle. We focus on giving you a high standard without pushing up the price. Our full selection of genuine factory products comes backed by the original manufacturer's warranty. You'll love our fast delivery, seamless shopping experience, and convenient return policy, saving you all the hassle.
Dodge Piston transforms violent combustion pressure to clean thrust, making all engines alive and vigorous. Dodge started as a small machine shop and instantly established the mood of muscle, introducing the first mass-produced all-steel body car in 1914, which proved to be durable enough to look like a muscle car as well. Dodge continued to roll out tough sedans and coupes which combined brash horsepower with street comfort without timorously exploring loud styling that announces purpose at the curb. HEMI rumble, Viper road grip and drag-strip minded drive modes demonstrate that Dodge appreciates speed but in no way fails to provide the driver with easy controls rather than coded menu. The new Fratzonic Chambered Exhaust emissions are blasted at up to 126 decibels with a 600-watt amp that is identical throttle mapwise, and even moan silent in Stealth. Cast out of lightweight aluminum and cut to close tolerances, every Piston slides smooth, seals blazing heat, seals combustion, and converts explosive gas energy to smooth cranking thousands of hard miles. A Piston can beat the commute to work, run errands on the road or surprise track days without banging, breaking, or robbing horsepower with its skirts and heavy-duty wrist pins. Rings and bosses are fed by internal oil channels to prevent the Piston from having to touch hotspots and ensure constant output when the pedal is pushed to the floor.
Dodge Piston Parts and Q&A
- Q: What steps should be taken to prepare piston/connecting rod assemblies for inspection and reassembly on Dodge Grand Caravan?A:The pistons/connecting rods cannot be inspected while still contained with the engine and therefore require cleaning and the removal of the original piston rings from the pistons to be replaced with new piston rings upon reassembly. Some of the cas uses include the following piston ring installation tool to cut out the old rings with out damaging the pistons in anyway. Get rid of all the carbon deposits you find on the top of the piston using the hand wire brush or fine emery cloth never use the wire brush that is mounted on the motor because this will lead to erasing of the surface finish of the softer material used on the construction of the Piston. Carbon deposits should be scraped out from the ring grooves using a piston ring groove cleaning tool and if this is not available, a piece of old ring can just as well be used, but care should be taken not to remove any metal or damage the grooves. After the deposits have been removed, wash out the piston/rod assemblies between solvent and dried with compressed if available. If the pistons and cylinder walls arent skint or worn too thin and if the engine block is not rebored new pistons may not be required; but new piston should always be fitted when an engine is being rebuilt. The skirt, pin bosses, and ring lands of each piston should be checked for cracks, while scoring, scuffing and any holes on the piston crown and burned areas on the edge of the crown which could be as a result of overheating or any abnormal combustion should also be checked for. Pitting corrosion means that there is a leakage of coolant into the combustion chamber or crankcase which must be rectified. Piston ring side clearance must be measured by installing a new piston ring to each groove and then using the feeler at different sections on the groove bearing in mind, each groove take the right ring. Engine bore wear can be checked by measuring the bore and piston diameter of the particular engine at the cylinder that depends on the type of the engine; if the piston to bore clearance goes beyond certain levels, this will require reboring of the block and new pistons and rings. Piston-to-rod clearance can be determined by rotating them in opposite directions, where significant looseness means there is wear and need for adjustment that may mean that the piston, rod and pins may have to be taken to an automotive machine shop for resizing. If pistons have to be pulled off the connecting rods, these should also be taken to the machine shop to check them for bend and twist, while the connecting rods should be examined for cracks and damage; old bearing inserts should also be temporarily removed for cleaning before reassembly.